
You are using an out of date browser. It may not display this or other websites correctly.
You should upgrade or use an alternative browser.
You should upgrade or use an alternative browser.
-
You can now help support WorldwideDX when you shop on Amazon at no additional cost to you! Simply follow this Shop on Amazon link first and a portion of any purchase is sent to WorldwideDX to help with site costs.
A little CPI refurbishing
- Thread starter N8YX
- Start date

Next, the '2000 itself.
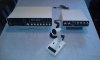
This rig required a good cleaning both inside and out, a re-paint of the covers and the speaker grille...which was a little challenging without removing the front decal. Knobs were removed and cleaned with soapy water and left to dry while the rest of the radio was being checked out.
The electrical side of things saw all switches and pots get a shot of DeOxIt, then a complete alignment. All checked out - but what about the nasty scratch across the VSWR meter's bezel?
If anyone has to replace a bezel or the movement itself, those meters are Modutec 920048 series - and can be found on Ebay. I just needed the bezel, so I got the cheapest one out there and carefully separated the bezel from the movement with a small X-Acto knife. The OEM meter had its outer edges painted dull black so I masked everything accordingly and shot it with a spray can.
While that was drying I disassembled the radio to get at the old meter. All three function boards (RF, SMO, NB) have to be removed before you can remove the interface board and desolder the old meter. Hint: Take pictures before you dive in.
The X-Acto trick was used again to separate the damaged bezel from the innards, and the new bezel secured in place. Then, back together it all went.
The top and bottom covers were shot with Krylon 8809 Gloss Ivory. A thread on Yahoo's CPI Group listed another Krylon paint (Eggshell White) as a match for the OEM color but none of the stores I visited had the stuff. 8809 matches a slightly faded knob set rather well so the whole radio looks gracefully aged.
To replicate the original finish, spray one tack coat...then a few coverage coats...then a final spatter coat from about 18-24" out. Wait 10-15min between coats for best results.
After the covers were replaced the '2000 was let run for a week or so to verify operation. Works good - sounds good on the air - looks nice too.
Attachments
Last edited:
The '400:
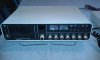
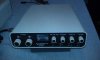
This one also required a good cleaning, case repaint and alignment...plus a meter replacement. Additionally, the speech processor circuit was out to lunch: A coupling cap which fed audio from the mic amp to the clipper decided it didn't want to cooperate, was found out and eventually replaced.
Getting the interface board out of this radio to replace the meter required even more gymnastics than the base rig - plus its anchor posts were riveted in, rather than retained with screws! :headbang
I had to drill these out and carefully thread 2-56 hardware into the underlying holes to chase the internal threads - then used the same hardware to secure the interface board once the meter had been swapped.
Since the rig won't see mobile use this won't matter.
I wish it had an RF Gain and Mic Gain control (a la CP2500) but a CPI Range Plus attenuator/preamp accessory will fix the former. As for the latter....
Attachments
...welcome to the "What-If?" department:
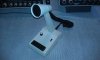
Turner OEMmed a couple mics for CPI (the DM-1 and a mobile mic), and I had few beat-halfway-to-hell Super Sidekicks and +3s in Ye Olde Junque Box...so what can we make from them?
A candidate +3 was disassembled, cleaned and shot with the same paint which was used on the radio cases. The element was disassembled and the outer screen shot with gloss black. Ebay came through with a matching knob - which was color-reversed from the original CPI scheme. I had to trim about 1/4" from the skirt to make the knob ride low enough on the +3's Mic Level control shaft for the set screws to engage properly. Next, the knob insert was carefully removed and shot with Gloss Ivory. When dry the insert was given a drop of black paint to serve as an indicator then it was glued onto the knob.
After assembly I wired it to the '2000 and checked the functionality. Sounds nice - it'll make a good companion to the CP400. Just need to come up with an OEM CPI nameplate or reasonable facsimile thereof to make it complete.
Attachments
Man, you did a REALLY nice job on those rigs. I have a friend in our RT group (Mike, RT455) that is out of Kansas and runs a Yahoo forum for these rigs. I always wonder how you guys get the yellow out of the knobs?
Again, outstanding job restoring these old rigs to beautiful shape!
73,
RT307
Again, outstanding job restoring these old rigs to beautiful shape!
73,
RT307
Man, you did a REALLY nice job on those rigs. I have a friend in our RT group (Mike, RT455) that is out of Kansas and runs a Yahoo forum for these rigs.
I'm a member of that group - joined a couple months ago - and plan to post these along with details and pics of a few other accessories when I get them finished. In particular: The BC2000 and FC70.
There's an Achilles Heel with the display driver and reference oscillator circuitry which I accidentally happened to find - and the solution is one of those serendipitous things which also was happened upon accidentally. Writeup forthcoming - waiting on yet another Mouser order.
Mike & Co. suggest immersing them in bleach. I might try this on a junk knob just to see how the bleach affects the painted insert. Fortunately, I was able to whiten the ones on my equipment just by giving them a good scrubbing with toothbrush and soapy water.I always wonder how you guys get the yellow out of the knobs?
Thank you. 95% of the fun I have with this hobby is tinkering and restoring stuff - the other 5% comes on-the-air.Again, outstanding job restoring these old rigs to beautiful shape!
73,
RT307
The one thing these rigs are missing is a "Now" and "Then" switch. I'd love to be able to flip it and hear all of my long-vanished friends suddenly reappear in the speaker as they were 'back in the day'. Heck, I'd even tolerate an S9+ noise level as was present in the late 70s. It's better than listening to today's silence.
I've actually done that on some Drake (Kurz-Kasch) knobs on occasion and it does work well. There is a liquid automotive finishing compound called "NicSand" which incorporates 10,000-grit particles and it'll do a nice job too. Those inserts concern me - not sure how delicate the paint is and don't want to slip with the brush while polishing. Still, I think I have a junk knob or two on which to practice.Might actually use some tooth paste with the tooth brush on the knobs. It contains fine abrasives.
Very nice job!
Non-related topic: I got a big bag full of the 4p polarized Molex connectors which were used on the radio, BC2000, FC70 and so forth. These are the female side which facilitate connection of a DC power cable or function jumper. If anyone needs a few, PM me and we'll work out shipping.