• You can now help support WorldwideDX when you shop on Amazon at no additional cost to you! Simply follow this Shop on Amazon link first and a portion of any purchase is sent to WorldwideDX to help with site costs.

Oxidation Removal -- Help

Starduster

Member
Feb 18, 2008
49
2
18
Central Wisconsin
What is the best way to remove the oxidation on the silver contact selector switches that are found in Tram and Browning radios? The contacts turn a ugly black and contact cleaner don't seem to do the trick.
Also is there an easy way to desolder the wires that attach to these switches? The factory really had a thing for wrapping the wire around the lugs so it is hard to get them off without damaging the switch or wire.
Thanks, Starduster
 

I use a pencil eraser (the pink kind, not the white ink erasers). This will remove the oxidation without scratching the contacts. After cleaning off as much of the oxidation as you can with the eraser, use some TARN-X on a Q-tip to get the rest. Works pretty good. Then put a light coating of GC Electronics silicone dielectric compound on the contacts to keep the oxidation from returning.

- 399
 
DE-OXIT

Radio Shack carries it and can probably be found at other stores catering to electronics or online.

I use it on the old tube rigs, cleans band switches great.

The desoldering of the wires? Patience and a good vacuum solder removal tool.
 
X2 on the de-oxit. On some switches I'll saturate a thin strip of cotton material and slide it back and forth between the contacts. I use a solder sucker for desoldering components on (single side) PCB but for pots, switches, etc I prefer to use desolder braid.
 
What is the best way to remove the oxidation on the silver contact selector switches that are found in Tram and Browning radios? The contacts turn a ugly black and contact cleaner don't seem to do the trick.
Also is there an easy way to desolder the wires that attach to these switches? The factory really had a thing for wrapping the wire around the lugs so it is hard to get them off without damaging the switch or wire.
Thanks, Starduster

Hey Starduster, it is great to see you back on the forum. I have missed your postings in the antenna section, and for sure with your progress on the nice AstroPlane you built. How about and update?

I was always hopeful that you might one day confirm or not my own findings when making the top radiator a full 1/4 wave in length. I don't think I found my modification to a full 1/4 wave very useful, in fact I didn't leave it up but a few days and fixed it back to a shorten radiator with the top hat. I didn't make any notes, so I'm not sure I remember correctly, but if it had shown some improvement...I think I would have been excited and left it up.

I've heard guys claim the full 1/4 wave would be much better, but after I did mine, I'm doubtful too many ever tried it and were just talking off the top of their hat. I was refreshing when you came on the forum and showed some of your work and not just words.

Give us another try, I appreciate when guys do good work and post evidence of their efforts.

Eddie
 
Maybe a little off topic here. On my Browning, I clean the relay points by cutting a small piece of the striker from a book of matches. Insert it into the relay and key the mic. With the mic keyed pull out the piece of striker. Repeat, by turning over the striker thingy. Clean contacts in the relays.

Terry
 
I use a pencil eraser (the pink kind, not the white ink erasers). This will remove the oxidation without scratching the contacts. After cleaning off as much of the oxidation as you can with the eraser, use some TARN-X on a Q-tip to get the rest. Works pretty good. Then put a light coating of GC Electronics silicone dielectric compound on the contacts to keep the oxidation from returning.

- 399

This is what I do with all my silver switch contacts. Using a silver polish like Silvo leaves too much crap behind that you do not want left behind and it,s too hard to remove. I apply the silicone grease with a Q-Tip in minute quantities.
 
Cleaning Contacts

I love the "match book cover"....Good old Brown paper bag works also...little easier to get in tight spaces.
I use good old Isopropyl Alcohol (90%) on the end of a Que-Tip...rub lightly...you should see the tarnish come off...might take a couple of these till they are clean.
TARN-X will work...just do not be generous with it on the Que-Tip...it is ACID Based...if I use TARN-X I will follow with the alcohol to remove...
GL
All the Best
BJ
 
Removing old solder from switches...etc

Couple different products...
SOLDER-WICK
NO-CLEAN... by TECHSPRAY...made in Texas
both work well once you get the hang of how to use them effectively.
I prefer the smaller sizes in tight spaces and on copper-clad boards.
All the Best
BJ
 
THANKS ALL for the good replys.
I looked for Deoxit at Radio Scrap but our store did not have any.
Heres what I did:
1. Took a lot of photos so I was sure to get things wired back correctly
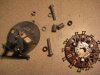
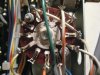
2. I removed the switch from the project radio, in this case a Tram D201. Using a nail clippers to cut the wires as close as possible to the lugs. This leaves the wires long enough to re-attach.
3. Using solder wick and a lot of patience with the iron I removed the remaining wire wrapped on the switch lugs.
4. Now the switch was disassembled. Again MUCH care was used so it would be re-assembled in exactly the same way it came apart, this is VERY IMPORTANT.
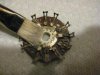
5. Washed the switch wafer with soap and water using a small brush that my wife donated from her art stuff. She comes in handy indeed. I think I'll keep her around.
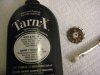
6. Dried the wafer and brushed on the Tarn-X, worked it in well with the brush until all tarnish was removed. This stuff works great, BUT it does have acid in it. That is why I removed the switch from the radio first. I thought if the Tarn-X got wicked up into the wiring it would no doubt be a problem down the road.
7. Now came a hot bath for the switch wafer in hot soapy water withh a good rinse in hot water. This was followed with a blow dry with the hair drier.
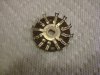
8. Assembled the switch and reinstalled. I applied WD-40 to keep the tarnish away untill I can score some silicone or dielectric grease. Then I will coat it lightly with that.
9. I must say, use this method at your oun risk, you must have patience removing and re-installing the switch. Always use you best soldering skills, be neat and accurate.
Enjoy the photos. The results are outstanding. Next I will tackle the AM/SSB selector switch, this will be a challange as it is a muti layered beast.


Marconi, I havent given up on the antenna projects. I was in the process of erecting a tower for the beam last fall when I ran out of time due to deer hunting and then the weather turned on us, did score a nice buck though.
The Astrobeam is about 3/4 of the way done and I am planning to get back into it after this Tram project. I sure jump around a lot with hobbies and projects.
 

Attachments

  • IMG_2583 (2).jpg
    IMG_2583 (2).jpg
    54.6 KB · Views: 1
  • IMG_2585 (2).jpg
    IMG_2585 (2).jpg
    46.3 KB · Views: 1
  • IMG_2586 (2).jpg
    IMG_2586 (2).jpg
    45.1 KB · Views: 1
  • IMG_2589 (2).jpg
    IMG_2589 (2).jpg
    45.3 KB · Views: 1
  • IMG_2595 (2).jpg
    IMG_2595 (2).jpg
    51.1 KB · Views: 1
Great results, nice pics.

Silicone grease?

Automotive after market parts store sell it, they call it spark plug wire sealant.

Put it in the boot of the spark plug wire and then install the wire onto the spark plug.

Usually comes in small packet, last I remeber not to expensive either.
 

dxChat
Help Users
  • No one is chatting at the moment.
  • @ Wildcat27:
    Hello I have a old school 2950 receives great on all modes and transmits great on AM but no transmit on SSB. Does anyone have any idea?
  • @ ButtFuzz:
    Good evening from Sunny Salem! What’s shaking?
  • dxBot:
    63Sprint has left the room.
  • dxBot:
    kennyjames 0151 has left the room.