• You can now help support WorldwideDX when you shop on Amazon at no additional cost to you! Simply follow this Shop on Amazon link first and a portion of any purchase is sent to WorldwideDX to help with site costs.

Kenwood TH-D72 2m/440 APRS HT Review

Moleculo

Ham Radio Nerd
Apr 14, 2002
9,194
1,674
283
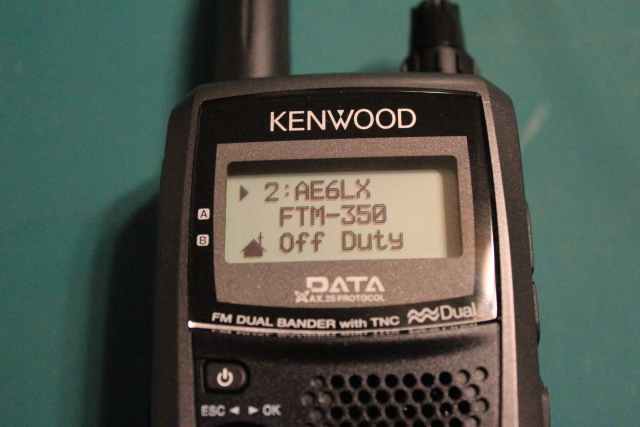
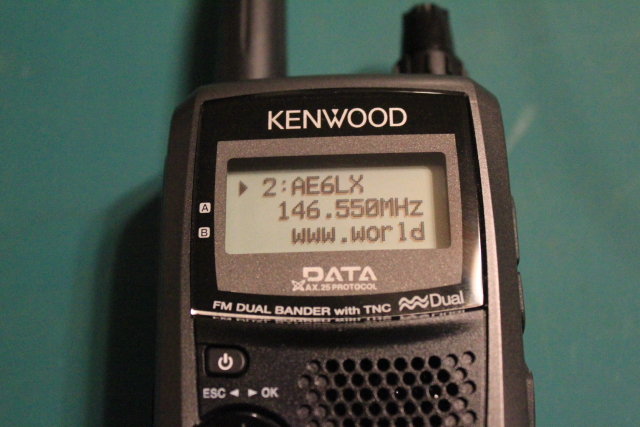
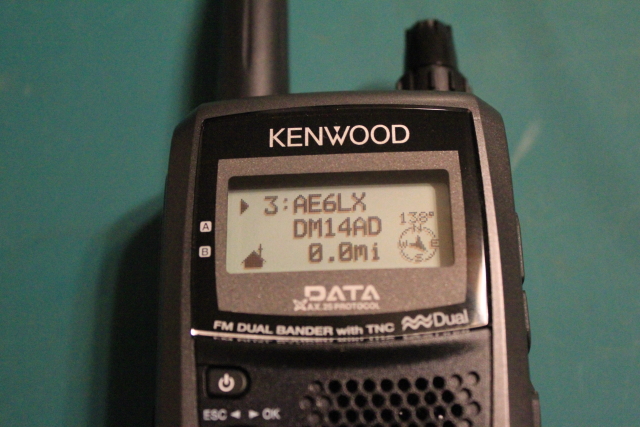
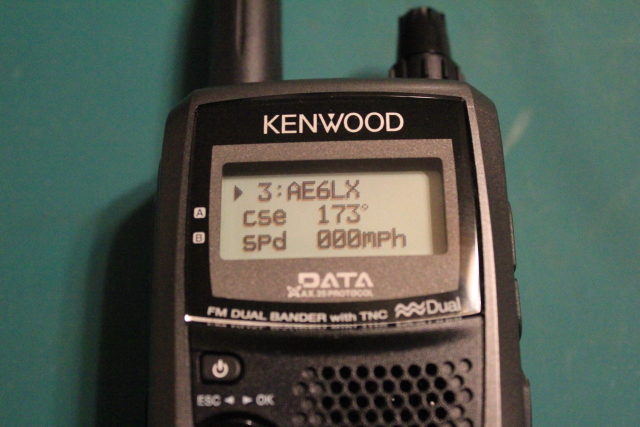
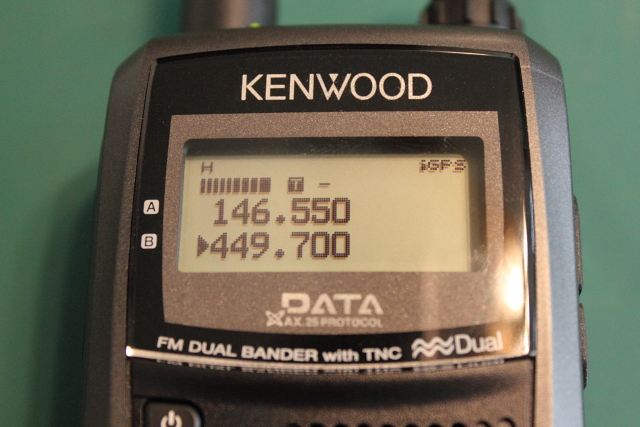
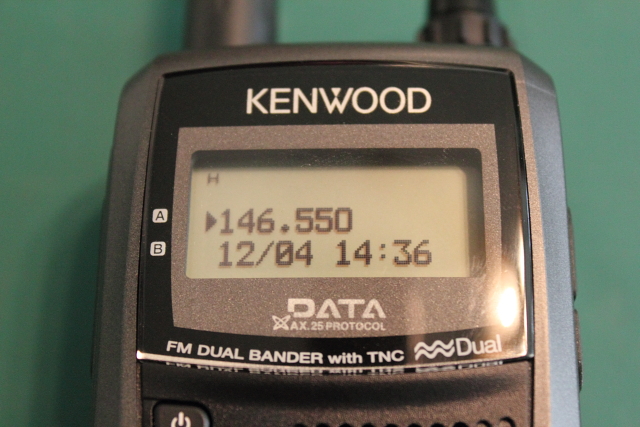
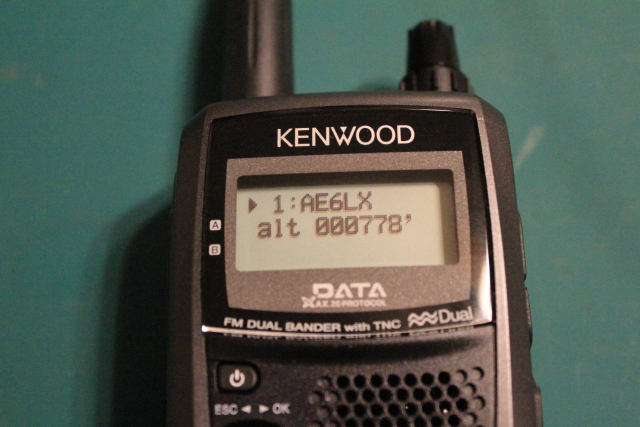
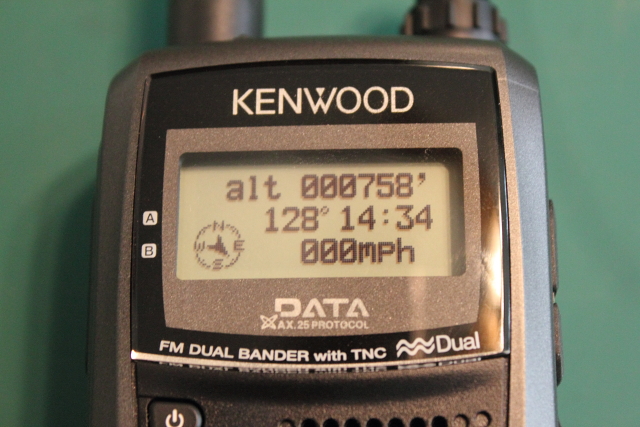
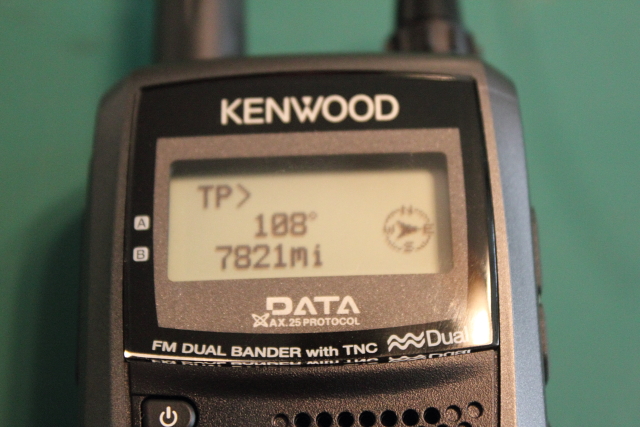
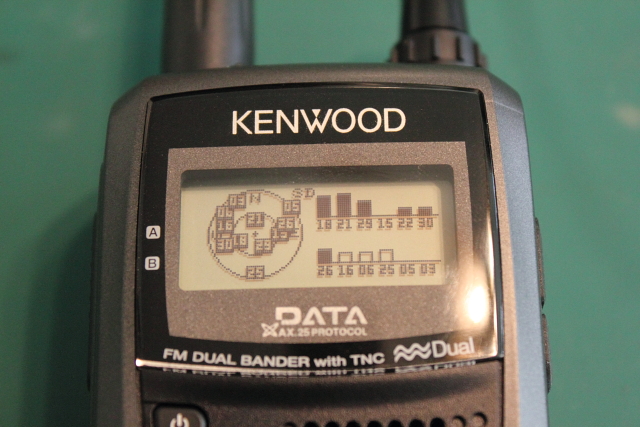
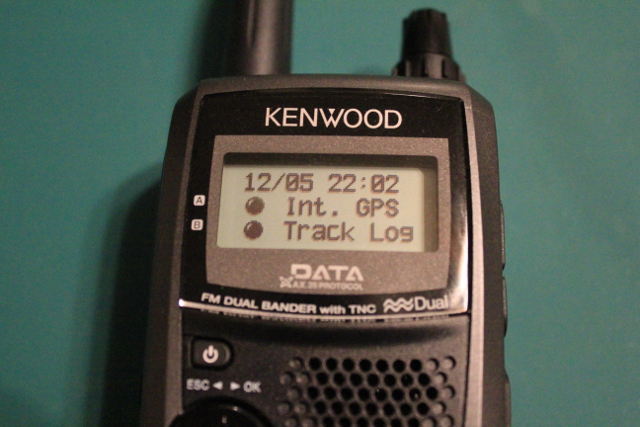
I've had the new Kenwood TH-D72 144/440 Mhz APRS hand-held radio in my possession for almost 24 hours now, so it's time to start writing my review. This radio is indeed interesting and has a unique set of features which make it unlike anything else on the market. It is in some ways both more and less than I was expecting it to be, which I will cover in as much detail as possible. The price on this new radio is right at $500, which includes the built-in GPS.

Physical Attributes
Before discussing the feature set of the HT, I'll first cover the physical attributes. This first pic is of the TH-D72 next to the popular Yaesu VX-8r for size comparison:
1476-1291397289-387dfd0c5d54fae5817deecc10a7c72c.jpg


These are the same two radios on their sides. The VX-8r has the extended battery pack:
1477-1291397289-daea8ccbb8aeaedd26bf81bc367bbb7f.jpg


As you can tell, the TH-D72 is considerably larger in height and width than the VX-8r. It is closer to the size of the Icom IC-T70a. If you like something that fits larger in your hand with buttons spaced a little farther apart, you will like this radio.

This picture shows the difference in the stock ducky antenna sizes. The Kenwood's is considerably smaller, but I haven't had a chance to do any real life comparisons yet.
1478-1291397289-261e52bca56e737bb30205086b724a5d.jpg


The belt clip is made of metal and screwed to the back of the radio. I think you'll have a difficult time breaking this!
1479-1291397289-333897429b3d9819d1060be9a82fb0ca.jpg


This picture should give you a fairly good idea of the width of the radio in your hand:
1480-1291397650-bd490c74946323ccb4e0f4bae50cd4a6.jpg


Here is the top of the radio with the SMA connector exposed. You can see that the connector is sealed up pretty well to help keep moisture and dust out. However, rhe specifications do not say anywhere that it is waterproof or even water resistant.
1481-1291397650-fe9f6f35434596ad86d30d7689a580a9.jpg


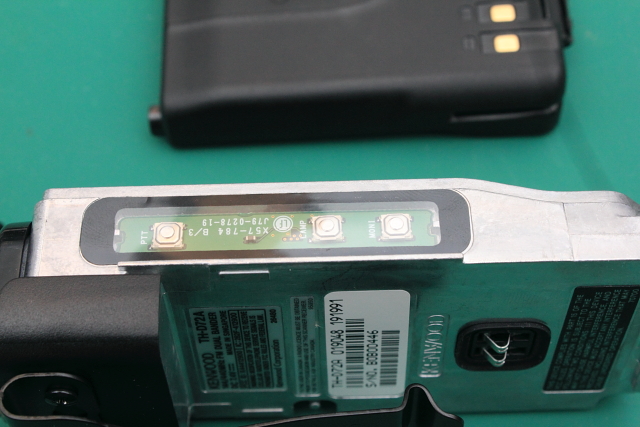
This is a close-up view of the PTT, monitor, and lamp buttons. The PTT is very nice, easy to push, and quite large. I like it!
1482-1291397650-8d2c3623a1a630aad55bd865d68b6df5.jpg


This close-up view of the other side shows the speaker, mic, COM, power and USB port. Finally, an HT with a USB port!!!
1483-1291397650-21192e11e97baf0de5696c6aed8137c6.jpg


This is the same view with the rubber covers closed:
1484-1291397742-a2a81e32605e9bc520cf65babe622449.jpg


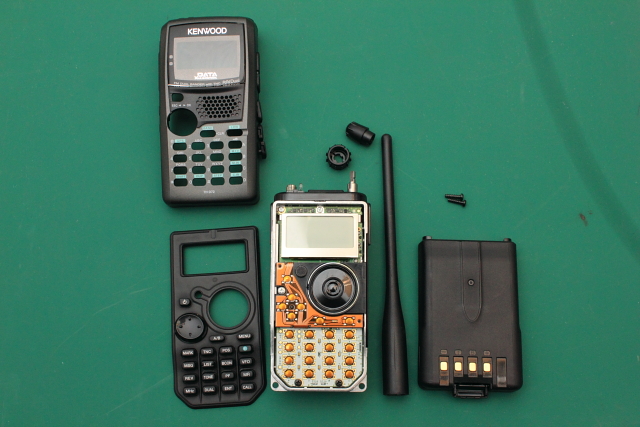
Overall, the radio seems like it is constructed very sturdy. The battery is held in tightly by a strong clip on the bottom. There is no slop or play at all with the battery secured. I can't see any reason why this radio wouldn't last a long time, although time will tell how well it withstands the elements.

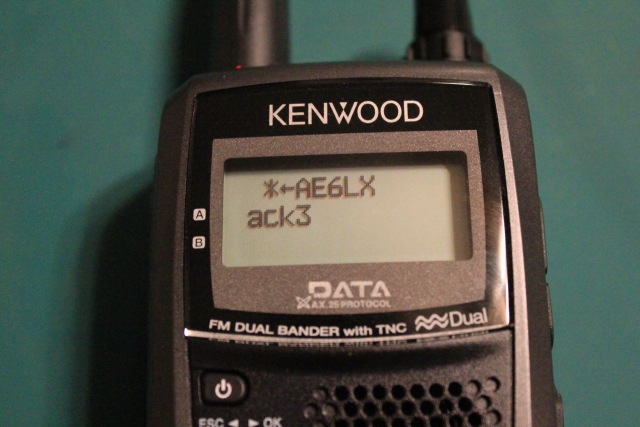
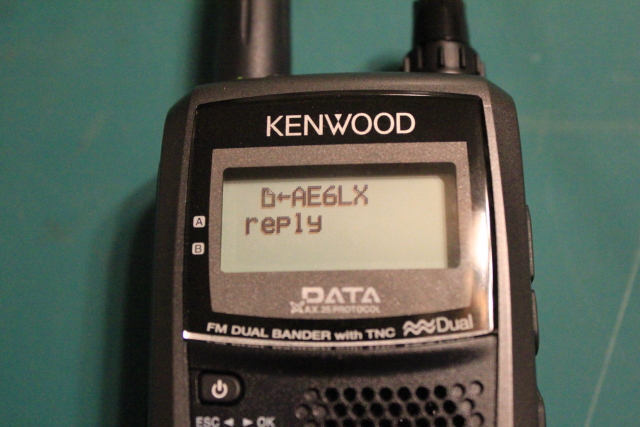
Next, I'll start discuss the features and functions of the radio.
 

As for weather proofing it is claimed to be, MIL-STD810 and IP54 weatherproofing.

IP First number - Protection against solid objects
0 No special protection
1 Protected against solid objects up to 50 mm, e.g. accidental touch by persons hands.
2 Protected against solid objects up to 12 mm, e.g. persons fingers.
3 Protected against solid objects over 2.5 mm (tools and wires).
4 Protected against solid objects over 1 mm (tools, wires, and small wires).
5 Protected against dust limited ingress (no harmful deposit).
6 Totally protected against dust.


IP Second number - Protection against liquids
0 No protection.
1 Protection against vertically falling drops of water e.g. condensation.
2 Protection against direct sprays of water up to 15o from the vertical.
3 Protected against direct sprays of water up to 60o from the vertical.
4 Protection against water sprayed from all directions - limited ingress permitted.
5 Protected against low pressure jets of water from all directions - limited ingress.
6 Protected against temporary flooding of water, e.g. for use on ship decks - limited ingress permitted.
7 Protected against the effect of immersion between 15 cm and 1 m.
8 Protects against long periods of immersion under pressure.

So while not as water proof as the Yaesu it should be fine in the rain.
 
Weatherproofing

At the time of this writing, kenwoodusa.com doesn't have any info on the radio, although I did confirm from the press release on kenwood.co.jp: October 29, 2010 | News Release | Corporate Information | Kenwood Corporation that it does meet both the MIL-STD810 and IP54 specifications.

MIL-STD810 & IP54 weatherproofing

Heavy-duty specs mean the user does not have to worry about getting caught in a shower. Fully prepared for tough outdoor conditions, the TH-D72A/E is very robust. And as well as offering IP54 levels of dustproofing and splash-proofing, it meets or exceeds the US MIL-STD standards for rain, humidity, vibration and shock.
 
When they say "meets or exceeds the US MIL-STD standards for rain, humidity, vibration and shock." I wonder if these were actually tested by an actual outside source or if they just designed to target those standards.
 
One of my twitter followers asked me to take apart the radio and show some pics of the inside. Well, here you go!

1485-1291486233-ae8d3ca4b2fb8b00e1aed41219bdf8ce.jpg


This is the sequence of steps to take it apart:

  1. Remove the battery.
  2. Remove the antenna and pull off the top dial knobs
  3. Remove the two screws on the back.
  4. Unlatch the rubber ports cover from the post on the back. Use a small screwdriver to slip under and it just pops off.
  5. Pull the case up and off.
Once you get it apart, you can see that it is put together rather well. The unit is also sealed up pretty good to protect it from the elements. Here is a picture that shows the seal placed over the PTT, Lamp and Moni buttons:

1486-1291486233-4f6abd59089dc4291845200a2bc467e9.jpg
 
The Basics

First and foremost, The Kenwood TH-D72 is a basic VHF/UHF dual VFO FM radio. It cannot receive broadcast AM/FM, the aircraft band, 6 meters, or the 220 band The RX range is slightly different between the two internal VFOs: Band A range is 136-174/410-470 Mhz, Band B is 118-174/320-524 Mhz. If you want to monitor anything outside of that frequency range, you need a different radio. Using the basic functions of the radio is a lot like the Kenwood TH-F6A; if you've ever used one, you won't have any trouble figuring out standard operations. It has 1000 memories that allow for 8 digit memory names. Like most dual band HTs, you can select dual or single band mode to suit your needs. Overall, the screen is uncluttered and easy to read. I get the impression that the designers put a lot of effort in making the screen displays simple without a lot of small characters.

Here are a couple of pictures of the basic VHF/UHF screens, both in dual and single band modes. In this picture you can see that the GPS is turned on, the radio is receiving something and the current B band is a tone and a negative offset selected:
1492-1291503345-25dacd03d40344e1a40c4fcd1c6c439b.jpg


This picture shows the screen in single band mode:
1496-1291503422-47d8350d7a6d0741525bf4545b485cd7.jpg


Transmit and receive audio quality seems to be very good; it might be the best of the HTs that I own. While there is a VOX gain, there is no Mic gain, which would have been nice. On my radio, you must hold the mic right up to your mouth to get enough volume on the other end. Since this is how I operate an HT anyway, it suits me fine.

The radio does have a special weather band preconfigured which is activated by hitting the PF button by default. It also has the ability to enable to monitor for weather alerts (1050 Hz tone) from NOAA periodically.

As was already noted in an earlier post, the programming software and USB interface cable are included with the radio (you must download the software and driver from Kenwood's website). I didn't have any problems installing either the driver or software, making a few changes and uploading them to the radio. The software supports importing from a CSV file, which is useful if you own the ARRL TravelPlus Repeater software or want to import from some other software.

The 1000 memories should give you more than enough storage. The memories are organized into 10 groups of 100 memories and you can name each group. Unfortunately, you cannot create your own groups or even change the allocation of the memory slots between the 10 groups. You can, however limit the scan function to a specific memory group. Speaking of scanning, it is as fast as any HT I've owned, a little faster even than the VX-8r.

One thing that I encountered that I don't like is the way the radio controls the mic when you have an external speaker/mic plugged in. On my VX-8, you can use either the external or built-in mic when the external is plugged in. However, the Kenwood only allows you to use the external mic when the external speaker/mic is attached. It might sound odd, but there have been several occasions where I have needed to operate in this manner.

In my opinion, changing between the various basic functions very intuitive and I don't believe the typical user will have any trouble figuring it out.

Next in the review, I'll cover the advanced features, starting with the internal GPS.
 
Internal GPS Functionality

Like the Yaesu VX-8Gr, the GPS is built into the TH-D72 and obviously factored into the market price of the rig. Obviously, you need the GPS to make the APRS functions effective, but it does offer stand-alone functionality. Like the basic radio screens, the GPS screens are simple and easy to read. Rather than attempting to cram all of the GPS information onto one screen, the designers chose to put it on several screens requiring you to use the left and right navigation buttons to move between the screens. Some people will prefer the Kenwood's design; others will prefer the more cluttered but everything-at-a-glance presentation of the Yaesu design. I like both display designs and understand the merits of each.

One nice, well thought-out feature is the ability to turn the GPS on and off. It also has a GPS battery saver feature that turns the gps on and off based on the user selected timer and whether or not it has been able to lock onto your position. Here are a few shots of the various of the GPS screens that become active once you have turned the GPS on and it has locked onto your position:

GPS coordinates with Grid-Square indicator:
1505-1291701745-01f1234cdb67f19d71e37cf492930cb8.jpg


Altitude, bearing, time and speed:
1490-1291503204-fa36174916e987a1bb8ed3221398b91e.jpg


The TH-D72 has GPS functionality is useful to those interested in geocaching, orienteering, or other such activities. You can enter up to 5 "target points" and then use the GPS to direct you to that point. Here is the screen that shows the distance and bearing to a target point off the coast of Africa in the Gulf of Guinea (00.000, 00.000):
1489-1291503204-c70dafa3d09d3efc6d81436f45a12ad4.jpg


Here is the screen that shows you the radio's current GPS acquisition status:
1487-1291503204-b35f6bc027190e8a833a4ecb5ca1db16.jpg


You can save 100 waypoints into the radio by using the "MARK" function. This is accomplished by pressing and holding the MARK button, after which you can edit the name and symbol used to recall the marked location. To recall the waypoints, you press the MARK button quickly, which results in this screen:

1499-1291621620-d4ce3d47fe00ca15c4495c269d9df53e.jpg


You can then use either the dial on top or the up/down buttons to select the waypoint, hitting the right arrow button to see the details like this:
1493-1291503345-f78c602ccd2313234390c63878a49c55.jpg


Repeatedly pressing the right arrow button will also show you the altitude, bearing, and date/time the waypoint was saved. Pressing the MENU button brings up the naming options and also gives you an option to copy the waypoint to a "target point" for navigation. Even though the radio only allows 5 active "target points", the ability to save 100 waypoints should give you plenty of memory slots to play with.

The waypoint functions are not all that intuitive, unfortunately. Without reading the manual, there is really no way to figure out how to do certain things by relying solely on the the information labeled on the buttons. For example, if you want to delete a waypoint, you press the A/B button after highlighting the saved waypoint in the list. However, there is no way you will ever figure that out on your own and if you miss that one line in the manual, you'll end up frustrated.

An interesting GPS function is the ability to perform GPS logging. This feature saves a log of where you have traveled over a period of time. You must first configure how you want the log function to work by going into the menu labeled "LOG SETUP". You can select between three different methods: Time, Distance, or Beacon. Selecting Time or Distance allows you to set either a fixed time interval or distance change that you want to use to trigger the radio to record your GPS data. The manual does not say how the "Beacon" setting works and I haven't had a chance to test it yet. I assume it will record the GPS data every time your radio beacons the APRS info. I'll report back on that setting later.

Starting and stopping the logging function is a little tricky and not fully explained by the manual. If you want to perform logging while using the normal radio functions, you must be on the main frequency display screen (this is the part the manual leaves out). You press F then 2 to start or stop logging. The screen will indicate at the top that the logger is starting or stopping. The other method is to put the radio into "GPS ONLY" mode and using the F-2 button. When you do this, you get the resulting screen:
1498-1291615848-1e012e6179efe2f3a17a73690652aac3.jpg

When in this mode, you have no radio or APRS functionality; only GPS functions are enabled.

The logger saves the GPS information into an internal stored memory. You can see both the status of the logger and the amount of memory used by hitting the POS (position) button and then using the right arrow to select the logging status screen that looks like this:
1488-1291503204-caa754b61c959d8c7b51573be2f2239e.jpg

If the logger is active, screen displays "Logging..." in the center.

Once you've recorded a GPS log, you need to use the Kenwood software to retrieve it to your PC. You can also clear the GPS log at this time. The file is saved in standard NMEA format. I use Microsoft MapPoint which does not support importing NMEA files, but instead expects the GPX format. Fortunately, the free GPSBabel software (GPSBabel: convert, upload, download data from GPS and Map programs) can convert between any GPS file formats and allowed me to quickly import my test GPS log for display in the software.

Here is a screen capture of part of my test route today:
1497-1291591651-2d320a12ddad891d64f7f1c450d50bad.jpg

I didn't have a chance to test out live tracking with MapPoint using the radio's GPS today, but I will do that soon and report the results. I'm hopeful that it will work fine.

As you can tell, the GPS functions are very full featured. The ability to copy a trip log to a PC in a standard format is a really neat feature. Saving waypoints and then navigating to them is very straight forward. Some of the GPS functions are not very intuitive to figure out, but once you understand how to activate them, they work well.

Next, I'll start reporting on the APRS functionality.
 
Nice review. WD9EWK has been using this HT lately for full-duplex on the FM sats. I ordered one on the first but it is not expected to ship until the 15th of the month. This is WD9EWK's initial report:
Hi!

The TH-D72A is the real deal as a cross-band full-duplex HT for
FM satellite work. And, unlike with the DJ-G7T and some
versions of the IC-W32A, no RX
desense while
transmitting. :)

I used VFO B for TX, VFO A for RX (it has better
sensitivity), balanced audio all the way to VFO A,
open squelch for
VFO A, 5W transmit, and juat worked
AO-27. Nice!

I will try it on a later AO51 pass today, not the next
one around 2147 UTC, for another test. As for APRS,
it took little time to set it up and get it picked up
online. I have not hooked it up to a computer yet, but
that is not a high priority yet.

73!
 
Thanks for the report on the full duplex while working the sats. That was on my list of things to test and report back on, so it is helpful to have a few other people testing some of these things out :)
 
APRS Basics

APRS functionality is the what this HT excels at. It is the probably the main reason why anyone would consider purchasing this radio, and in my initial testing, Kenwood delivers. The HT has every possible APRS function that I could think of (I'm sure I missed something!) including the capability to digipeat. In this segment, I'll demonstrate Kenwood's implementation of the basic APRS functions

The basic APRS functionality is very easy to set up and fairly straight forward to use. To get started, you only need to go to the setup menu and enter the your callsign into the basic APRS setup. The default data band is the A band, so if you set that to your local APRS frequency (144.390 typically) and hit the TNC button to turn on the TNC, the radio will start decoding the APRS traffic. If you want to Beacon your own position, go to the TX BEACON menu and set up either a beacon interval or turn on smart beaconing. You can set up more advanced APRS settings, but the defaults will get you going.

Once the radio starts to decode APRS data, it will start to pop up a display showing the received stations. This is a sample display of the HT receiving a beacon from my Yaesu FTM-350:
1500-1291701660-bcdc43e07ead9563f85a0164580bc37f.jpg


When the station beacon is displayed, you can hit the right arrow button to scroll through the other screens to display the remaining info. You perform the same function from the station list menu. Here are the screens that are shown as you continue to scroll through them:
1501-1291701660-dc22d429c1de5934ac725b2f6556e0fa.jpg


Note that the entire status text is not shown on one screen; more scrolls are required:
1502-1291701660-ce474168a68d39d2ac2b274e9c14c8d8.jpg


Grid Square and distance from your station:
1503-1291701660-a7cc80b083c2f8b79cd419737158f22a.jpg


Course and speed:
1504-1291701745-1fb44cf2d5e94c700efd92653e5e6661.jpg


Altitude:
1505-1291701745-01f1234cdb67f19d71e37cf492930cb8.jpg


GPS location:
1506-1291701745-a25848f8154f792c6c13939b8808a757.jpg


To display the list of APRS stations received, hit the LIST button which shows three stations at a time:
1507-1291701745-e7854bd00fdc748938a0bf4502e938ac.jpg


If you hold down the LIST button, you get five stations at a time with a bit of additional information:

1513-1291703263-5da1cfc7aa798fc824096aacd16f1a4e.jpg


If you hold the LIST button again, it changes the right column to the time received. Once you've chosen your preferred display for the list, the radio remembers the setting for the next time. Using the scroll buttons, you can select a station on the list, hit the MENU button which then allows you to either sort by distance, callsign, or date, apply a filter, or tune to the monitoring frequency indicated by the station's beacon. This particular functionality set is well thought out and very useful.

The method used by the TH-D72 to scroll through the APRS info for each station is another example of simplicity in screen display. As is the case with the GPS screens, it is obvious that the designers went out of their way to make the display large and easy to read. The downside of this approach is that not much information can be displayed at one time. It takes no less than 7 screens of scrolling to view all of the APRS data for one station. The contrasting approach is the Yaesu VX-8 which implements vertical scrolling on the individual screen with a smaller font to show you more information quickly. My personal preference is the Yaesu implementation, but I can also appreciate why some would favor Kenwood's approach.

Sending/Recieving APRS Messages

Sending and receiving text messages using the TH-D72 couldn't be easier. Once you've selected the station you want to communicate with on the station list, you simply press the MSG button, resulting in this screen where you just use the alphanumeric buttons to enter your message:
1509-1291701809-4a51487d317f3eefb03de0dc7ec48f89.jpg


After entering the text, press the right arrow button to send it, which will result in this screen once a digipeater/iGate accepts it:
1510-1291701809-fd24fe4bffa599e508e6defd0f964a8e.jpg


When the other station receives and ACK's your message, you get this in response:
1511-1291701896-25583bfede1ff1be098e4bd5c8e0747b.jpg


When you receive a message from another station, you get a popup with the message display like this:
1512-1291701960-f5c4f09d0d570a6ae5a117966a148cfa.jpg


There are a lot of things to like about the way Kenwood has implemented APRS functionality in this HT, but as is the case with anything, there are also a few areas for improvement. I'll make some comments about some of the things I would do differently in the next update. If there are any questions or others that would like to contribute their views on this HT, feel free to comment and add your own opinions.
 
Duplex operation

Because there have been a couple of comments posted about using this radio with satellites, I thought I would deviate from the APRS discussion for a moment.

First, duplex operation on this radio does work well. As you would expect, you need to put on some headphones to keep the radio from squealing with it enabled. The duplex only works by transmitting on the B VFO; you transmit on B VFO and monitor on A VFO. Duplex operation is helpful when operating satellites because it helps you determine if your signal is making it into the bird or not. That said, I don't find that the way the TH-D72 has implemented frequency management to be terribly helpful for satellite operation with duplex enabled.

Most HT users will TX on the same 2m frequency throughout the satellite pass because the doppler shift is not very pronounce on 2m. They will want to shift the RX 440Mhz frequency where the doppler effect does affect things. If you are using the radio in duplex mode, this means that you will want to shift the monitoring frequency on VFO A. However, you must have VFO B selected to transmit. If you have VFO B selected, there is no way to change the frequency on VFO A unless you hit the A/B button, bump the frequency, then hit A/B again to change to VFO B. This operation is a hassle when you've only got a few minutes to work the pass, especially if you're holding some type of hand-held yagi in another hand! What you really need to be able to do is configure the buttons or knobs so that you can change VFO A independent of VFO B to really make effective use of the duplex function while working the satellites. I don't mean to imply that you can't do it this way; it just seems like too much of a hassle to me.

Of course, this is just my opinion.
 
So it has good full duplex cross band operation but no ability to become a hand held cross band repeater?
 

dxChat
Help Users
  • No one is chatting at the moment.
  • dxBot:
    Tucker442 has left the room.
  • @ BJ radionut:
    LIVE 10:00 AM EST :cool:
  • @ Charles Edwards:
    I'm looking for factory settings 1 through 59 for a AT 5555 n2 or AT500 M2 I only wrote down half the values feel like a idiot I need help will be appreciated