• You can now help support WorldwideDX when you shop on Amazon at no additional cost to you! Simply follow this Shop on Amazon link first and a portion of any purchase is sent to WorldwideDX to help with site costs.

Kenwood TH-D74 Review: 144/220/440 Mhz with D-Star, APRS, HF, and More

Moleculo

Ham Radio Nerd
Apr 14, 2002
9,194
1,674
283
When Kenwood announced that they were coming out with an HT that would include not only D-Star, but also include and expand on the features of the TH-D72, I knew that I had to have one as soon as they were available. Before I wrote a review, I decided to make sure I had enough experience with the radio to give it a fair evaluation. After 6 weeks with the TH-D74, I can confidently say that this is the best, most complete HT on the market and it's not even close.

4491-1479077137-d48f8fbe85a72b5c694bf1158973f062.jpg


The TH-D74 has a few cosmetic and ergonomic changes from the TH-D72: The most noticeable change is the new color, high resolution dot-matrix screen, but it doesn't take long to notice that the buttons are much larger and as a result, much easier to use. The four-way button is also moved to the center of the radio, which is important since it is used extensively in D-Star mode.

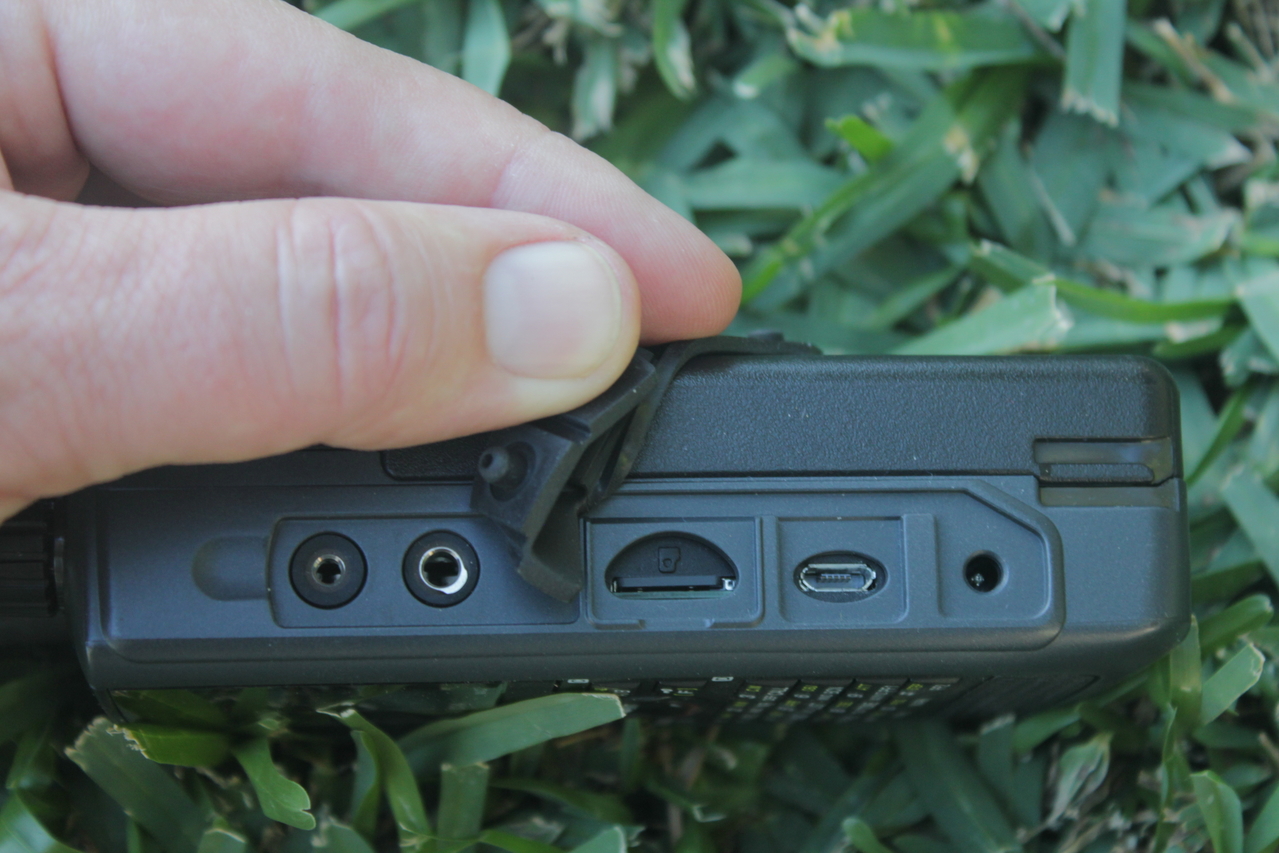
The radio now includes a microSD slot, and the USB port has been replaced with the same micro USB that is found on most phones and other small electronics. The speaker and mic ports are consistent with other models, so any Kenwood compatible mic will continue to work.

4492-1479077145-f02bf1a96a2ff5aac414111007374ee0.jpg


Ease of Use
I always try to figure out as much of a new radio as I can on my own without reading the manual, which is my litmus test for ease of use. If you're familiar with the TH-D72 or other Kenwood HTs, most of the functions are pretty easy to figure out. There are a few nuances that I had to turn to the manual for, specifically how to change bands (you hold the left or right arrow on the four-way pad) and how to change the From and To settings on D-Star (you hold the Down or Up button on the four-way pad). Overall, I find the menu structure, settings,and memory programming very simple but keep in mind that I'm coming to this radio after using the TH-D72 and the two radios are similar in a lot of ways.

General Features

The most helpful feature for writing this review is the ability to store screen captures on the microSD card. Unfortunately, you can only capture images if you purchase a Kenwood mic which contains the three Programmable buttons, because you have to configure one of those buttons to perform the capture. Fortunately, the mic is only about $35. Here's a screen capture of the PF3 button being configured for the task:
4484-1478061269-eda7b03677441f594c7317f8b14f7f54.jpg


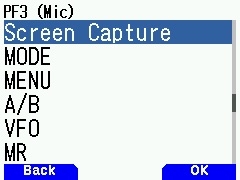
One of the first things you'll want to configure is the display background color, which can be reversed from the white background shown above.
4463-1478061256-cdf69e26e5c3e6758c3cc55b9f42c14f.jpg


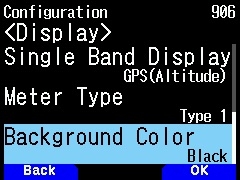
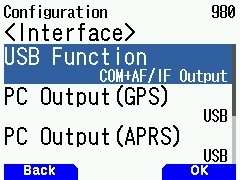
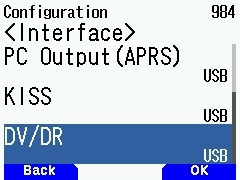
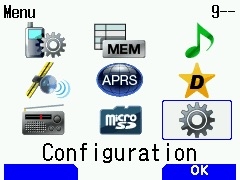
The configuration for any of the general settings is handled via the MENU setting, which brings up this screen which has icons and subtitles. It really is easy to understand where to go for certain settings once you've run through the menus a few times:
4478-1478061265-05ae4f34414cd378d8fd3f3f0122329a.jpg


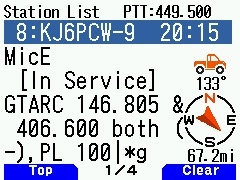
Despite all of the advanced features of the TH-D74, the basics are presented in a manner that is easy to understand. The screen you see most often which displays the active band(s) is fairly mundane (which is a good thing). Here are a few images of some common screens:

4435-1478061231-dbe0132bdf8ac7c5140d58747ddf929d.jpg

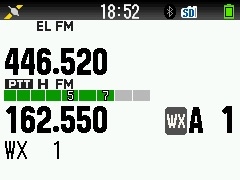
The above images shows the radio on 440 band on VFO A and the Weather band on VFO B. The Weather frequency is also memory A1. The GPS is turned on as is Bluetooth (more on this later). there is an SD Card inserted and VFO A is set at the lowest power output setting (EL).

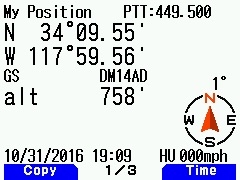
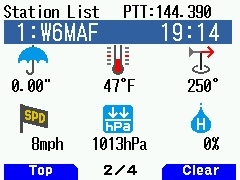
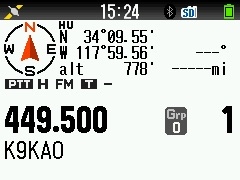
Here is an image with the radio in Single band mode on VFO B, set on memory 1 with the GPS turned on:
4429-1478061227-b3a8f6e8ca085914b1ece05bda4b9f5e.jpg


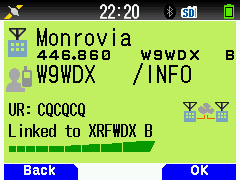
Here's what the radio displays when one VFO is on regular FM and the other VFO is using D-Star mode. In this case, the D-Star repeater is the "Monrovia" repeater on VFO A, but VFO B is the active selection on memory 1, which has been programmed as the K9KAO repeater.

4481-1478061267-b128be234ad64432882965973a755529.jpg


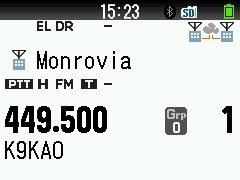
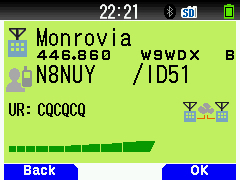
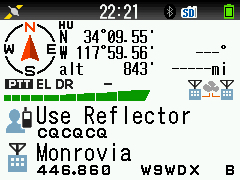
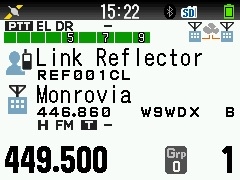
In this image, the active VFO has been changed to the D-Star repeater, which changes the top half of the screen to display the necessary D-Star information:
4473-1478061262-22b257cb529e0c9ff46c9049347ab229.jpg


As you can probably guess, there is a ton of information that I intend to cover about this radio, including the expanded use of Bluetooth. I plan on updating this thread with more information in the coming days, so stay tuned for more.
 

can you load the sd card with repeater lists FM and Dstar like the icom id-51?? this is very handy I can have the entire state of Wisconsin or whatever state I want saved on the card then just load them and the gps will give you the top 15 or so closest repeaters
 
can you load the sd card with repeater lists FM and Dstar like the icom id-51?? this is very handy I can have the entire state of Wisconsin or whatever state I want saved on the card then just load them and the gps will give you the top 15 or so closest repeaters

Yes. Kenwood has their own programming software available for download from their website which includes full radio configuration and memory / repeater editing. If you're familiar with the ID-51 software, the Kenwood application will be a breeze to learn.
 
  • Like
Reactions: camaro1
Kenwood TH-D74 Review, Continued

Receiver Features

In many ways, the TH-D74 is akin to a hybrid between the TH-D72, the TH-F6A, and an Icom ID-51. One of the similarities of the popular TH-F6A is the inclusion of a general HF receiver capable of SSB, CW, AM, and FM modes, as well as the ability to listen in on WFM broadcast. However, Kenwood didn't just add the same features of the older HT, they expanded on them.

One new feature is a pass band filter that can be used on SSB, CW, and AM, and is particularly useful when using the rig to listen in on HF or SW:
4457-1478061251-ba5fcc30871e9313d97d7f9bdb0cc7d9.jpg


This HT even includes a 5 band RX EQ:
4472-1478061261-768e6868bc9e08ab693f58920d090a9a.jpg


The RX audio quality out of this radio might be the best on the market. In addition to good, quality, rich sound that can be tailored to your liking, there is plenty of volume available, which is something that is lacking in many of the competitor offerings.

There aren't many places you will try to dial the TH-D74 where it cannot act act as a receiver (to it's upper RX limit, of course). The complete RX range is a whopping 0.1 - 524 Mhz! One common problem with an HT that has such a broad frequency range is the presence of RX birdies caused by the CPU clock oscillator. Most HTs now include a "beat shift" option that shifts the oscillator frequency. Kenwood took this approach a step further in the TH-D74 to ensure you can eliminate the internal interference on any frequency you want to listen in on by supplying 8 different beat shift settings! As I mentioned before, this radio also includes a WFM mode, so you can program your favorite FM broadcast frequencies as memories, or just dial them in:

4433-1478061231-ac4806ea0f6af103dd29ab610ff87917.jpg


Like the TH-F6A, the HF receiver can be set to use either the internal bar antenna or the external antenna connector:
4493-1479188957-0ecdc9c0f1b4389394292931c1081f1f.jpg


The effectiveness of the external antenna depends greatly on what type of antenna is connected, and to demonstrate that point, I decided to shoot a short video showing what 40 meters stations can sound like with the internal bar antenna vs. a wire antenna tossed into a tree. Enjoy!

 
  • Like
Reactions: Dorian and camaro1


Kenwood TH-D74 Review: Bluetooth

A few years back, I wrote an article lamenting the fact that amateur radio manufacturers were terribly slow to adopt bluetooth and incorporate the ubiquitous standard into their new products. In that commentary, I wasn't just asking for bluetooth audio or mic capabilities, but I called on the industry to adopt it for general connectivity, as well. Over the last few years, we seen steady but slow progress toward this goal, but Kenwood has finally established itself as the company that is the most interested in adopting bluetooth in the same manner that we see in other electronics with the capabilities of the TH-D74.

I first tried the radio with a regular bluetooth headset that I use with my cell phone, which worked just fine. I consider this baseline functionality since most radios in this price range include this capability. What I was really interested in was how well the bluetooth connectivity features worked. Before you do anything related to these features, you must download and install the appropriate driver from Kenwood's website, which of course, I didn't do. Regardless, after finding the documentation, and installing the software, putting the radio into Pairing Mode, I had no problems pairing the radio with Windows 10 once I turned on Bluetooth on the radio using this menu setting:
4464-1478061256-9e04a7d2a3659f908ae436f6632d6ee1.jpg


The radio presents itself as a serial over bluetooth device with the name "TH-D74" assigned to a COM port . Once you've done that, things get interesting.

You can individually configure each of the radio interfaces to use either the USB port or Bluetooth. The interfaces available for bluetooth are GPS, APRS, KISS TNC, and DV/DR (for D-Star), as shown by these menu settings:
4465-1478061257-60869d1c9aa75a9d7bc869111ef59fe0.jpg
4466-1478061257-f62953bba932dd2a154d475c9fcb1570.jpg


You can also just use the programming software to connect to the radio via bluetooth, as well. One hint on that: After you pair the radio, it will not stay "connected" to the PC when not in communications with the PC. However, when you tell the software to read or write to the radio, it initializes the bluetooth connection and works fine. Note that serial over bluetooth is MUCH slower than USB, so if you want speed, you should still use the USB or microSD card option. The communication speed over bluetooth is just fine for any of the interfaces listed in the menus, but it is a little too slow for general programming.

We finally have a radio that has complete bluetooth interface connectivity!
So how much did it set you back?
 
After some travel for work, I'm back to continue on with the review...

Missing Features

There are a couple of things missing from the D74 that were present on previous radios. The most obvious missing feature is full duplex, which was a feature that the D72 had. Satellite operators and those in heavily populated, high usage areas will miss this the most.

The next feature that is missing involves the TNC: It won't do packet. One of the things I used the D72 extensively for was Winlink / Airmail on local VHF systems that use Packet, especially while in the MARS service. I wrongly assumed that the D74 would perform the same since it also includes an internal TNC which is accessible to a PC via the USB port. Unfortunately, these modes just don't work with the D74, and I've verified by testing it with Winlink. The internal TNC supports APRS and KISS, and that appears to be all. Whether or not the TNC can be updated / upgraded via software update is unknown at this time, but the latest firmware updates didn't provide any new TNC functionality that I'm aware of.

Crossband Repeat is a feature that didn't exist in the D72, but it would be nice if Kenwood would include it in an upcoming radio.
 
Transmit Audio

A couple of quick thoughts on transmit audio quality: The radio includes the following settings that affect transmit audio quality:
  • Mic sensitivity (gain)
  • 4 band EQ shown here:
4471-1478061260-2515a1916febe42263140da616eab8eb.jpg


  • There are settings to apply both the TX EQ individually to FM, NVM, and DV. You can also turn off the RQ EQ while enabling the TX EQ.
By now a few other locals have these radios and I've had a chance to hear the audio quality for myself. Honestly, I cannot tell the difference between the TH-D74 HT and other Kenwood mobile radios like the V71 - the audio quality is outstanding and sounds nothing like a typical HT. In my opinion, this is the best sounding HT on the market from an TX audio quality perspective...and it's not an exaggeration to say that I've heard them all in my area.
 
GPS & APRS Features

The GPS and APRS features are fundamentally the same as the D72, but of course the user interface is greatly improved. In this section, I'll showcase a few of the screens and functions of each of these features.

Here's the basic position screen. Note that in addition to your GPS coordinates, it also tells you your current grid square, frequency, and heading:
4439-1478061234-450ab420b1e3ad58ec4a2dee9db6ba4e.jpg


If you press the Copy button, you can copy your current location to one of five saved "My Position" location memories:
4443-1478061236-f22665f414675ada52bddf8939c6e803.jpg


If you press the Time button on the previous screen, you can set the radio's current time:
4442-1478061236-cb1125671be7d2f0b4e0aff88528de97.jpg


Next is the typical screen that shows the location of the GPS satellites and the relative signal strength:
4441-1478061235-3731a69523da7c6450514bb8f43414c7.jpg


In addition to the "My Position" memories, you can save 100 GPS coordinates into the location memory. Then, if you want range and bearing back to a specific place, you select it as a "Target Point", which then results in this screen:

4451-1478061246-053f793eab28dc1f79d9755b50d9d6d5.jpg


In that screen, you can see that my target point is .29 mi due West from my current location.

When you couple APRS functionality with the GPS, you can get a range and bearing display to a specific recently heard station. In this image, KJ6PCW-9 is 67.2 miles away with a bearing of 133 degrees (SE) from my present location:
4453-1478061248-61fd161fed77c3ceb02564946a2bc878.jpg


A new feature for APRS is the display for specific object types. For example, this screen shows how a Weather station is displayed, showing precipitation, temperature, wind direction and speed, etc.
4445-1478061237-ab6c640f60754db6acdac278d50a3dd5.jpg


Most of the remaining APRS functions are the same as the previous model radio with similar looking screens, so I won't go through all of them here. If there are specific questions about APRS or the TH-D74 functionality related to APRS, I'll be happy to answer them.
 
what format does this radio use for the repeater lists?? my icom id-51a , I have all my fm and dstar stored on the micro sd card for my state and other states that I travel to, icom uses .csv files for the repeater list, just wondering if id be able to keep my repeater lists with the TH-D74
 
what format does this radio use for the repeater lists?? my icom id-51a , I have all my fm and dstar stored on the micro sd card for my state and other states that I travel to, icom uses .csv files for the repeater list, just wondering if id be able to keep my repeater lists with the TH-D74

It uses a proprietary Kenwood file format but it can import CSV files, so you can repurpose existing memory files from other radios.
 
  • Like
Reactions: N3KDJ and camaro1
I just realized that I never commented on the D-Star functions; nor did I show any screenshots of how those features work. Stay tuned; I will rectify that within the next couple of days.
 
D-Star Features

The D-Star implementation in this radio is excellent. The UX is on par with the newer Icom radios; in my opinion the reflector functions are easier to use on the TH-D74. To change to a D-Star mode, you just tap the Digital Mode button on the keypad. One thing to remember: use F-Mode to change between DV and DR, to do a DR Scan, or to switch between D-Star Voice and Data modes.

Here are the D-Star basics for this radio, focusing on DR mode. This is the basic screen shown receiving a transmission from a local D-Star repeater. Note how the screen changes to green while receiving:

4647-1486708175-754148acde185493801be5a1f3a1248d.jpg


In the above shot, I'm connected to the W9WDX repeater and I sent the Info command. It's telling me that it's connected to the XRFWDX B reflector.

In this screen shot, I'm receiving a transmission from N8NUY. The little icons toward the bottom right indicate that the W9WDX repeater is currently connected to a remote reflector or repeater.

4650-1486708177-e426272cc6b4102ac941b5006c04149c.jpg


Here you can see that the radio is talking through the W9WDX repeater (the FM station) and is giving a command to link to the REF001C repeater:

4473-1478061262-22b257cb529e0c9ff46c9049347ab229.jpg


f you want to change the repeater you're talking through (the FM repeater), you hold the down arrow on the 4-way keypad to get this menu:

4640-1486708171-c413c613f769e9becc7eebec64819f0a.jpg


Selecting Nearby Repeaters gives you a list to choose from. If you pick one, it gives you the distance from your location (obviously you need the GPS turned on to make this work):

4639-1486708170-9cfb8f2f1483f823dd73789b5a06d22e.jpg


If you want to select a repeater manually from the memory band, you first need to choose your Region, then your Region Group as shown here:

4641-1486708172-db9e5341118cc14e5b1cc1d9bca51d7c.jpg


4642-1486708172-25f52fd64e38ae95c4e0dae303caf872.jpg


After that, you'll get a list of repeaters to choose from. If you want to change destinations, you hold the up arrow on the 4 way keypad to activate this menu:

4643-1486708173-831d2eda7d78686430a2a237d8c76929.jpg


This menu is pretty self-explanatory, but here's a brief walk through of selecting a reflector. First choose "Link to Reflector":

4644-1486708173-ce629b72c7b0c127ba9d1c5764a97eb5.jpg


The next menu will display recently used reflectors. If it's not shown, choose the "Input" option to get this screen. Turn the dial to input the reflector. Note that this method only allows you to select Icom reflectors. If you want to connect to Xreflectors or DCS reflectors, you need to input them using the Direct Input menu. This is one function I dislike; I like the way Icom allows you to program other reflectors and select them from the memory list better.

4648-1486708175-a446d685189bec5d91bec644ad178215.jpg


Once you've connected to the reflector, hold down the up arrow on the 4 way pad to select the "Use Reflector" menu to get your transmission out from the repeater to the reflector, which results in this screen:

4649-1486708176-157b075ea2eb91714549e3d1d524c29a.jpg


There are a couple of small features that are nice. The call history allows you to quickly call a recent station or connect to a recently used reflector:

4646-1486708175-4203003ef571230357424c711831a608.jpg


The DR scan will scan nearby repeaters for activity, which is pretty neat if you have a bunch of them in your area. In summary, the D-Star features of this radio are quite complete and very easy to use.
 
Fantastic write-up. Just started using this as an upgrade from my ID-51...very pleased. Using it mostly with an RF Shark OpenSpot...one at home and one in mobile with a Verizon 4G hotspot and a VONETS VAR11N-300 Mini Multi-Functional Wireless Portable Wifi Router/ Wifi Bridge/ Wifi Repeater for $19 US on Amazon. Works fantastically and supports D-Star and DMR and more.
 

dxChat
Help Users
  • No one is chatting at the moment.
  • dxBot:
    Tucker442 has left the room.
  • @ BJ radionut:
    LIVE 10:00 AM EST :cool:
  • @ Charles Edwards:
    I'm looking for factory settings 1 through 59 for a AT 5555 n2 or AT500 M2 I only wrote down half the values feel like a idiot I need help will be appreciated