
I like my older radios, most were discarded by someone else and snatched up for parts and experimentation. Mine always end up as living breathing functioning works of love.
Even after freshening up, some of my radios drift with temperature. Being in the Cleveland area, my mobiles can see temperatures from below 0f to above 100f, and anywhere between depending on the season. Sometimes my 30 minute commute wasn't enough to get up to operating temp and I'd still sound like Donald Duck or Darth Vader.
So, if you have drift issues, or just want a quick reversible unlock without too much effort this is for you. Leave everything in place by carefully unsoldering and lifting instead of clipping or ripping anything (be nice to your radio).
This unlock doesn't add any extra range, so the clarifier doesn't get "touchy". If you need extra range, another mod or PLL switching might be better.
It's easy to use: If your receive is in tune and clear, You will be in tune and clear.
ENJOY!
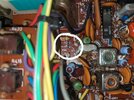
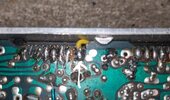
1) Unsolder and carefully lift one side of d52. This just disables VR5, it's functionality will be taken by the clarifier now.
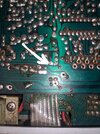
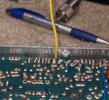
2) Unsolder and carefully lift the rearmost leg of R44, straighten it enough to make it accessible. This disables the "RX only" 8V to the clarifier, we're making it continuous.
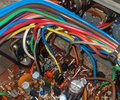
3) Solder and heat shrink a length of wire to the free leg of R44.
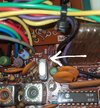
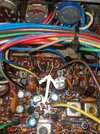
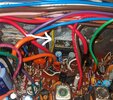
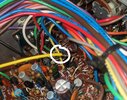
4) Tuck the wire into the wire loom towards the side of the radio, continue until just over the rear gap of the voltage regulator and route the wire through.
5) Adjust the wire length to your liking and solder this end to the closest leg of the regulator. This supplies continuous 8V to the clarifier.
6) Button it up, You're Done!!!
Check out the Pics for reference.
Even after freshening up, some of my radios drift with temperature. Being in the Cleveland area, my mobiles can see temperatures from below 0f to above 100f, and anywhere between depending on the season. Sometimes my 30 minute commute wasn't enough to get up to operating temp and I'd still sound like Donald Duck or Darth Vader.
So, if you have drift issues, or just want a quick reversible unlock without too much effort this is for you. Leave everything in place by carefully unsoldering and lifting instead of clipping or ripping anything (be nice to your radio).
This unlock doesn't add any extra range, so the clarifier doesn't get "touchy". If you need extra range, another mod or PLL switching might be better.
It's easy to use: If your receive is in tune and clear, You will be in tune and clear.
ENJOY!
1) Unsolder and carefully lift one side of d52. This just disables VR5, it's functionality will be taken by the clarifier now.
2) Unsolder and carefully lift the rearmost leg of R44, straighten it enough to make it accessible. This disables the "RX only" 8V to the clarifier, we're making it continuous.
3) Solder and heat shrink a length of wire to the free leg of R44.
4) Tuck the wire into the wire loom towards the side of the radio, continue until just over the rear gap of the voltage regulator and route the wire through.
5) Adjust the wire length to your liking and solder this end to the closest leg of the regulator. This supplies continuous 8V to the clarifier.
6) Button it up, You're Done!!!
Check out the Pics for reference.
Attachments
-
 D52 out of hole.jpg1.2 MB · Views: 20
 -
 D52 rear hole.jpg1.4 MB · Views: 20
 -
 D52.jpg826.4 KB · Views: 21
 -
 Heatshrink & tuck.jpg992.6 KB · Views: 21
 -
 Pin 1.jpg510.2 KB · Views: 21
 -
 R44 leg hole.jpg1.4 MB · Views: 20
 -
 R44 rear leg.jpg1.6 MB · Views: 18
 -
 Rear gap at regulatot.jpg1 MB · Views: 19
 -
 Rear gap top.jpg468.6 KB · Views: 18
 -
 Solder wire.jpg981.2 KB · Views: 20
