Replacing incandescent bulb in THP HL-1.5KFX meter, or replacing with LEDs
Described here are the steps required to replace the bulb or modify the amplifier display meter by substituting LEDs for the incandescent bulb.
Remove the 14 Phillips-head screws that hold on the top cover.
Remove the two recessed Phillips-head screws that hold the front display section onto the front-to-rear top rails.
Flip the amplifier and remove the three smaller Phillips-head screws that hold that front display section onto the bottom. Then, upright the amp.
The front display section is now free and can be moved away slightly from the rest of the amplifier, tethered by several cable bundles.
With a 2.5mm hex-head wrench, remove the four screws that secure the 2" x 9" glass panel. Doing so exposes a recessed Phillips-head screw that secures a "Z-shaped" bracket that holds the meter in place. Remove that bracket. The meter assembly is now mechanically removable from the amplifier front display section.
The meter is electrically connected via a 4-wire bundle. Unplug that bundle from a socket about 6 inches away from the meter. Completely remove the meter and its cable from the amplifier.
On a clean workbench, carefully remove the black tape from the bottom and the clear tape from the mid-section of the meter. Carefully pull the meter assembly from its plastic housing, exposing the meter movement. You'll now see the bulb soldered between two terminals below the meter pivot point. Using an ohmmeter, confirm infinite resistance, if you haven't already done so.
Carefully de-solder the bulb and solder in the replacement.
Reverse the steps above.
Total repair time, first time through with these instructions, should be less than half-hour. Good luck.
Now, if you wish to substitute LEDs for the incandescent bulb, use the following information as background and guidance. All work on the meter itself was with it completely removed from the amplifier.
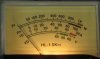
Figure 1 is a photo of the removed meter with the incandescent bulb temporarily installed and activated at 12.1V from a bench supply. (That is the voltage I measured at the amplifier's meter lighting terminals with the cover removed and by momentarily pressing on the safety lockout switch on the left side rear of the amplifier.)
The resulting illumination is certainly adequate and puts the amplifier back into its original configuration.
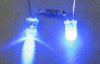
However, out of curiosity, I decided to experiment with blue LEDs instead of using the incandescent bulb. With some concern that a single LED might be too little light and also that the light from one LED in the center might be blocked somewhat by the meter needle movement, I decided to use two LEDs in series. One is either side of the needle origin with a voltage-dropping resistor in between, as shown in the following figure.
Note that the LED lamps appear to be opaque. Concerned that the narrow field of illumination, which was stated as only 12 degrees on the LED package, might cause uneven lighting of the meter face, I scuffed the ends and sides of both LEDs with extra-fine sandpaper. The following figure shows the significance of this effect. The LED on the right has been scuffed with sandpaper but the LED on the left has not yet been scuffed. Note the narrow cone of light emitted by the diode on the left as it is supplied from the vendor.
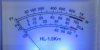
Below is the final result of installing two blue LED bulbs in the meter:
If one were to conduct a poll as to which looks better-the white incandescent or the blue LEDs-the results would likely be mixed. Personally, I think the blue is attractive and it certainly looks striking in the amplifier. But, the slightly yellow background that THP originally placed on the meter face makes it looks just fine with a white incandescent bulb. I'll live with the blue for a while and then see if a change is desirable. BTW, pictures can be deceiving-the two highly illuminated blue areas near the bottom aren't nearly as pronounced in operation as they appear in this photo. The color intensity is more uniform.
The dropping resistor used is 270 ohms. The LEDs each drop about 3.2V at the recommended design point of 20mA forward current. (MAX forward current on these devices is 30mA and you don't want to exceed that.) So, with two of them in series and wanting to operate at about 20mA with a 12.1V supply, the resistance should be about 285 ohms. The 270 ohm standard resistor value is close enough.
I used NTE30043 5mm clear blue LEDs that sell for about $2 each. You need to carefully note which LED lead is the cathode (that connects to the negative side of the supply for these FORWARD biased diodes to glow) and on this particular diode, it's the side with the ever-so-slight flat spot on the plastic base near the lead, too subtle to discern on any of the foregoing photos.
BTW, in retrospect, I think a single LED would give an adequate amount of light. And, after looking at the spacing between the moving needle and the front plastic meter housing, light from a single centered LED wouldn't be adversely blocked by the needle. If I were doing another one (or doing this one over), I'd use a single LED. But, the voltage dropping resistor would have to be different: about 450 ohms. The resistor would need to be situated in such a manner that it allows the LED to be centered at the meter bottom (at about where the resistor appears in the earlier photo).
For reference, the THP HL-1.5KFX has four leads going to the display meter: orange, yellow, purple and gray. The first two go to the meter light, with orange being +12.1V and yellow being the return. The other two leads are for the meter movement.
Described here are the steps required to replace the bulb or modify the amplifier display meter by substituting LEDs for the incandescent bulb.
Remove the 14 Phillips-head screws that hold on the top cover.
Remove the two recessed Phillips-head screws that hold the front display section onto the front-to-rear top rails.
Flip the amplifier and remove the three smaller Phillips-head screws that hold that front display section onto the bottom. Then, upright the amp.
The front display section is now free and can be moved away slightly from the rest of the amplifier, tethered by several cable bundles.
With a 2.5mm hex-head wrench, remove the four screws that secure the 2" x 9" glass panel. Doing so exposes a recessed Phillips-head screw that secures a "Z-shaped" bracket that holds the meter in place. Remove that bracket. The meter assembly is now mechanically removable from the amplifier front display section.
The meter is electrically connected via a 4-wire bundle. Unplug that bundle from a socket about 6 inches away from the meter. Completely remove the meter and its cable from the amplifier.
On a clean workbench, carefully remove the black tape from the bottom and the clear tape from the mid-section of the meter. Carefully pull the meter assembly from its plastic housing, exposing the meter movement. You'll now see the bulb soldered between two terminals below the meter pivot point. Using an ohmmeter, confirm infinite resistance, if you haven't already done so.
Carefully de-solder the bulb and solder in the replacement.
Reverse the steps above.
Total repair time, first time through with these instructions, should be less than half-hour. Good luck.
Now, if you wish to substitute LEDs for the incandescent bulb, use the following information as background and guidance. All work on the meter itself was with it completely removed from the amplifier.
Figure 1 is a photo of the removed meter with the incandescent bulb temporarily installed and activated at 12.1V from a bench supply. (That is the voltage I measured at the amplifier's meter lighting terminals with the cover removed and by momentarily pressing on the safety lockout switch on the left side rear of the amplifier.)
The resulting illumination is certainly adequate and puts the amplifier back into its original configuration.
However, out of curiosity, I decided to experiment with blue LEDs instead of using the incandescent bulb. With some concern that a single LED might be too little light and also that the light from one LED in the center might be blocked somewhat by the meter needle movement, I decided to use two LEDs in series. One is either side of the needle origin with a voltage-dropping resistor in between, as shown in the following figure.
Note that the LED lamps appear to be opaque. Concerned that the narrow field of illumination, which was stated as only 12 degrees on the LED package, might cause uneven lighting of the meter face, I scuffed the ends and sides of both LEDs with extra-fine sandpaper. The following figure shows the significance of this effect. The LED on the right has been scuffed with sandpaper but the LED on the left has not yet been scuffed. Note the narrow cone of light emitted by the diode on the left as it is supplied from the vendor.
Below is the final result of installing two blue LED bulbs in the meter:
If one were to conduct a poll as to which looks better-the white incandescent or the blue LEDs-the results would likely be mixed. Personally, I think the blue is attractive and it certainly looks striking in the amplifier. But, the slightly yellow background that THP originally placed on the meter face makes it looks just fine with a white incandescent bulb. I'll live with the blue for a while and then see if a change is desirable. BTW, pictures can be deceiving-the two highly illuminated blue areas near the bottom aren't nearly as pronounced in operation as they appear in this photo. The color intensity is more uniform.
The dropping resistor used is 270 ohms. The LEDs each drop about 3.2V at the recommended design point of 20mA forward current. (MAX forward current on these devices is 30mA and you don't want to exceed that.) So, with two of them in series and wanting to operate at about 20mA with a 12.1V supply, the resistance should be about 285 ohms. The 270 ohm standard resistor value is close enough.
I used NTE30043 5mm clear blue LEDs that sell for about $2 each. You need to carefully note which LED lead is the cathode (that connects to the negative side of the supply for these FORWARD biased diodes to glow) and on this particular diode, it's the side with the ever-so-slight flat spot on the plastic base near the lead, too subtle to discern on any of the foregoing photos.
BTW, in retrospect, I think a single LED would give an adequate amount of light. And, after looking at the spacing between the moving needle and the front plastic meter housing, light from a single centered LED wouldn't be adversely blocked by the needle. If I were doing another one (or doing this one over), I'd use a single LED. But, the voltage dropping resistor would have to be different: about 450 ohms. The resistor would need to be situated in such a manner that it allows the LED to be centered at the meter bottom (at about where the resistor appears in the earlier photo).
For reference, the THP HL-1.5KFX has four leads going to the display meter: orange, yellow, purple and gray. The first two go to the meter light, with orange being +12.1V and yellow being the return. The other two leads are for the meter movement.