• You can now help support WorldwideDX when you shop on Amazon at no additional cost to you! Simply follow this Shop on Amazon link first and a portion of any purchase is sent to WorldwideDX to help with site costs.
  • A Winner has been selected for the 2025 Radioddity Cyber Monday giveaway! Click Here to see who won!

xtal colpitts smd pcb

brandon7861

Loose Wire
I Support WorldwideDX.com!
Nov 28, 2018
2,045
2,256
293
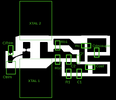
Figured I would share the photoresist mask I made for an oscillator. The 600dpi image fits 4 copies on a 4"x3" board. This was made for 1206 smd caps/resistors, JZ trimmers by Voltronics, HC49 crystals laid flat on board (because bigger crystals pull better than SMD ones) and sot-23 transistors. I think other sizes will fit. If your transistor pinout is different, you can flip the image.

There is a place for a second crystal in parallel for pulling purposes (or its pad can accomidate an inductor to ground). The trimmer has a pad next to it for adding more capacitance in parallel so a smaller range (easier to adjust) trimmer can be chosen. There are solder bridge points for connecting the other crystal pad so its capacitance is not present when not needed and another set of points to short out the trim cap to simulate max capacitance.

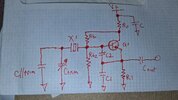
For fundamental oscillators between 1 and 30MHz, Rc is 470, Cout is 1nF, C supply is 10nF and C2 is 47pF. R1 and C1 are chosen to meet a few criteria, but the whole range can be covered very well with a few common pairs. For 1-4MHz, use 1.8k and 220pF, for 4-12MHz use 1k and 100pF, for 12-30MHz, use 560 and 47pF (good chance 1k and 100pF will run just about any crystal you have). Rb1 and Rb2 are chosen to establish an emitter voltage that places 1-3mA through R1, which also puts the oscillator in the active region and insures startup and stabilized bias. Their parallel equivalent resistance is across the crystal and loads it which can kill the oscillation alltogether if too low. Lower frequency crystals need higher bias resistances or they won't run. A good start is 12k for both Rb1 and Rb2, raised if needed at lower frequencies. Mid rail off the collector works fine for base voltage too. You'll end up between 1 and 3mA on an 8v regulated supply.

Just about any transistor will do. I just ordered the MMBT5088s, I expect they will work good for this (so would a 2222, 3904, 945 etc). RF stuff prefers thin film resistors and C0G capacitors. Tolerance doesn't really matter here, 5%, 20%, it don't really matter, so just meet the thin film and C0G critera and get the cheapest of those in the 1206 series.

Now I need to go find printer drivers for linux.
 

Attachments

  • SMD Xtal Colpitts Toner 4x3.png
    SMD Xtal Colpitts Toner 4x3.png
    23.6 KB · Views: 161
  • SMD Xtal Colpitts single.png
    SMD Xtal Colpitts single.png
    31.9 KB · Views: 159
  • 20250419_223203.jpg
    20250419_223203.jpg
    1.2 MB · Views: 161
Last edited:

oops, had to flip the image because toner side down gives better resolution. I always print the first one backwards lol
 

Attachments

  • SMD Xtal Colpitts Toner.png
    SMD Xtal Colpitts Toner.png
    51.2 KB · Views: 152
  • Haha
Reactions: Cable Guy
I usually don't realize its backwards until after it's transferred and etched. I found most success from cranking the toner output up, fuser temp down and using high gloss photo paper. Was looking into making my own etchant solution once upon a time. Never actually got around to it. That's a cool circuit.
 
  • Like
Reactions: brandon7861
Thanks! I've been using the same homemade etchant for 9 years now. I went with copper chloride because it makes more of itself as it is used. Toxic to fish but easily destroyed with aluminum foil if some gets contaminated.

I am slowly getting better at making boards this way. I still struggle getting the resist to stck without overexposure bleeding through the plastic where it shouldn't be and have to scrape off bits with a sewing needle and touch up bad spots with acrylic paint before etching, but I'm getting there. Getting better at solder mask too, back side turned out good, tonight I need to do the parts side. Another mask to print...
20250420_153021.jpg

crap, I forgot the ground via pads on the back. I guess I will scratch off little spots where I drill it.
 
Last edited:
  • Like
Reactions: Cable Guy
Thanks! I've been using the same homemade etchant for 9 years now. I went with copper chloride because it makes more of itself as it is used. Toxic to fish but easily destroyed with aluminum foil if some gets contaminated.

I am slowly getting better at making boards this way. I still struggle getting the resist to stck without overexposure bleeding through the plastic where it shouldn't be and have to scrape off bits with a sewing needle and touch up bad spots with acrylic paint before etching, but I'm getting there. Getting better at solder mask too, back side turned out good, tonight I need to do the parts side. Another mask to print...
View attachment 72605
crap, I forgot the ground via pads on the back. I guess I will scratch off little spots where I drill it.
There is a skill I would like to have. Every board I have ever made, pretty much sucked.
 
  • Like
Reactions: Cable Guy
There is a skill I would like to have. Every board I have ever made, pretty much sucked.
Mine sucked at first too, some still do, keep at it! I'm no expert, but I can detail how I do it. If anyone has improvements to this, Id love to hear them.

One thing that held me back for a long time was washing the boards with acetone before applying the resist film. No matter how much I sanded or cleaned with acetone, no matter how hot I got it or how hard I pressed the film down, it would partially peel off when I went to peel the second protective film back. I started using gloves and using washing soda to remove the oils before applying the resist and rinsing with distilled water. You know the oil is gone when the distilled water wets the entire surface smoothly without beading up anywhere. My acetone was too dirty for this.

Some say photoresist film only lasts a year, mine is 5 years old now. I keep it wrapped in black plastic, wrapped in aluminum foil, put that in a paper bag, and that goes under my metal desk. I only take it out in the bathroom with a red headlamp as my only light source. I will cut what I need, wrap up the rest, then keep that piece covered with a towel until needed. The entire time, from film cutting to developing, the room is dark. Some people do it in the daylight, that didn't work for me. My film is too sensitive I guess.

I'm too poor for a fancy laminator, so I use a hair dryer or hot air from the solder station set to 150C. I also have a block of aluminum (my adjustment tool/pen holder) that I heat to 170 in the toaster oven to help heat the board. When I get the board rinsed, shake it dry, I lay it on a piece of paper, peel the resist backing, and lay the resist down starting in the middle. I then rub the air out using a paper towel. A little moisture will not hurt, it even helps get the air out. Then, the board goes on the aluminum block and heated with air and I continue to rub with the paper towel under my finger until the board is almost too hot to touch. Any stubborn bubbles get poked with a needle and rubbed down. When I feel it is stuck down good, I let it cool before peeling off the other backing. That can be a pain too, so I flip the board over and lightly cut along the board edge with a sharp razor to cut the paper and cured resist that overhangs while trying not to cut the backing. I find the backing peels off better without lifting the resist that way. Again, all this is done in the dark with red light only. If some lifts away, don't quit, just fix it later.

The next step is placing the mask, toner side down, and held in place with a sheet of glass. I give it a minute with a fingernail curing UV light (thinking about going to 45 seconds, but everyones light is different). Once that minute is up, the UV is unplugged and the board goes into a warm solution of washing soda. The masked parts slowly dissolve away. Rubbing with a gloved finger helps. The lights are still off until this step is done. Rinse and dry.

The next step is at the bench under a magnifying glass to remove overexposure by picking it off with careful cutting and scraping. Touch up any missing resist that lifted away with fingernail paint and let dry. I also fingernail paint the back side if I am keeping that layer.

Once dry, it goes into the etch. This takes a while depending on etch solution and a soft toothbrush across it with the bristles at a safe angle helps speed things up.

After the board is etched, I rinse it, then use acetone to remove any fingernail paint, and then a potassium hydroxide bath to remove the photoresist.

The liquid solder mask is something I havent fully dialed in yet. You will want to wear gloves unless you want smurf hands. This stuff is harder to get to stick than the film. Again, washing soda works way better than hardware store acetone. I wash, rinse, then dry with hot air. After the board is dry, it goes on paper (again, to keep the mess contained). I run a line of mask down the middle, place a piece of transparency film on top, secure one edge with tape so it dont slide while spreading, then gently pre-spread it with my finger. I then use a piece of glass to evenly press it down until the copper traces start to be easy visible. I try to stop at what I would call 50% transparent. Too thick or too thin is a problem. I give this stuff 2 minutes UV. After the cure, there will be loads of resist that didn't cure around the edges. I carefully peel the film off. Then, on a piece of sandpaper, I run the messy board across it at a 45 degree angle to remove the cured overhang without peeling it, and then wash the remaining uncured solder mask off with rubbing alcohol and paper towel. If a pad mask is used, I print that toner side up so I can use a drop of alcohol to optically bind it to the plastic that is spreading the mask and then press the glass down.

This is only cost effective if you don't count your time lol, its a heck of a mess and takes half a day. I see amazon now has brass via rivets for PCB work, I'm gonna have to pick me up some of those!
 
I was using mspaint for my masks, but after switching to linux, I had to learn GIMP and i am sure glad I did. You can draw things by entering the numbers too, so if you draw a rectangle in a random place, you can go to the tool panel and change the position, dimensions, thickness, corner radius etc, which is nice for making pads for parts. Staight lines with the pencil, just hold shift. Flipping, rotating, adding layers for pads, traces, outlines, labels and being able to hide them etc, it has all the features that photoshop has, but its free. And unlike MSPaint, when you tell it to use 600dpi, it actually stays that way lol.

I doubt I'll ever use a real board design program. To this day, I have no idea how to have one made. I wouldn't know where to begin at JLC or wherever the pros do it.
 
Mine sucked at first too, some still do, keep at it! I'm no expert, but I can detail how I do it. If anyone has improvements to this, Id love to hear them.

One thing that held me back for a long time was washing the boards with acetone before applying the resist film. No matter how much I sanded or cleaned with acetone, no matter how hot I got it or how hard I pressed the film down, it would partially peel off when I went to peel the second protective film back. I started using gloves and using washing soda to remove the oils before applying the resist and rinsing with distilled water. You know the oil is gone when the distilled water wets the entire surface smoothly without beading up anywhere. My acetone was too dirty for this.

Some say photoresist film only lasts a year, mine is 5 years old now. I keep it wrapped in black plastic, wrapped in aluminum foil, put that in a paper bag, and that goes under my metal desk. I only take it out in the bathroom with a red headlamp as my only light source. I will cut what I need, wrap up the rest, then keep that piece covered with a towel until needed. The entire time, from film cutting to developing, the room is dark. Some people do it in the daylight, that didn't work for me. My film is too sensitive I guess.

I'm too poor for a fancy laminator, so I use a hair dryer or hot air from the solder station set to 150C. I also have a block of aluminum (my adjustment tool/pen holder) that I heat to 170 in the toaster oven to help heat the board. When I get the board rinsed, shake it dry, I lay it on a piece of paper, peel the resist backing, and lay the resist down starting in the middle. I then rub the air out using a paper towel. A little moisture will not hurt, it even helps get the air out. Then, the board goes on the aluminum block and heated with air and I continue to rub with the paper towel under my finger until the board is almost too hot to touch. Any stubborn bubbles get poked with a needle and rubbed down. When I feel it is stuck down good, I let it cool before peeling off the other backing. That can be a pain too, so I flip the board over and lightly cut along the board edge with a sharp razor to cut the paper and cured resist that overhangs while trying not to cut the backing. I find the backing peels off better without lifting the resist that way. Again, all this is done in the dark with red light only. If some lifts away, don't quit, just fix it later.

The next step is placing the mask, toner side down, and held in place with a sheet of glass. I give it a minute with a fingernail curing UV light (thinking about going to 45 seconds, but everyones light is different). Once that minute is up, the UV is unplugged and the board goes into a warm solution of washing soda. The masked parts slowly dissolve away. Rubbing with a gloved finger helps. The lights are still off until this step is done. Rinse and dry.

The next step is at the bench under a magnifying glass to remove overexposure by picking it off with careful cutting and scraping. Touch up any missing resist that lifted away with fingernail paint and let dry. I also fingernail paint the back side if I am keeping that layer.

Once dry, it goes into the etch. This takes a while depending on etch solution and a soft toothbrush across it with the bristles at a safe angle helps speed things up.

After the board is etched, I rinse it, then use acetone to remove any fingernail paint, and then a potassium hydroxide bath to remove the photoresist.

The liquid solder mask is something I havent fully dialed in yet. You will want to wear gloves unless you want smurf hands. This stuff is harder to get to stick than the film. Again, washing soda works way better than hardware store acetone. I wash, rinse, then dry with hot air. After the board is dry, it goes on paper (again, to keep the mess contained). I run a line of mask down the middle, place a piece of transparency film on top, secure one edge with tape so it dont slide while spreading, then gently pre-spread it with my finger. I then use a piece of glass to evenly press it down until the copper traces start to be easy visible. I try to stop at what I would call 50% transparent. Too thick or too thin is a problem. I give this stuff 2 minutes UV. After the cure, there will be loads of resist that didn't cure around the edges. I carefully peel the film off. Then, on a piece of sandpaper, I run the messy board across it at a 45 degree angle to remove the cured overhang without peeling it, and then wash the remaining uncured solder mask off with rubbing alcohol and paper towel. If a pad mask is used, I print that toner side up so I can use a drop of alcohol to optically bind it to the plastic that is spreading the mask and then press the glass down.

This is only cost effective if you don't count your time lol, its a heck of a mess and takes half a day. I see amazon now has brass via rivets for PCB work, I'm gonna have to pick me up some of those!
I'm done with it. The last PCB I made, was with a resist pen, rub on trace decals and a drill. This was in the 80's.
 
  • Like
Reactions: brandon7861

dxChat
Help Users
  • No one is chatting at the moment.