Hi guys I am new to this forum and recently acquired a really clean Robyn T-240D this unit has very good recieve but very poor transmit as it is putting out under a watt, I am in the middle of replacing tubes to start with, does anyone know which tubes in this radio are for the transmit final section of this radio ? I will be probably replacing them all anyways but I would like to know which are for recieve and which ones are for transmit, also is there any other common issues with this radio that very low transmit wattage like caps ect. ? There are also 2 other power supplies in this radio other than the large one along with 2 transistors on the back of the unit which I wonder about ? Any info on this unit or recommendations would be greatly appreciated! Thanks

You are using an out of date browser. It may not display this or other websites correctly.
You should upgrade or use an alternative browser.
You should upgrade or use an alternative browser.
-
You can now help support WorldwideDX when you shop on Amazon at no additional cost to you! Simply follow this Shop on Amazon link first and a portion of any purchase is sent to WorldwideDX to help with site costs.
-
The Father's Day Retevis RA89R Winner is Announced! Click Here for more info!
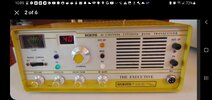
Beutiful Robyn T-240D " Yellow Bird" with very low TX issue, please help
- Thread starter Danzik
- Start date
have you tried the tune and load adjustments? they are accessable from the back of the radio,, check your manual if ya need to,,,
Hi , yes I did actually or at least one of them and attempted the other very carefully as not to break them because the factory used paint to glue them into place so they would not move in shipment and one is tight so I didn't get to move it, the one that moved didn't really make a differencehave you tried the tune and load adjustments? they are accessable from the back of the radio,, check your manual if ya need to,,,
I just got the other one loose very carefully with a Q tip and a drop of thinner and no go on bringing the power up, only getting 0.4 of a watt whistling into the michave you tried the tune and load adjustments? they are accessable from the back of the radio,, check your manual if ya need to,,,
Kind of a dismal proposition. Changing tubes can affect internal adjustments that are supposed to be "peaked", or tuned for max signal. Those adjustments are there in part because manufacturing tolerances in the tubes will change where the peak setting of an adjustment should be. Just changing one good tube for another good tube can reduce performance, either in the receiver or transmitter. Not because the new tube is bad, but only because it's a bit different on the inside of the tube. Once that adjustment is reset to match the new tube, the old performance comes back.
The really-bad news about this radio is that those adjustments are mostly locked down with a white enamel paint dribbled onto the threaded adjustment slugs. Inserting the non-metal hex tool into an adjustment slug won't make it move, but will crack it if you turn the tool with enough force. Once that happens, turning the tool again just forces the cracked halves of the slug against the inside of the threaded form. Kinda like the centrifugal clutch on a go-kart. Solvents can loosen the white glop, but they tend to soften the glue holding the coil to the inside of the can. When that happens, turning the alignment tool spins the innards around inside and severs the wires. Bad juju, that.
Like "my car won't go over 20 miles per hour". More than one possible cause. No simple way to pin that down sight unseen.
Troubleshooting requires some resources. If you don't have access to a tube tester, you can tryi a known-good tube one at a time for each of the tubes in the transmit side. This only works if you have good spares on hand.
The calibrated eyeball is the one tool you probably have. A bright light on the circuitry under the transmit tubes can reveal parts that are visibly scorched or discolored.
A schematic diagram with DC voltage notations only helps if you have a meter to make DC-voltage measurements.
Troubleshooting is a process of identifying what's not broken, one circuit section at a time. Hard to do without a diagram and the means to make some measurements. The two transistors on the back panel are there to power the radio from a 12-Volt DC source. They are not active when running it from the AC power cord.
This particular radio model came from Panasonic. They put different name badges on versions of this radio sold by Robyn, Teaberry, Colt, Gemtronix and others. It was a decent performer when it was new, but it would age rapidly, in part because it runs hot inside. High temperatures age the components faster. The way it's built isn't particularly end-use friendly. Maintaining one of them calls for a lot of labor to work around the glued-down tuning adjustment slugs.
My experience is that it will be an uphill slog unless you get lucky.
73

Lots of good info here, thank you ! Now I know what those transistors are for on the back too. I did just now aquire a tube tester but everything I have tested so far has tested good except for the F lever on a couple tubes so far, we'll see what that is about later may it be the tester itself or faulty tube, I am basically installing all new tubes in the radio anyways, not used and power has not changed at all whatsoever I really think it is somthing else like a capacitor, i am very carefully getting those adjustments broke lose though without any damage so farKind of a dismal proposition. Changing tubes can affect internal adjustments that are supposed to be "peaked", or tuned for max signal. Those adjustments are there in part because manufacturing tolerances in the tubes will change where the peak setting of an adjustment should be. Just changing one good tube for another good tube can reduce performance, either in the receiver or transmitter. Not because the new tube is bad, but only because it's a bit different on the inside of the tube. Once that adjustment is reset to match the new tube, the old performance comes back.
The really-bad news about this radio is that those adjustments are mostly locked down with a white enamel paint dribbled onto the threaded adjustment slugs. Inserting the non-metal hex tool into an adjustment slug won't make it move, but will crack it if you turn the tool with enough force. Once that happens, turning the tool again just forces the cracked halves of the slug against the inside of the threaded form. Kinda like the centrifugal clutch on a go-kart. Solvents can loosen the white glop, but they tend to soften the glue holding the coil to the inside of the can. When that happens, turning the alignment tool spins the innards around inside and severs the wires. Bad juju, that.
Like "my car won't go over 20 miles per hour". More than one possible cause. No simple way to pin that down sight unseen.
Troubleshooting requires some resources. If you don't have access to a tube tester, you can tryi a known-good tube one at a time for each of the tubes in the transmit side. This only works if you have good spares on hand.
The calibrated eyeball is the one tool you probably have. A bright light on the circuitry under the transmit tubes can reveal parts that are visibly scorched or discolored.
A schematic diagram with DC voltage notations only helps if you have a meter to make DC-voltage measurements.
Troubleshooting is a process of identifying what's not broken, one circuit section at a time. Hard to do without a diagram and the means to make some measurements. The two transistors on the back panel are there to power the radio from a 12-Volt DC source. They are not active when running it from the AC power cord.
This particular radio model came from Panasonic. They put different name badges on versions of this radio sold by Robyn, Teaberry, Colt, Gemtronix and others. It was a decent performer when it was new, but it would age rapidly, in part because it runs hot inside. High temperatures age the components faster. The way it's built isn't particularly end-use friendly. Maintaining one of them calls for a lot of labor to work around the glued-down tuning adjustment slugs.
My experience is that it will be an uphill slog unless you get lucky.
73
Seems as if someone has done alot of work to it before ! I am guessing they repaired the rx section in it that alot of these radios had problems with, I can tell alot of the resistors are the newer tan color instead of the darker brown color Not much you can do with that radio aside from replacing the tubes. If that dont work i suggest you dispose of it in the trash.

Wouldn't it be wise for me to try this radio on a 12 v power source then as I have not tried it and not real sure how it is to be done but I am wondering if I won't get different resultsKind of a dismal proposition. Changing tubes can affect internal adjustments that are supposed to be "peaked", or tuned for max signal. Those adjustments are there in part because manufacturing tolerances in the tubes will change where the peak setting of an adjustment should be. Just changing one good tube for another good tube can reduce performance, either in the receiver or transmitter. Not because the new tube is bad, but only because it's a bit different on the inside of the tube. Once that adjustment is reset to match the new tube, the old performance comes back.
The really-bad news about this radio is that those adjustments are mostly locked down with a white enamel paint dribbled onto the threaded adjustment slugs. Inserting the non-metal hex tool into an adjustment slug won't make it move, but will crack it if you turn the tool with enough force. Once that happens, turning the tool again just forces the cracked halves of the slug against the inside of the threaded form. Kinda like the centrifugal clutch on a go-kart. Solvents can loosen the white glop, but they tend to soften the glue holding the coil to the inside of the can. When that happens, turning the alignment tool spins the innards around inside and severs the wires. Bad juju, that.
Like "my car won't go over 20 miles per hour". More than one possible cause. No simple way to pin that down sight unseen.
Troubleshooting requires some resources. If you don't have access to a tube tester, you can tryi a known-good tube one at a time for each of the tubes in the transmit side. This only works if you have good spares on hand.
The calibrated eyeball is the one tool you probably have. A bright light on the circuitry under the transmit tubes can reveal parts that are visibly scorched or discolored.
A schematic diagram with DC voltage notations only helps if you have a meter to make DC-voltage measurements.
Troubleshooting is a process of identifying what's not broken, one circuit section at a time. Hard to do without a diagram and the means to make some measurements. The two transistors on the back panel are there to power the radio from a 12-Volt DC source. They are not active when running it from the AC power cord.
This particular radio model came from Panasonic. They put different name badges on versions of this radio sold by Robyn, Teaberry, Colt, Gemtronix and others. It was a decent performer when it was new, but it would age rapidly, in part because it runs hot inside. High temperatures age the components faster. The way it's built isn't particularly end-use friendly. Maintaining one of them calls for a lot of labor to work around the glued-down tuning adjustment slugs.
My experience is that it will be an uphill slog unless you get lucky.
73
again did you check the owners manual? the plug for the 12 volts is jumpered and specialized for 12 volts,,, i am unsure you knew what i meant about thee tune and load on the back of the set,,, again check the owners manual it is a big help in operating and maintaining this style of radio
A word of caution that’s not mentioned about those octal plugs, always make sure the power cord is unplugged from the wall socket first before attaching the octal plug. IMO the key post on male side should have been made a little longer to avoid any pins from making contact incorrectly before the plug is locked into place. Years ago I did major damage to one and have since worked on a few others radios that were damaged the same way.
Nomad gave a great overview about restoring these sets earlier. I would also recommend Mikes Radio Repair YouTube video if you haven’t seen it already. He has an excellent visual representation for what’s involved.
Nowadays when I see one, I can’t help dream about striping the entire chassis and installing a modern radio inside that beautiful case, but in reality that takes considerable time too, an undoubtedly belongs to someone younger with more time.
Yep, I jumped the pins for 12v operation just like the schematic shows, the tubes would glow in standby but the radio did nothing more when turned on off 12v operation. Yes, I think I know which tune and load coils you were referring to on the bottom of the radio and I was able to get the paint loose and the barrels freed without any damage but adjusting them only lowered the power output even more, thanks for the help as it is appreciatedagain did you check the owners manual? the plug for the 12 volts is jumpered and specialized for 12 volts,,, i am unsure you knew what i meant about thee tune and load on the back of the set,,, again check the owners manual it is a big help in operating and maintaining this style of radio
again did you check the owners manual? the plug for the 12 volts is jumpered and specialized for 12 volts,,, i am unsure you knew what i meant about thee tune and load on the back of the set,,, again check the owners manual it is a big help in operating and maintaining this style of radio

I did it just like it shows for 12v operation there
Yes, I sure understand that ! Yeah that notch doesn't stick up much and I have always had it unplugged when I hooked to the radio but that doesn't mean whoever had it before me didA word of caution that’s not mentioned about those octal plugs, always make sure the power cord is unplugged from the wall socket first before attaching the octal plug. IMO the key post on male side should have been made a little longer to avoid any pins from making contact incorrectly before the plug is locked into place. Years ago I did major damage to one and have since worked on a few others radios that were damaged the same way.
Nomad gave a great overview about restoring these sets earlier. I would also recommend Mikes Radio Repair YouTube video if you haven’t seen it already. He has an excellent visual representation for what’s involved.
Nowadays when I see one, I can’t help dream about striping the entire chassis and installing a modern radio inside that beautiful case, but in reality that takes considerable time too, an undoubtedly belongs to someone younger with more time.
dxChat
- No one is chatting at the moment.
-
-
-
dxBot:boog351 has left the room.
-
@ BJ radionut:
June VHF
The American Radio Relay League (ARRL) is the national association for amateur radio, connecting hams around the U.S. with news, information and resources.www.arrl.org
-