Fixing a Pride DX300 with a failed power or filament transformer used to be simple. Call RF Parts and order a new one.
That was then, this is now. They ran out of originals years ago, and any design records of replacements made by Peter Dahl are lost to the sands of time. Those parts never made it into his amateur replacement transformer catalog. And that's all the Hammond has to work from. The design files they obtained when they bought the name don't include this amplifier at all. Never mind he made one for you 15 years ago. He's not around to make you another one any more.
Dern!
Never mind the small low-voltage transformer. That's a can of worms to crack open another day. Here's what we have been using to replace the big HV transformer. The last couple of derelict Prides that we rebuilt and sold off had a perfectly-good high-voltage transformer in them. Dern good luck, that. Just the same, we removed it and installed this substitute. Mostly to prove that it's practical and reliable. So far, so good.
The original HV transformer was about half-again as large as needed to run one tube. Made it quite reliable. But sooner or later someone just keeps blowing bigger and bigger fuses until the transformer smokes. As the years go by, the death toll just creeps ever upwards. The toroid transformer we'll use is rated at 400 Volt-Amps. At 50 Hz. Since we'll be running it at 60 Hz, add 20 percent to the power rating. 480 Watts sounds pretty close to 500. And to run a 250-Watt tube, this should be about right. This kind of amplifier tends to be about 50 percent efficient. Half of that 500 Watts will make out onto the coax, the rest becomes heat in the tube's cooling air.
It comes from Antek, run by John Ango. His web site is http://www.antekinc.com

It's held in place with a single 5/16" bolt down the center hole. A dish washer keeps it centered, and a rubber washer protects the top and bottom surfaces.

It will just fit in place of the old one, but only by hanging slightly over the edge of the chassis surface at the front.


Sure enough, the dismembered chassis deck seen here arrived in the form of a genuine "basket case" amplifier. For now, it's missing the front panel and rear panel. This one might be an amplifier again, might not.
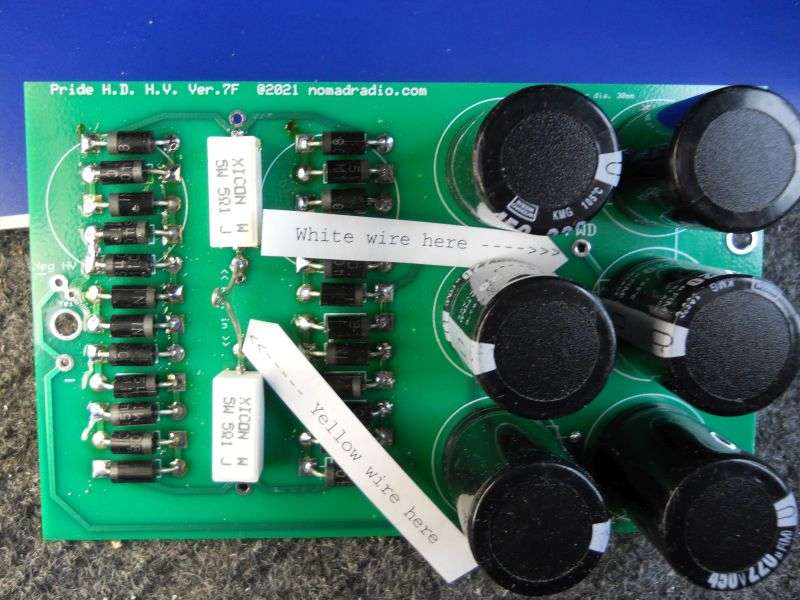
The key to using this tranformer is that the original full-wave bridge rectifier won't work. This one has two 430-Volt secondary windings that we'll connect in series for 860 Volts. The replacement/upgrade high-voltage pc board we sell for the Pride's stock transformer is designed for this adaptation. The original 100uf filter caps get upped to 220uf. This is necessary because of the way a doubler circuit operates. Not a big deal, but a little more expensive than the stock capacitor.
Before I can market this combo of transformer and circuit board, I'll need detailed instructions to get it all working.
This is just the first start of that chore.

The large "ignore this" hole was for a second tube. If the upgrade to two tubes had been done right, this amplifier would probably still be on the air. It may or may not again see the light of day as a one-tuber. Too much sheet metal work, looks like to me.
No need for pics of our HV circuit board with larger caps. Not exactly hard to visualize. And I haven't got them back from the assembly guy, anyway.
More as this project develops. Now that I sunk money into a carton of transformers, we need to turn this proposition back into cash flow.
73
That was then, this is now. They ran out of originals years ago, and any design records of replacements made by Peter Dahl are lost to the sands of time. Those parts never made it into his amateur replacement transformer catalog. And that's all the Hammond has to work from. The design files they obtained when they bought the name don't include this amplifier at all. Never mind he made one for you 15 years ago. He's not around to make you another one any more.
Dern!
Never mind the small low-voltage transformer. That's a can of worms to crack open another day. Here's what we have been using to replace the big HV transformer. The last couple of derelict Prides that we rebuilt and sold off had a perfectly-good high-voltage transformer in them. Dern good luck, that. Just the same, we removed it and installed this substitute. Mostly to prove that it's practical and reliable. So far, so good.
The original HV transformer was about half-again as large as needed to run one tube. Made it quite reliable. But sooner or later someone just keeps blowing bigger and bigger fuses until the transformer smokes. As the years go by, the death toll just creeps ever upwards. The toroid transformer we'll use is rated at 400 Volt-Amps. At 50 Hz. Since we'll be running it at 60 Hz, add 20 percent to the power rating. 480 Watts sounds pretty close to 500. And to run a 250-Watt tube, this should be about right. This kind of amplifier tends to be about 50 percent efficient. Half of that 500 Watts will make out onto the coax, the rest becomes heat in the tube's cooling air.
It comes from Antek, run by John Ango. His web site is http://www.antekinc.com
It's held in place with a single 5/16" bolt down the center hole. A dish washer keeps it centered, and a rubber washer protects the top and bottom surfaces.
It will just fit in place of the old one, but only by hanging slightly over the edge of the chassis surface at the front.
Sure enough, the dismembered chassis deck seen here arrived in the form of a genuine "basket case" amplifier. For now, it's missing the front panel and rear panel. This one might be an amplifier again, might not.
The key to using this tranformer is that the original full-wave bridge rectifier won't work. This one has two 430-Volt secondary windings that we'll connect in series for 860 Volts. The replacement/upgrade high-voltage pc board we sell for the Pride's stock transformer is designed for this adaptation. The original 100uf filter caps get upped to 220uf. This is necessary because of the way a doubler circuit operates. Not a big deal, but a little more expensive than the stock capacitor.
Before I can market this combo of transformer and circuit board, I'll need detailed instructions to get it all working.
This is just the first start of that chore.
The large "ignore this" hole was for a second tube. If the upgrade to two tubes had been done right, this amplifier would probably still be on the air. It may or may not again see the light of day as a one-tuber. Too much sheet metal work, looks like to me.
No need for pics of our HV circuit board with larger caps. Not exactly hard to visualize. And I haven't got them back from the assembly guy, anyway.
More as this project develops. Now that I sunk money into a carton of transformers, we need to turn this proposition back into cash flow.
73