
In the first part of my review of the Radioddity HF-010 portable HF Antenna, I covered the basic setup, tuning and build quality of this antenna with some comparisons to competing products on the market. In my first outing, I did not have time to test it out on lower bands like 40 and 80 meters. Today I got a chance to head back out to the park to set it up to see how difficult it is to get going on these lower, much more tuning sensitive bands. I decided to start on 80 meters since this band is typically much more difficult to set up.
80 Meters Testing
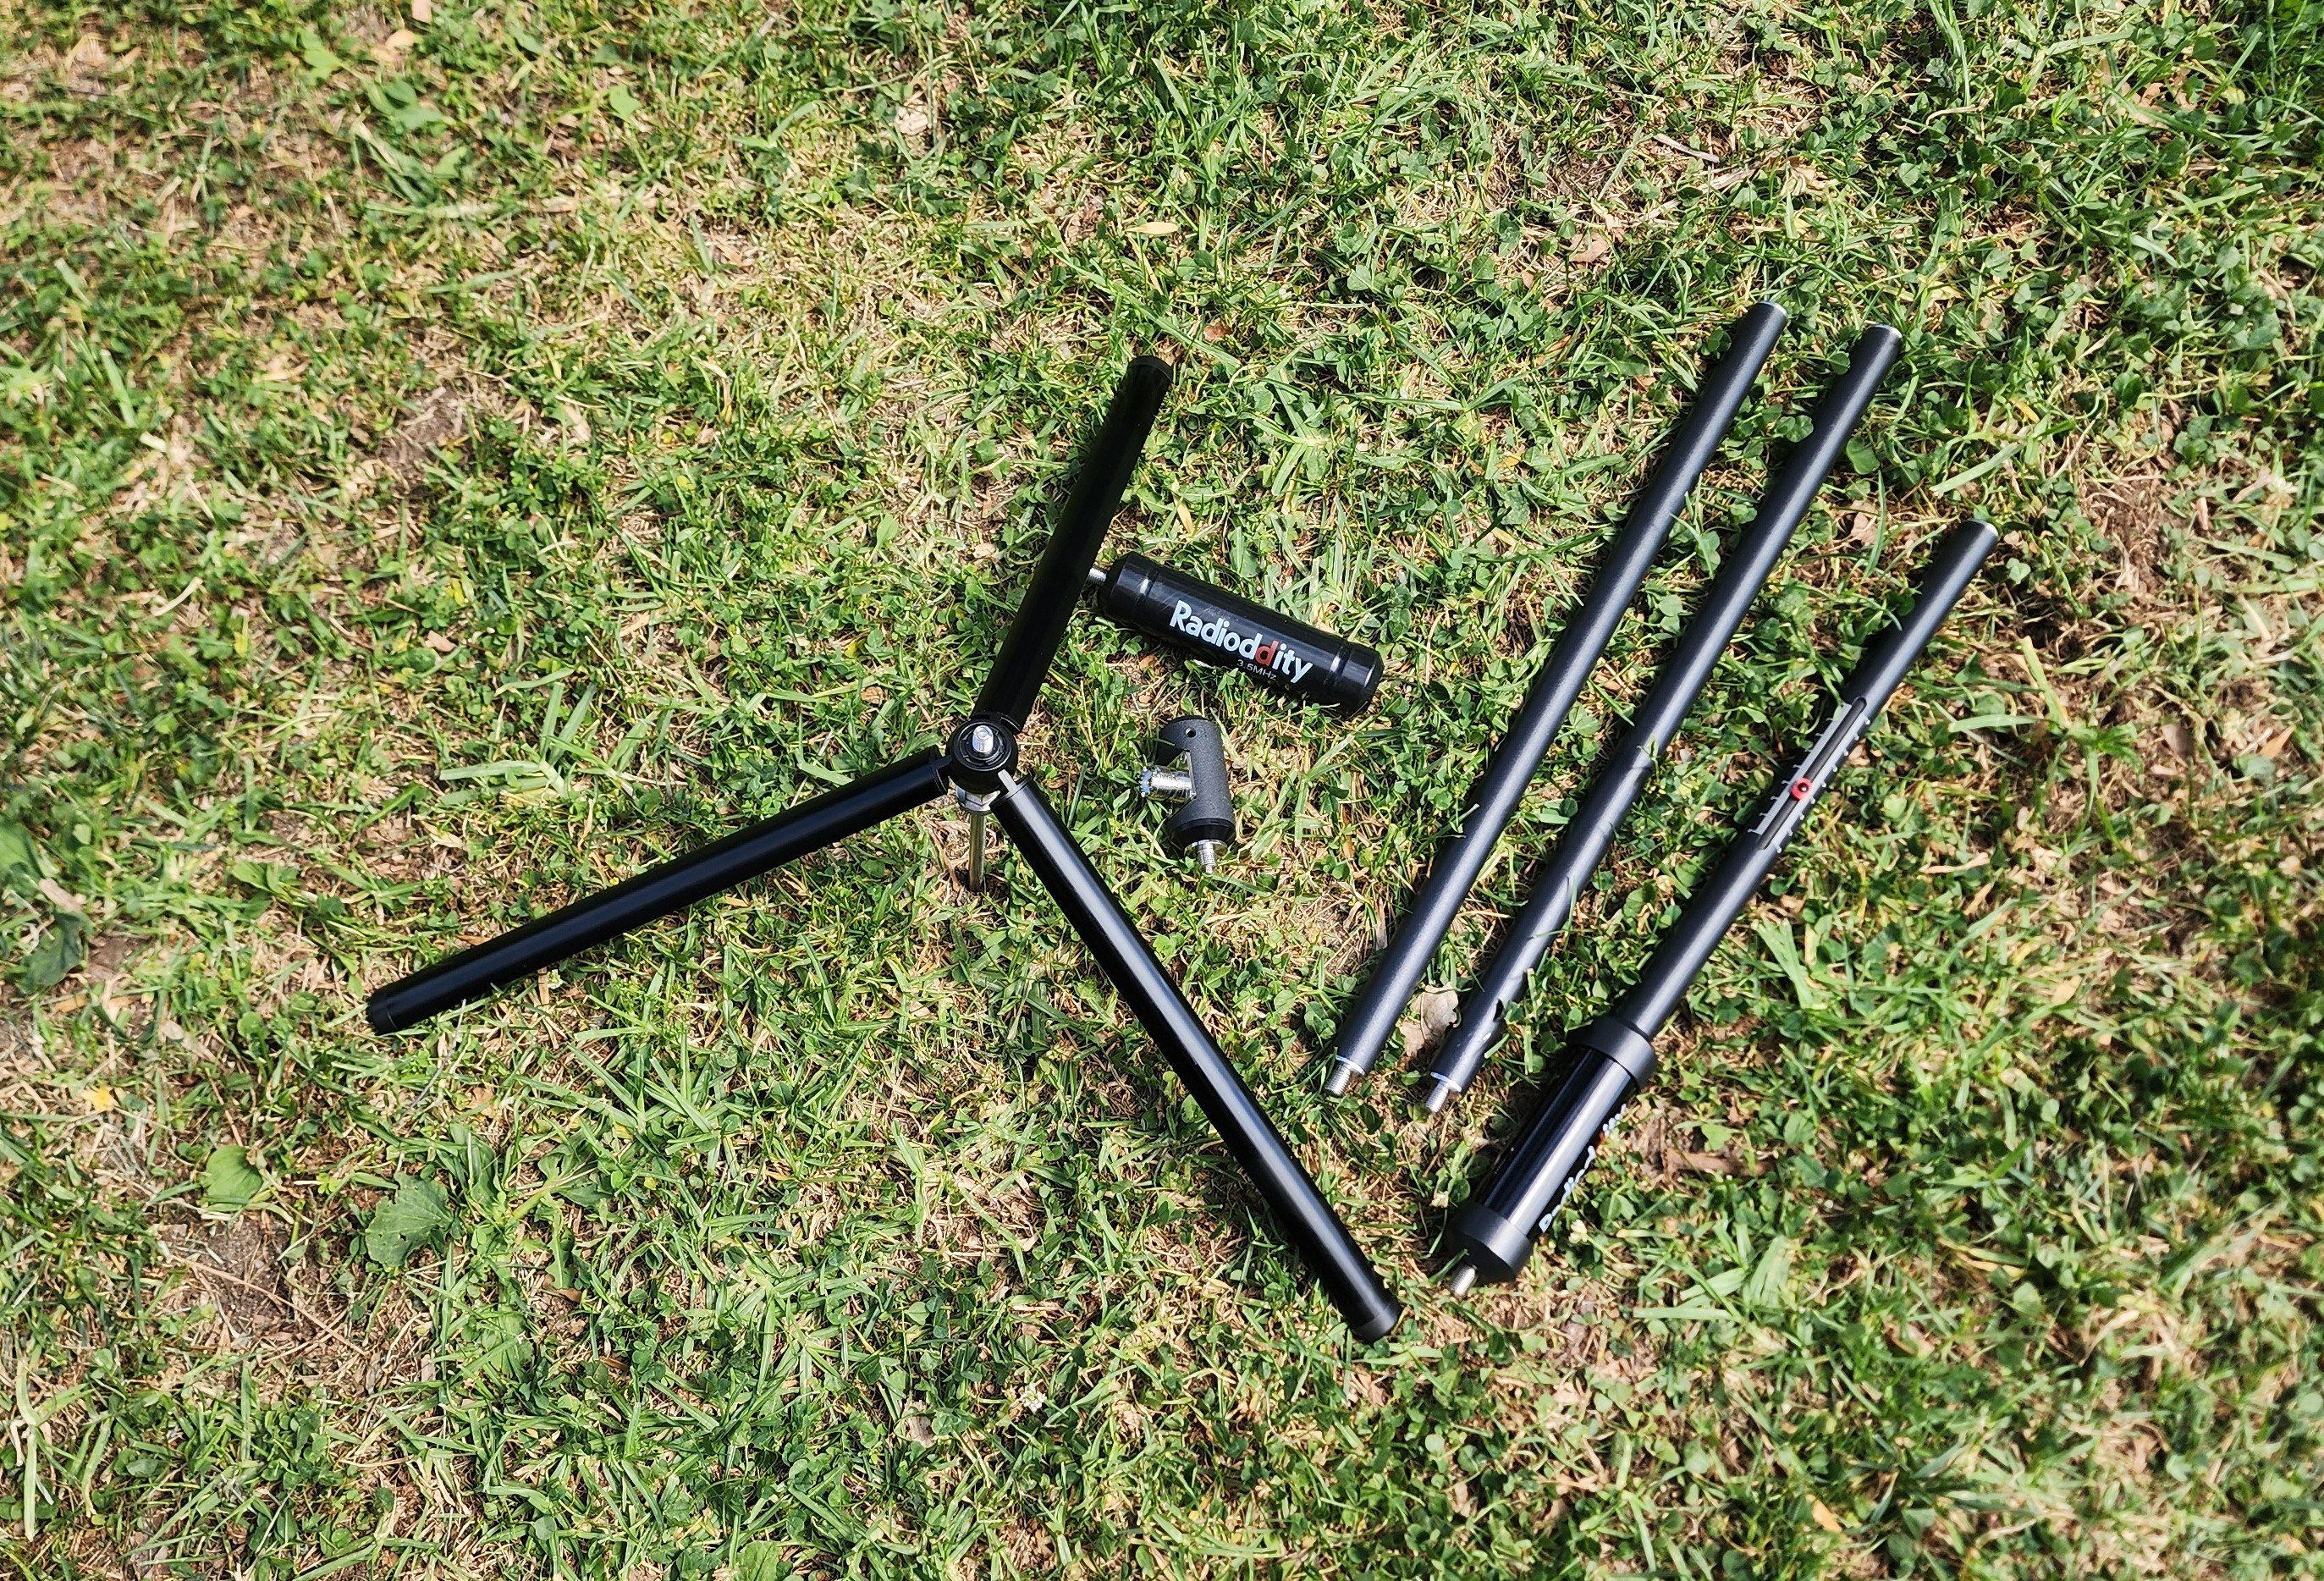
As noted earlier, the antenna kit comes with a dedicated 80 meter load coil, pictured here with the Radioddity logo on it.
For preparation for this test, I searched around the internet to see if anyone else had tried this band and learn from any difficulties they encountered. I found a few posts, but several of those, for whatever reason, had deviated from the include parts and instructions. To be fair to the manufacturer, I decided to follow the instructions exactly.
When set up for 80 meters, you swap the adjustable load coil section for the 80 meter coil - they are not used together. You also don't use any of the included radials, which immediately informs us that the antenna is designed to use the coax for the counterpoise on on this band. I'm not crazy about this design, but it's a choice that is not terribly worse than other portable antennas on the market that do the same. In any case, I just wanted to test how hard it was to dial in to get on the air.
In my first hasty assembly, I adjusted the whip to the length documented in the manual, stretched out the coax and took a reading on my NanoVNA. As I mentioned in part 1 of this review, if you don't have one of these to make field setup quick and easy, you really should pick one up since they're only about $100 on Amazon: https://amzn.to/3QBB3hh. The first reading showed that the low 1.85:1 SWR was slightly below the frequency that the owners manual indicated, but that shouldn't be surprising since a lot of factors will affect the reading on this band.
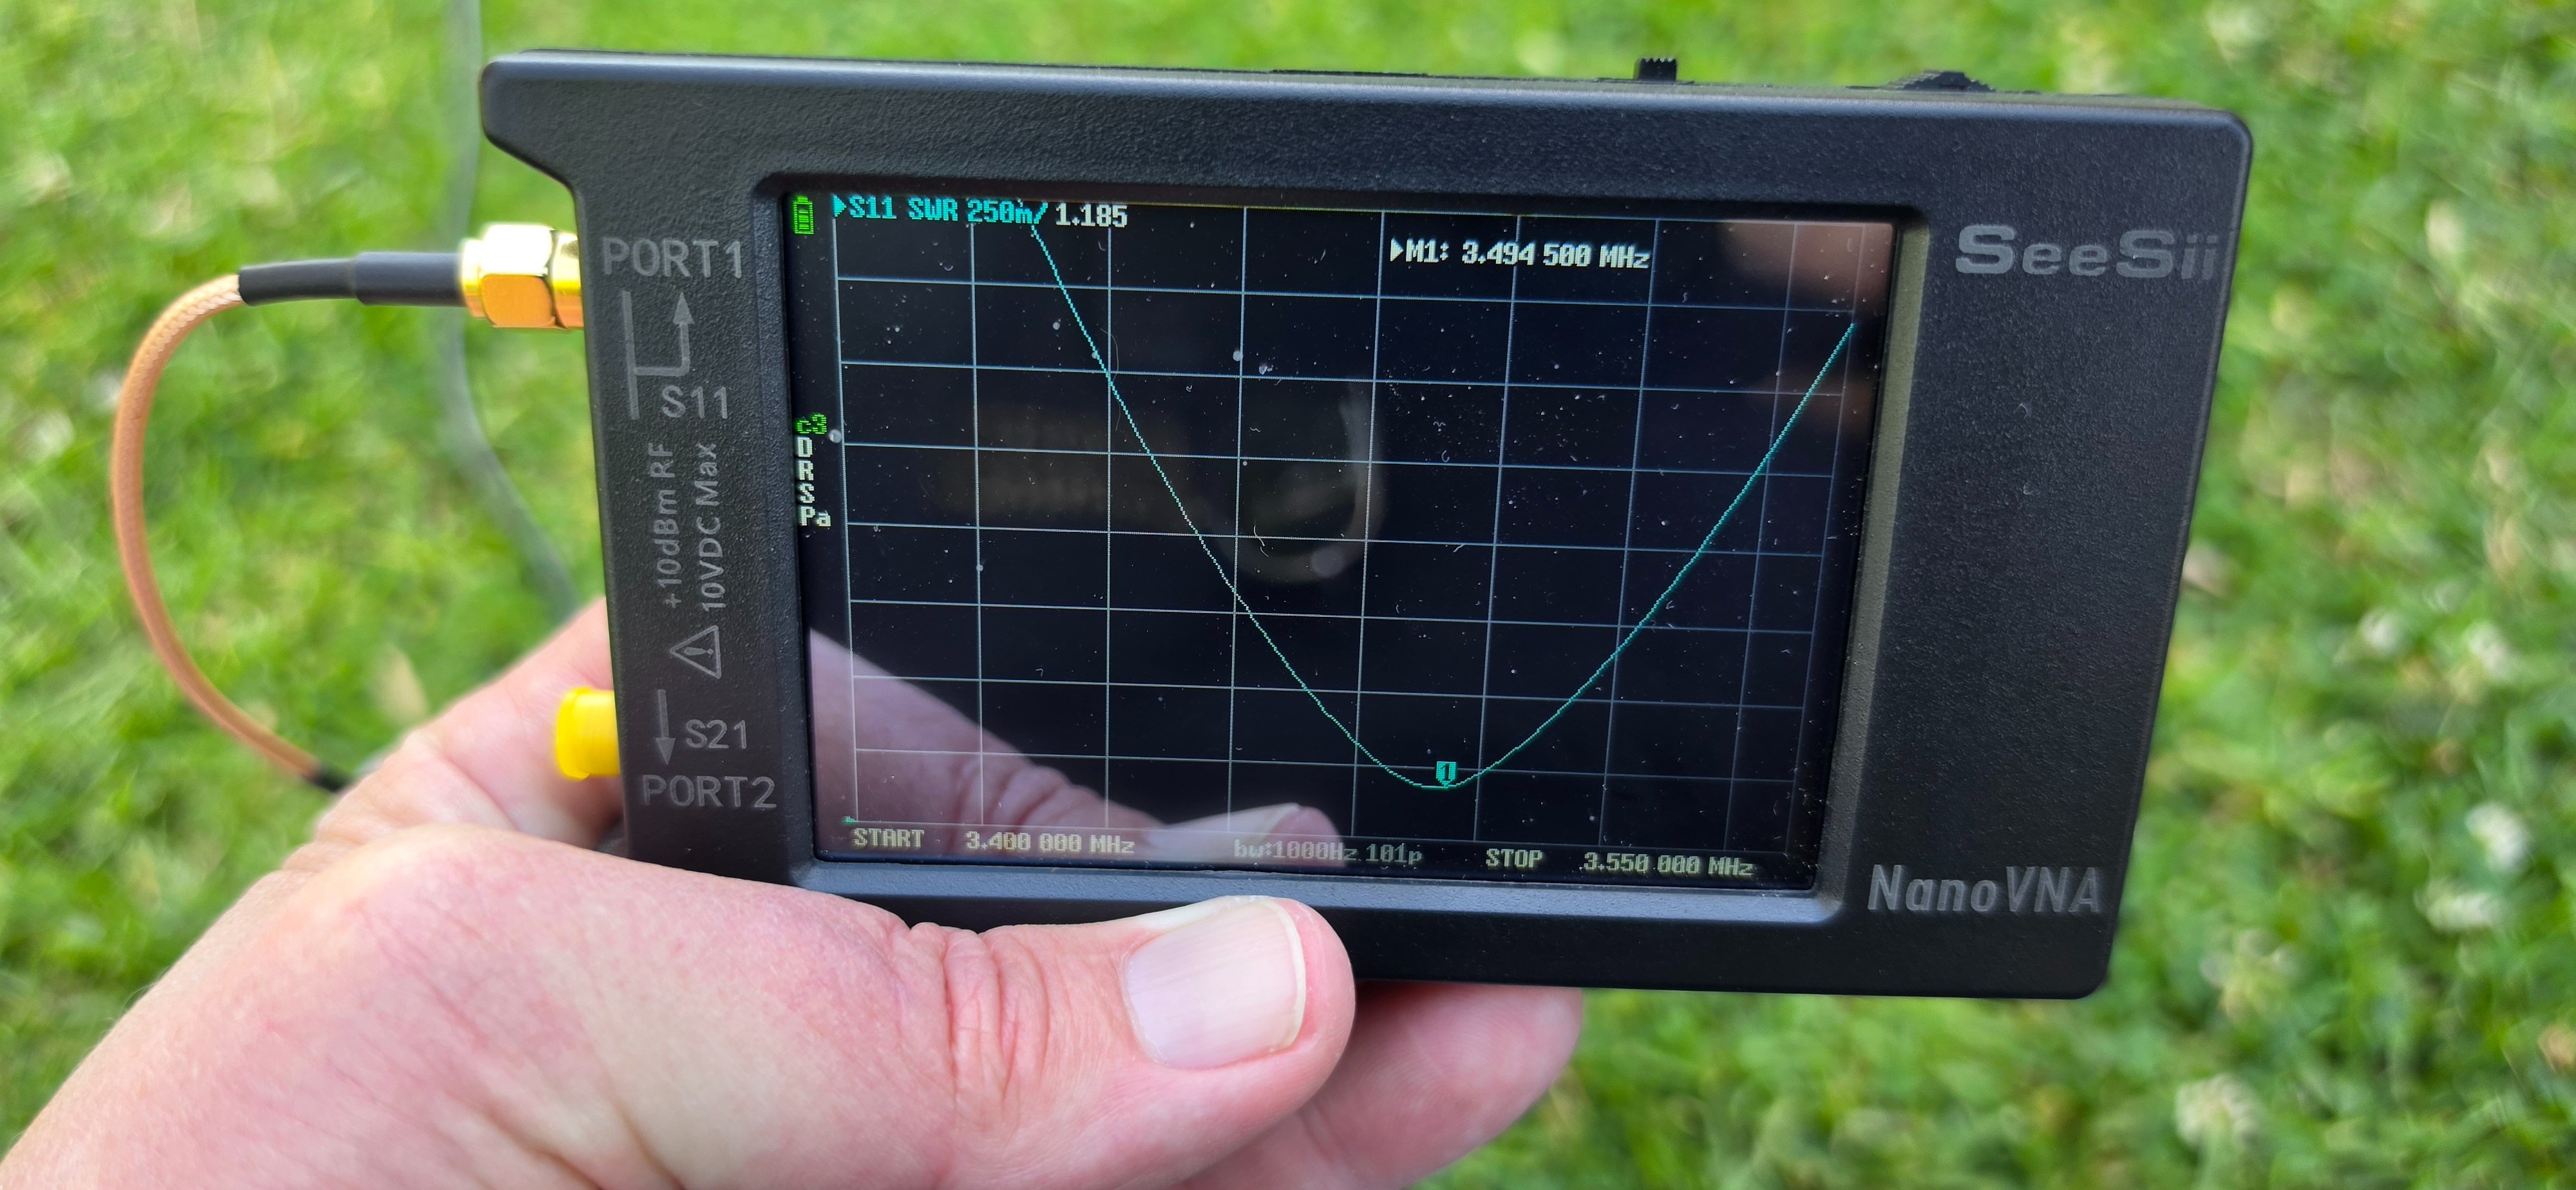
I noticed that the SWR moved around quite a bit depending on how the coax was positioned, which is what happens when it's used as the counterpoise. You'll want the coax as straight as possible; even elevating it a bit changes the reading. I was sitting on the grass and decided to raise the NanoVNA coax end off the grass as if I had a radio in my lap. Once into "operating position", the SWR became stable, but it did interact with my body if I grabbed the coax. These are all the downsides of an antenna designed like this, but on this band, it's really just designed to get you on the air as easily as possible.
I usually operate in the phone band, so I wanted to see how difficult it is to adjust. All I did was lower the whip from the base until I got the reading I wanted:
For this frequency, the final whip measurement was 74", and the meter shows under 2:1 SWR at about 80 Hz of bandwidth. It really was simple to get the SWR to dip down to 1.18:1, especially when you're using the NanoVNA.
40 Meters Testing
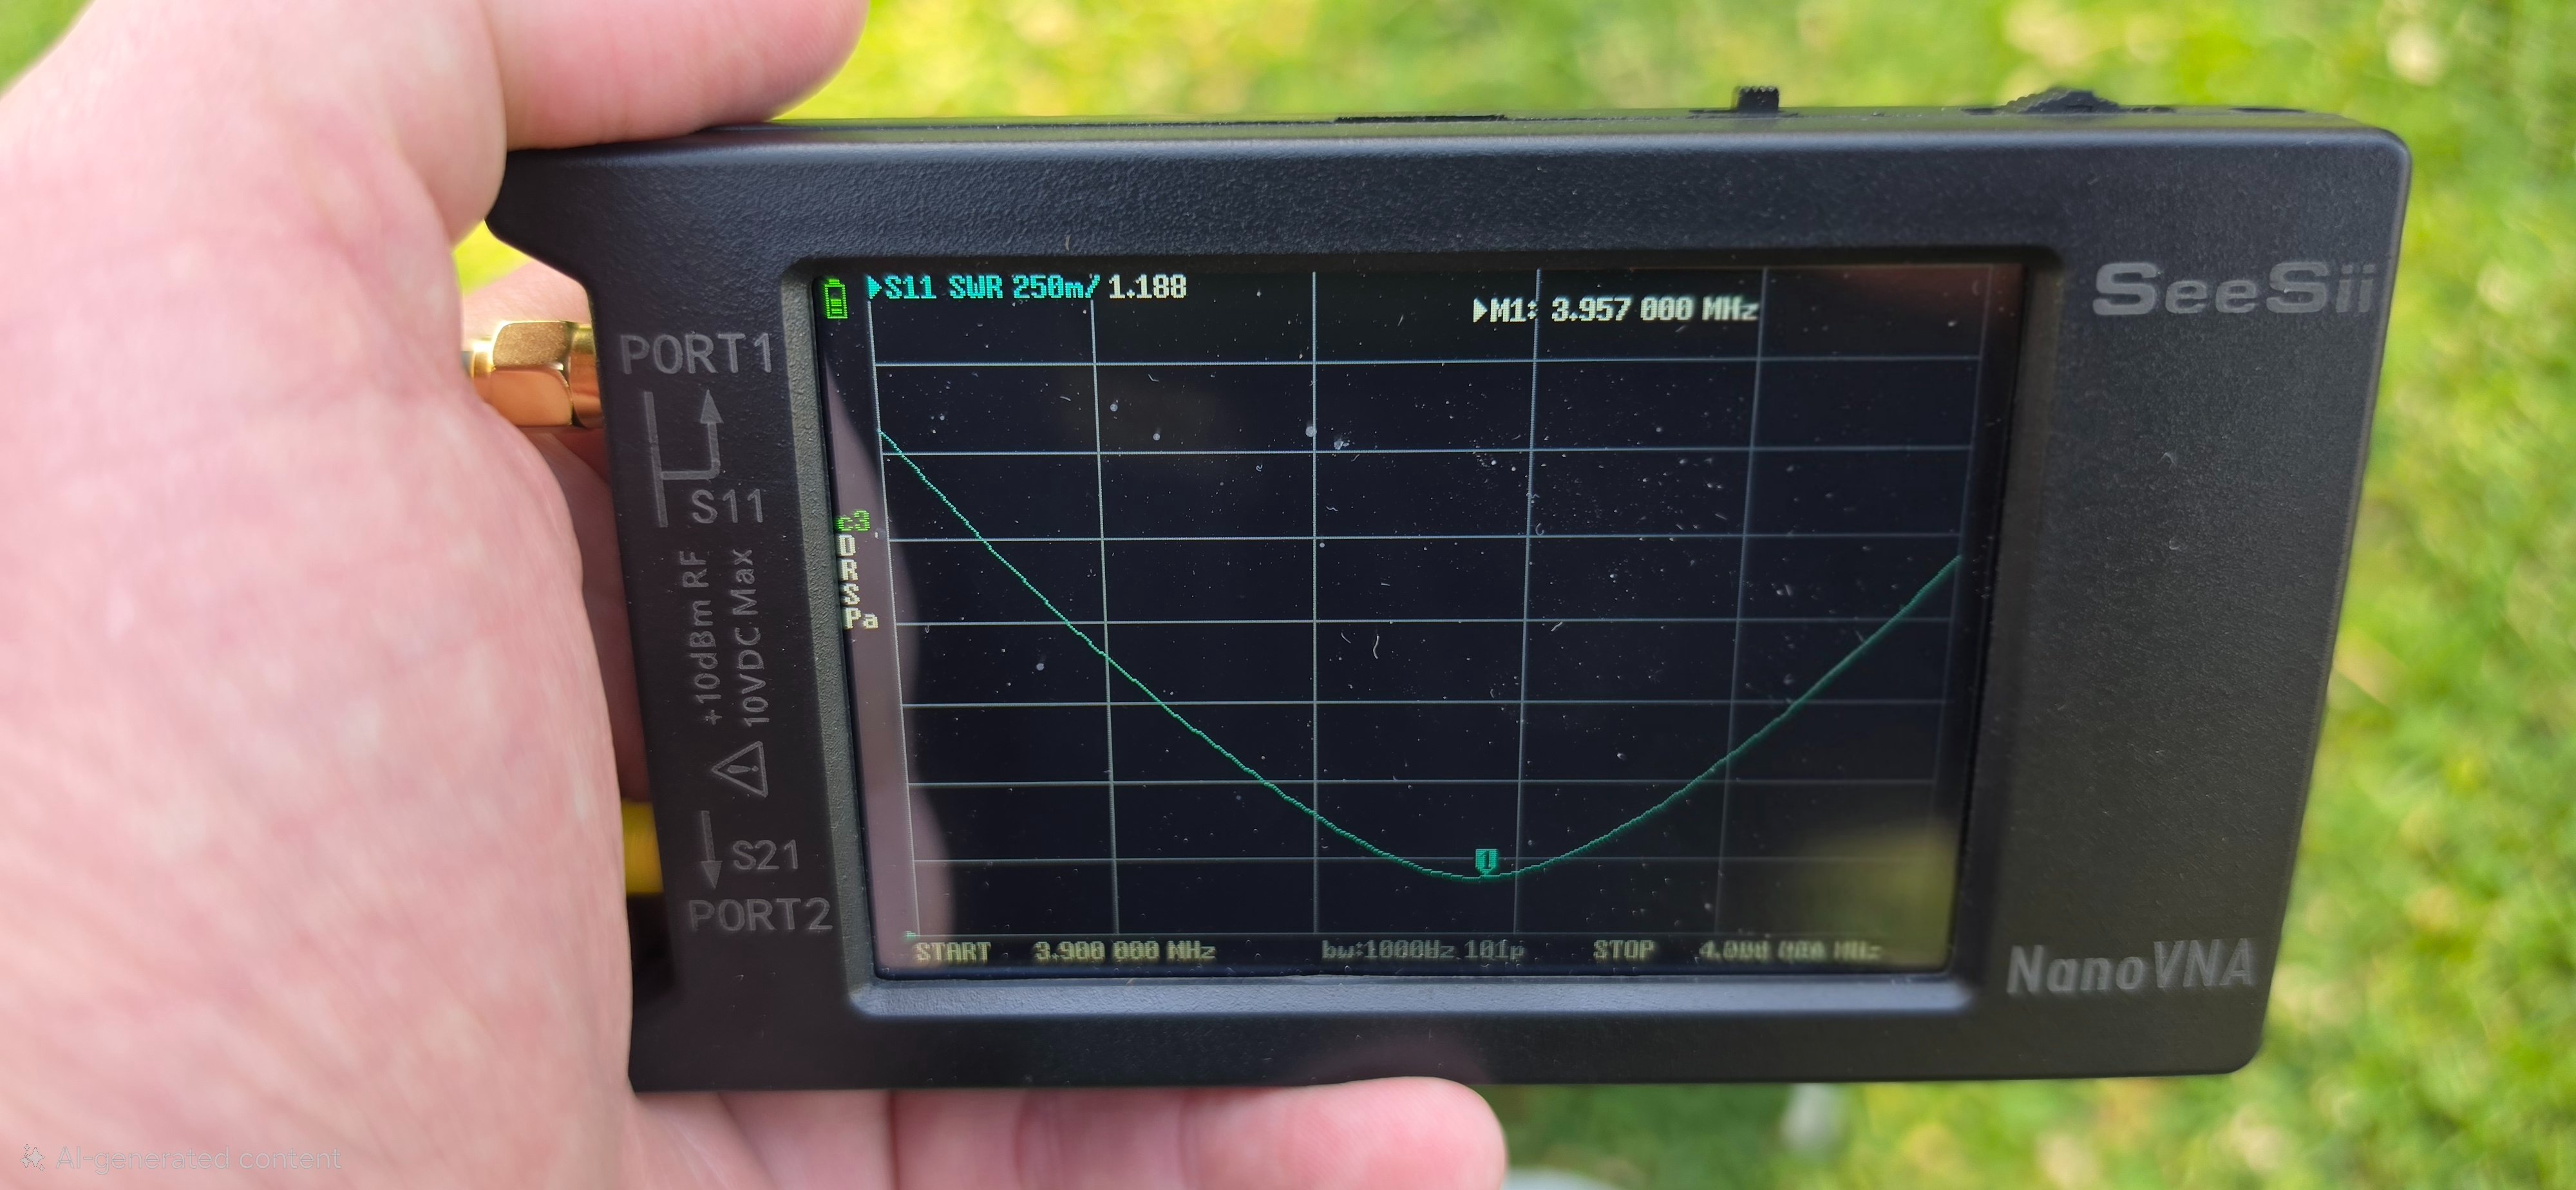
Next I wanted to change it over to 40 meters and take a few measurements. My purpose was two-fold: how fast I could change the band setup and how long it would take to dial the antenna in. Swapping to this band is just a matter of changing the 80 meter load coil for the adjustable shaft / coil, attaching the ground radials and laying them all the way out, and extending the whip all the way up. That operation took almost exactly 5 minutes. I set the tuning indicator as suggested in the manual and then adjusted to where I like to operate while taking readings on the NanoVNA. On 40 meters, the coil adjustment is sensitive but still easy. Within another couple of minutes, I had the antenna adjusted where I wanted it in the phone portion of the band.
Here, the antenna is broad-banded enough that it covers the entire phone portion under 2:1 SWR.
Here are a few observations and recommendations for using this antenna on these bands: First, follow the instructions. Don't try to reengineer the antenna on 80 meters until you've set it up successfully with the included components, including the coax. The load coil, shafts, whip, and coax length are all tuned as a system. If you add toroids, or common mode chokes on the coax, it's not going to work without other modifications. Don't coil the coax. I will probably mess around with alternative ground radial systems when I have time, which would be a fun experiment. I may try this antenna on 80 meters with the included load coil and some Buddipole components, including the VersaTee and Triple Ratio Switch Balun. That will wait for another day, though. If I really want to operate portable on 80 meters and have the setup time, I will likely choose a different, more efficient package, but I like that the HF-010 gives me options.
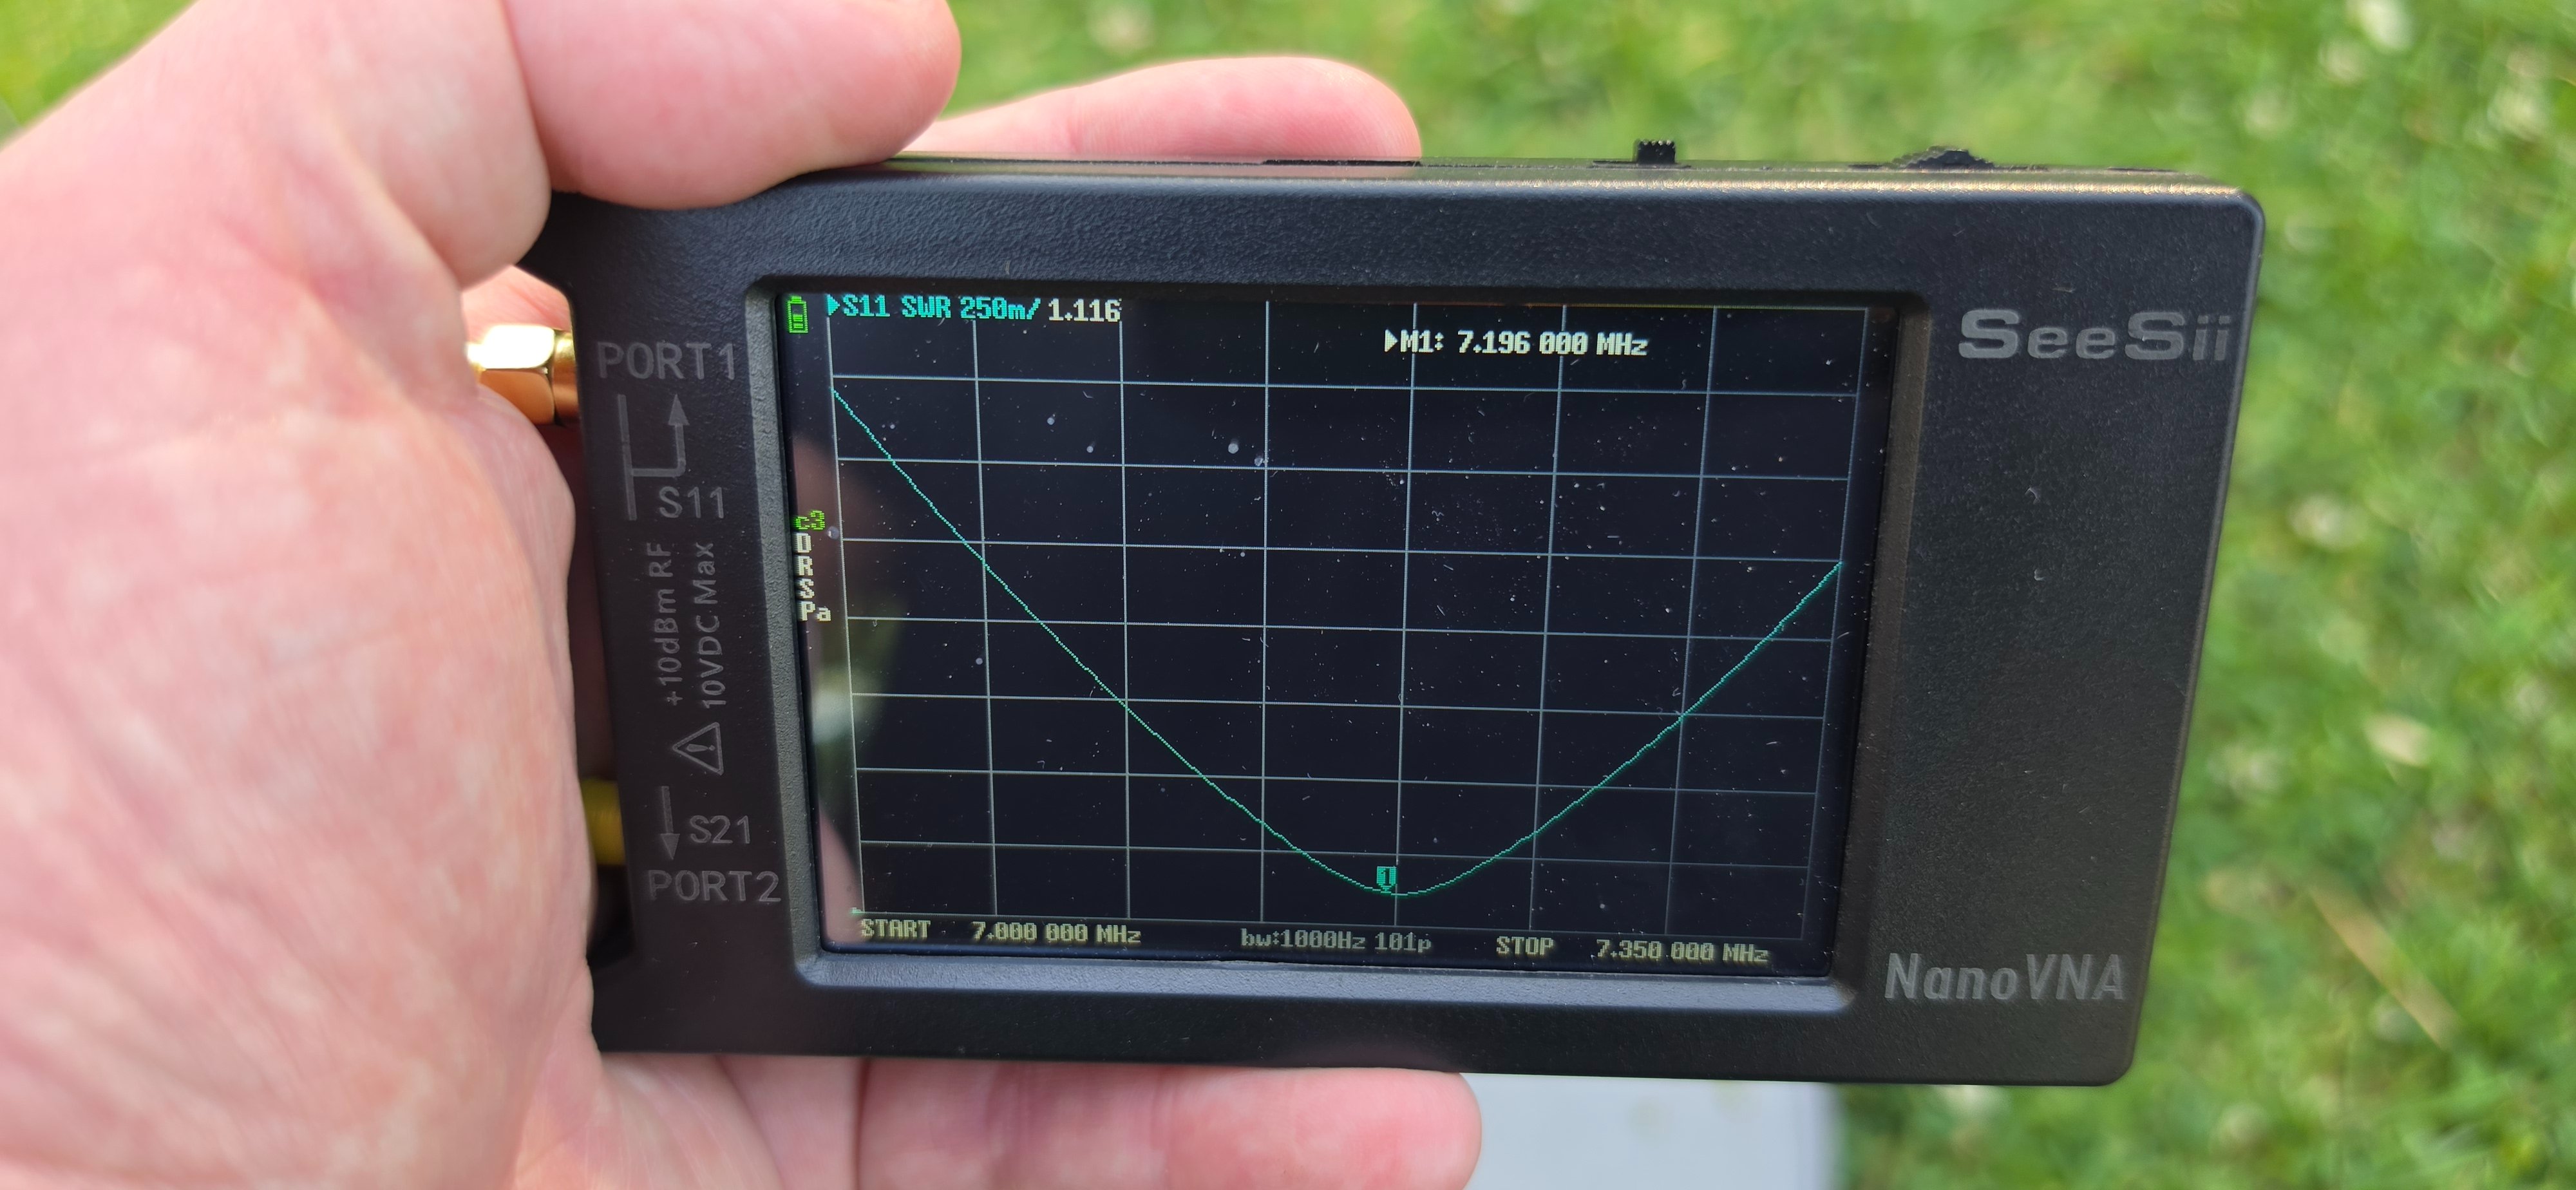
I'm still impressed at how easy it is to assemble and quickly get on the air, regardless of efficiency trade-offs on the lower bands. If you primarily operate CW or digital modes such as FT8 on these bands, you'll make plenty of contacts. For 6-40 meters, this might be one of the quickest "tuned" style antennas you can buy.
More info on the kit can be found on the Radioddity website:

 www.radioddity.com
P.S., I ditched the coax reel...that thing is a hassle.
80 Meters Testing
As noted earlier, the antenna kit comes with a dedicated 80 meter load coil, pictured here with the Radioddity logo on it.
For preparation for this test, I searched around the internet to see if anyone else had tried this band and learn from any difficulties they encountered. I found a few posts, but several of those, for whatever reason, had deviated from the include parts and instructions. To be fair to the manufacturer, I decided to follow the instructions exactly.
When set up for 80 meters, you swap the adjustable load coil section for the 80 meter coil - they are not used together. You also don't use any of the included radials, which immediately informs us that the antenna is designed to use the coax for the counterpoise on on this band. I'm not crazy about this design, but it's a choice that is not terribly worse than other portable antennas on the market that do the same. In any case, I just wanted to test how hard it was to dial in to get on the air.
In my first hasty assembly, I adjusted the whip to the length documented in the manual, stretched out the coax and took a reading on my NanoVNA. As I mentioned in part 1 of this review, if you don't have one of these to make field setup quick and easy, you really should pick one up since they're only about $100 on Amazon: https://amzn.to/3QBB3hh. The first reading showed that the low 1.85:1 SWR was slightly below the frequency that the owners manual indicated, but that shouldn't be surprising since a lot of factors will affect the reading on this band.
I noticed that the SWR moved around quite a bit depending on how the coax was positioned, which is what happens when it's used as the counterpoise. You'll want the coax as straight as possible; even elevating it a bit changes the reading. I was sitting on the grass and decided to raise the NanoVNA coax end off the grass as if I had a radio in my lap. Once into "operating position", the SWR became stable, but it did interact with my body if I grabbed the coax. These are all the downsides of an antenna designed like this, but on this band, it's really just designed to get you on the air as easily as possible.
I usually operate in the phone band, so I wanted to see how difficult it is to adjust. All I did was lower the whip from the base until I got the reading I wanted:
For this frequency, the final whip measurement was 74", and the meter shows under 2:1 SWR at about 80 Hz of bandwidth. It really was simple to get the SWR to dip down to 1.18:1, especially when you're using the NanoVNA.
40 Meters Testing
Next I wanted to change it over to 40 meters and take a few measurements. My purpose was two-fold: how fast I could change the band setup and how long it would take to dial the antenna in. Swapping to this band is just a matter of changing the 80 meter load coil for the adjustable shaft / coil, attaching the ground radials and laying them all the way out, and extending the whip all the way up. That operation took almost exactly 5 minutes. I set the tuning indicator as suggested in the manual and then adjusted to where I like to operate while taking readings on the NanoVNA. On 40 meters, the coil adjustment is sensitive but still easy. Within another couple of minutes, I had the antenna adjusted where I wanted it in the phone portion of the band.
Here, the antenna is broad-banded enough that it covers the entire phone portion under 2:1 SWR.
Here are a few observations and recommendations for using this antenna on these bands: First, follow the instructions. Don't try to reengineer the antenna on 80 meters until you've set it up successfully with the included components, including the coax. The load coil, shafts, whip, and coax length are all tuned as a system. If you add toroids, or common mode chokes on the coax, it's not going to work without other modifications. Don't coil the coax. I will probably mess around with alternative ground radial systems when I have time, which would be a fun experiment. I may try this antenna on 80 meters with the included load coil and some Buddipole components, including the VersaTee and Triple Ratio Switch Balun. That will wait for another day, though. If I really want to operate portable on 80 meters and have the setup time, I will likely choose a different, more efficient package, but I like that the HF-010 gives me options.
I'm still impressed at how easy it is to assemble and quickly get on the air, regardless of efficiency trade-offs on the lower bands. If you primarily operate CW or digital modes such as FT8 on these bands, you'll make plenty of contacts. For 6-40 meters, this might be one of the quickest "tuned" style antennas you can buy.
More info on the kit can be found on the Radioddity website:
Radioddity HF-010 Portable HF Antenna | Ham Radio Antenna
Meet the Radioddity HF-010, the all-terrain portable HF antenna. Covers 80m-6m with a durable 304 stainless steel build & included tripod. Perfect for POTA.
www.radioddity.com
P.S., I ditched the coax reel...that thing is a hassle.

