• You can now help support WorldwideDX when you shop on Amazon at no additional cost to you! Simply follow this Shop on Amazon link first and a portion of any purchase is sent to WorldwideDX to help with site costs.

The woes of a pontiac g6 and a CB

Sickpuppy22

Member
Nov 24, 2008
85
2
18
Montreal,Quebec.Canada
All right so for the jist of it everything is set up in the G6 power wires travel under the rear passenger seat to the Trunk fuse Box and are only seen like in the pics in my Album, coax is passed through the center fold down rear passenger seat and tucked away in the separation of the seat comes out of trunk lip to Wilson 1000 on the center of the roof.

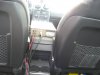
At the moment my CB is mounted on the center ArmRest Console Speaker side up so im pretty much Changing Channels by memory and clicks lol.

If anyone has any suggestions on mounting the Radio with out being to intrusive to the vehicle's interior ( Still on warranty dont want any holes in it yet) Please feal free to let me know.

Sickpuppy (y)


http://www.worldwidedx.com/members/...all-until-i-can-figure-mounting-solution.html <--- More pics here
 

Attachments

  • Picture 002.jpg
    Picture 002.jpg
    2 MB · Views: 27

here is something that i have done in the past that worked pretty well.

get a piece if 1/2" plywood that is about 4" x about 36". (these dimensions will vary depending on what works in your particular vehicle)

cover the wood with something so that it wont scratch the plastic in the vehicle.
i chose cloth tape, but cloth or duct tape would be fine. (i liked the cloth tape because it was black)

now, jam this piece of wood in between the passenger seat and the center console.

you should now have a slightly bent piece of wood held securely in place by the wedging action and sticks out along side the seat right along the edge of the center console. (just to the left of where the passengers shin would be)

now, with the mounting bracket mounted on the speaker side of the radio, hold the radio up to the wood and orient it so you can see it clearly and get to the knobs and connectors on back.

make some marks on the wood where the bracket meets it.

remove the wood from the car, and remove the bracket from the radio.

hold the bracket in place on the wood along your marks, and mark the holes.

drill out the holes in the wood, and mount your bracket to it.

i used bolts and acorn nuts so there were no sharp edges to scrape the plastic.

put the wood back in place in the car, and mount the radio.

VOILA!

you now have your radio mounted so it looks like its mounted to the passenger side of your center console, but without drilling any holes!

hope this made sense the way i described it. LOL

if it doesnt, please ask me to clarify and i will try and explain it better.

this really worked well for me, and one other cool thing about it, is that if i parked in a questionable location, i could unhook the connections from the radio, and put the whole assembly, wood and all, in the trunk out of sight.

hope this helps, sorry i dont have any pics.
one pic would have said it all. LOL
LC
 
Thanks For the Advice Loosecannon, After further pondering of where to mount it i was cleaning the carpets yesterday afternoon just before going to work and noticed that down uder the dash the center console had two removable plastic pannels.

The passenger side panel revealed a nice Fuse box witch this weekend i will be re doing the power lead and ground so nstead of having a 7 foot run it will be around 10 inches of power cable and maybe a foot for the ground YAY! , aswell as having a nice ground Bracket.

Now for the radio seeing ass the pannels would not support a radio screwed into it ( really flimsy) i resorted to Tiewraps and passed them all around the outside of the pannels then through the mounting bracket and finnishing off with good ol commercial wrapping plastic to remove any slack/ play in the bracket

I will post more pictures tomorrow afternoon and this weekend I'll finalize the install.

Ps center console is about the size off a pack of smokes :p
 
Alright the rain finally let up and i was given the chance to re work the ground and power leads which are now 17 inches long from a whopping 7 Feet hehe.

As well as using a Clip on Style Ferrite ring from and old portable dvd player power coard that is 1 inch long i was able to do 3 loops in it and now have no alternator whine.


sickpuppy22-albums-temp-install-until-i-can-figure-mounting-solution-picture852-picture-003.jpg

I plugged the power to a 10 Amp fuse which oddly enough it's for onstar (Car does not have onstar or does it? lol)

sickpuppy22-albums-temp-install-until-i-can-figure-mounting-solution-picture851-picture-005.jpg


sickpuppy22-albums-temp-install-until-i-can-figure-mounting-solution-picture853-picture-006.jpg


Last but not least I no longer have to tell my friends dont sit on the coax or your walking home! hehe
 
Last edited:
Atm being 6' 2" i have no problems seeing the radio at all and with the side pannels the way they are made are to flimsy to really support anything but themselves.

The pannel only interlocks nearest the seat and is held in place with get this two velcro pads LOL and this is from a car manufature
 

dxChat
Help Users
  • No one is chatting at the moment.