Where would be the best place to run my power and ground through the firewall on a 2001GMC? I have my 959 on a lighter plug now and want to get rid of the slight wine I have when the truck is running. Going to run 14ga straight to the battery with inline fuse. I'm going to braid the wires together also. Been told it will cut out the noise. Any opinions on this? Thanks!!

You are using an out of date browser. It may not display this or other websites correctly.
You should upgrade or use an alternative browser.
You should upgrade or use an alternative browser.
-
You can now help support WorldwideDX when you shop on Amazon at no additional cost to you! Simply follow this Shop on Amazon link first and a portion of any purchase is sent to WorldwideDX to help with site costs.
-
A Winner has been chosen for the 2026 July 4th Retevis RA89R Giveaway! Click Here to see who won!
Running Power Wire for CB
- Thread starter Galaxy 959
- Start date
Where would be the best place to run my power and ground through the firewall on a 2001GMC? I have my 959 on a lighter plug now and want to get rid of the slight wine I have when the truck is running. Going to run 14ga straight to the battery with inline fuse. I'm going to braid the wires together also. Been told it will cut out the noise. Any opinions on this? Thanks!!
There is usually a large rubber grommet on the firewalls of vehicles. It isn't guaranteed to cut noise as you can still get that if you've got a poor antenna ground.
As an aside the ground wire does not want to go directly to the battery regardless of what the manual says. Instead hook it up where the main ground wire from the battery connects to the body. There are a few reasons for this, one big one being that if anything does go wrong with the big thick wire the manufacturer put in and your radio is hooked up directly to the negative terminal then the sum electrical current of absolutely everything in the vehicle turned on at the time of the fault will go through the radio and kill it. On newer cars the current sensing of the smart charging circuit doesn't work if you wire directly to the battery negative terminal and causes all kinds of issues.

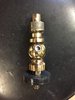
 Use larger than #14awg to account for losses for length. Next like M0GVZ stated there is usually a grommet or two under the dash of those trucks. The AC drain line is another spot. Just don't pinch the outgoing line. Also add a fuse block at the battery and use a 20 amp fuse. Take the ground to frame near the radio if possible is my choice for grounding. There are so many opinions on this it will vary from poster to poster I'm sure. Or use the seat frame bolt and a large ring terminal and ground at the seat frame ground. Make sure to remove all paint and debris and if possible use no-ox, which I have pictured below for reference. Can be bought off eBay. Make sure all connections have a small amount of no-ox on them and that all connections are crimped and/or soldered well. Here is photo of no-ox. Make sure to get the type special "A" when ordering the no-ox as seen at top of post.
MOGVZ I have the Sirio Performer 5000 on the Sirio Mag mount in the center of my cab. I'd like to hard mount it but really dont know where I could and it perform like it does in the center of the cab. 222DBFL I already bought my wire but guess I could exchange it. What does it have to be like 12ga? Thanks for all the info and tips.
I would use like #10awg. That or #8awg. Might seem like over kill but there will never be an issue with not enough power getting to the radio this way. JMO.
MOGVZ I have the Sirio Performer 5000 on the Sirio Mag mount in the center of my cab. I'd like to hard mount it but really dont know where I could and it perform like it does in the center of the cab.
The simple answer is in the center of the cab. Get the drill out
") Sirio do a SO239 mount and so do Breedlove Antenna Mounts. I would probably go for the Breedlove SO239 mount.
Sirio do a SO239 mount and so do Breedlove Antenna Mounts. I would probably go for the Breedlove SO239 mount.https://breedlovemounts.com/SO-239_Mounts.php
If memory serves me right, there is a plug on the passenger side of the firewall that when you push it out it's just below the dash. Personally I would run 8 gauge through there.
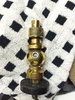
Same here Binrat. I tend to go way bigger than needed! As FR as drilling a hole, do this before you do. Find the best location on the roof with your mag mount setup. It will most likely be toward the rear of the cab about 8-12" from the back end of the cab. This may make it a bit directional, but not enough to bother anyone hearing you or you hearing them. This has been my experience with truck tops anyway. If you have an antenna analyzer, this is the time to break it out and test where the best location as far as R and X and VSWR. A field strength meter is another good tool to test this as well. But before you drill it, make sure it's where you want it and where it works best. JMO. Breedlove makes a very nice puck mount. Get one with the largest bottom plate they have. This will provide more surface area for the mount and add some strength to the area as most newer cars seem to use thinner metals. Can't go wrong with a Breedlove mount. They are expensive, but will out last you LOL. I just restored one that is over 15yrs old for sure, maybe more. It looks like new now that it's been polished. Here is my old ass Breedlove mount.
Attachments
A lot of good information here. As mentioned, my preference is directly to the battery. Knowing the battery cable configuration on GM vehicles, it has a lot to be desired especially if you want to add something to it since the cable bolt has short threads. Use a good quality round wire end, and not a fork type, and attach your wire directly to both pos/neg terminals. You may want to add a companion in the near future, so I would recommend 8 gauge size wire and solder all connections. JMHO and good luck.
555
555
You can also draw power from the junction box mounted by the power steering pump that opens up and red(ish) in colour for the + side.A lot of good information here. As mentioned, my preference is directly to the battery. Knowing the battery cable configuration on GM vehicles, it has a lot to be desired especially if you want to add something to it since the cable bolt has short threads. Use a good quality round wire end, and not a fork type, and attach your wire directly to both pos/neg terminals. You may want to add a companion in the near future, so I would recommend 8 gauge size wire and solder all connections. JMHO and good luck.
555
All great info fellas!! So we have.
Use heavy gauge wire like #10awg - #6awg. #8awg being the one to use IMO for this application.
Run power directly to battery and add a fuse block or in-line fuse with a 15-20 amp fuse at the battery. I don't normally run my grounds back to the Neg terminal, but rather make it short and go to a frame bolt either under the steering column or a seat bolt. Use good wire and terminal connections, most of these items can be bought at most any Walmart, stereo, or marine shop. Also like said, either solder or use a good crimp on type lug. Not the cheap yellow ring terminals either. I'm talking pandit or burndy type crimp on lugs. Also use no-ox on all connections and on all wire and metal surfaces to be mounted to. Also make sure that where your power wire exits the cab that there is a good grommet or some type of good protection from the wire rubbing on metal!! While it may not seem like a big deal, I've seen a few cars/trucks catch fire as they were incorrectly ran and rubbed through the jacket. Anyway, hope all this info helps and take your time doing the job! Have fun and let us know how it turned out. And don't forget to remove all paint before making a connection. Again, good luck and be safe.
Also like said, either solder or use a good crimp on type lug. Not the cheap yellow ring terminals either. I'm talking pandit or burndy type crimp on lugs.
I have yellow Panduit crimp connectors. The colour determines the wire size they are suitable for so I assume you meant simply no cheap connectors and that the colour had nothing to do with it.
Red Insulation 0.5-1.5mm2 / 22-16 AWG
Blue Insulation 1.5-2.5mm2 / 16-14 AWG
Yellow Insulation 4.0-6.0mm2 / 12-10 AWG
Well I got it done. I got #10 ran straight to the battery. I actually had a local Stereo Shop do it. They used all Stinger wire. They put a heavy duty 30amp fuse holder at the battery. It all looks nice to and done right. Thanks for all you guys input.
dxChat
- No one is chatting at the moment.