
You are using an out of date browser. It may not display this or other websites correctly.
You should upgrade or use an alternative browser.
You should upgrade or use an alternative browser.
-
You can now help support WorldwideDX when you shop on Amazon at no additional cost to you! Simply follow this Shop on Amazon link first and a portion of any purchase is sent to WorldwideDX to help with site costs.
-
A Winner has been chosen for the 2026 July 4th Retevis RA89R Giveaway! Click Here to see who won!
I finally ordered the new tower today.
- Thread starter Captain Kilowatt
- Start date
Only a little more progress today. I installed the base stubs on the bottom tower section to get it ready to install when the hole is ready. I also built another tower shelf to mount the rotator on. I got the tower with two shelves, one for the rotator bearing and one for the rotator itself but after rethinking some things I decided to go with two bearings and the rotator mounted further down inside the tower. This will allow me to have two secure clamping points above the rotator and will keep the 15 foot mast stable if I have to pull the rotator for any reason. I will be able to pull the rotator without having to lower the mast this way. The shelf brackets have a good coating of cold galvanizing and will be installed tomorrow whenever I get tired of using the jack hammer. Tomorrow is the day I (hopefully) finish the hole. pictures to follow soon.
The hole is finished and so am I. I had to wait until some idiot returned a jack hammer to the rental place as they were all out and someone didn't return one on time. I started shortly after 10:00am and worked until just after 7:00pm when it was too dark to see at the bottom. I took two short breaks to eat and a younger guy about 100 pounds lighter could surely have done it quicker but it was a really hard job. Three plus feet of compacted shale and hard slate to break out and shovel out of a hole six feet square and finally down to 5 feet deep plus undermined at the bottom. I finished by just breaking out some around the bottom and will shovel it out tomorrow after I return the hammer. I hope to have some pictures tomorrow of the progress including the homemade rotator shelf installed. Next I have to make something to support the bottom section over the hole and allow me to plumb the section when I pour the cement. The tower tapers in at a rate of 3/4 inch per four feet so I will simply use a 3/4 drill bit as a spacer between my 4 foot level and the tower section and adjust it until the level reads plumb on all three legs.
I took the day off today except for taking a few pictures and working on getting the gin pole made up. I am now seriously considering having a crane truck stand the entire tower up in one piece. I have to call Keddy's crane rentals tomorrow and get an estimate. If it's not too bad I'll go for it.If not then I will have to put it up one piece at a time and I am rethinking the wisdom of that given that cooler,wetter, windy weather is upon us now.The first picture below is of the finished hole. It is six feet square and five feet deep as per Trylon's spec. You can see where I hit the hard shale/slate about two feet down. That was hard going but will ultimately provide a good anchor for the concrete to adhere too filling in all the little ridges. After digging the hole I blasted the walls with the pressure washer to clean out all the loose debris and give a rougher surface. You can see how smooth the bottom is.

This the top section of the tower.The legs protrude above the top bearing plate and makes it easy to add more height in the future if you want too. This plate will support the top bearing.
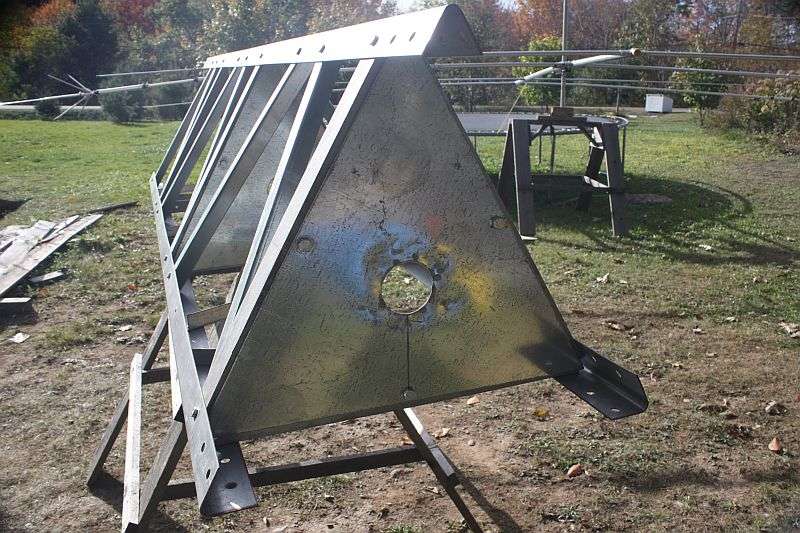
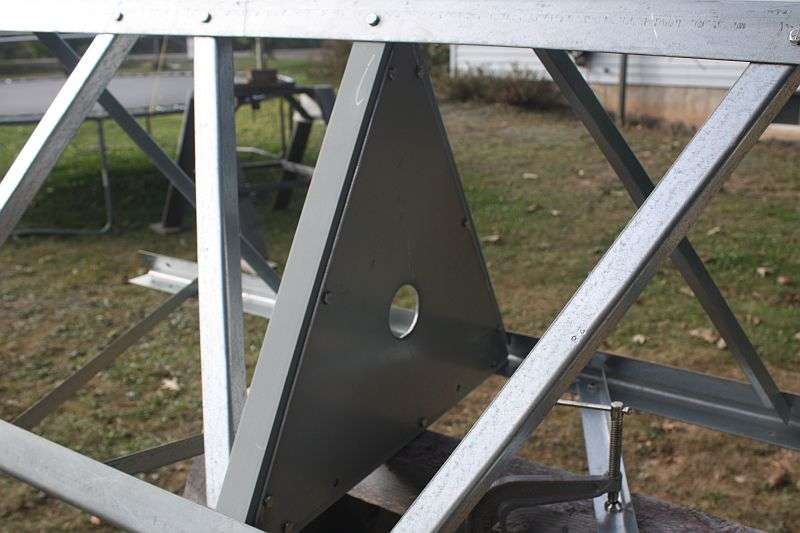
This is the lower bearing plate. Both bearing plates were installed before the tower was delivered.
Here is the rotator plate shelf I made myself. It is angle iron cut and fit to place and then given a good coat of cold galvanizing paint. Somewhere in my many changes before ordering I neglected to order a third shelf for the rotator and decided that I could make one cheaper and quicker than ordering a new one.
Here it is with the aluminum plate installed for the Yaesu G-2800 rotator.
This the entire top section with the top on the left.Using two bearing plates and a rotator plate will allow me to have two clamping points above the rotator so that the mast will be secure and stable if I should ever have to pull the rotator for any reason. One such reason will be when installing or removing antennas. The mast will be about 16 feet tall and will lower down inside the tower after removing the rotator to make room. This is why I needed two bearings above the rotator to hold the mast. The mast will be about four feet inside the tower and about 12 feet above the top. The top antenna will be a homebrew six element 6m yagi with a Cushcraft A3WS for 12/17m five feet below it and the Explorer 14 another five feet below that, right at the top of the tower, for 10,15,20, and 40m.
That's all for now. It's supposed to rain the next few days but I may get the gin pole finished and possibly get a start on the reinforcing steel for the base. The specs call for rebar but I have lots of old galvanized super strong steel tower that I am going to cut up and place in the hole instead. It is probably at least ten times better than cheap rebar. Besides it free and I need to get rid of some of it.
More updates as things progress.
This the top section of the tower.The legs protrude above the top bearing plate and makes it easy to add more height in the future if you want too. This plate will support the top bearing.
This is the lower bearing plate. Both bearing plates were installed before the tower was delivered.
Here is the rotator plate shelf I made myself. It is angle iron cut and fit to place and then given a good coat of cold galvanizing paint. Somewhere in my many changes before ordering I neglected to order a third shelf for the rotator and decided that I could make one cheaper and quicker than ordering a new one.
Here it is with the aluminum plate installed for the Yaesu G-2800 rotator.
This the entire top section with the top on the left.Using two bearing plates and a rotator plate will allow me to have two clamping points above the rotator so that the mast will be secure and stable if I should ever have to pull the rotator for any reason. One such reason will be when installing or removing antennas. The mast will be about 16 feet tall and will lower down inside the tower after removing the rotator to make room. This is why I needed two bearings above the rotator to hold the mast. The mast will be about four feet inside the tower and about 12 feet above the top. The top antenna will be a homebrew six element 6m yagi with a Cushcraft A3WS for 12/17m five feet below it and the Explorer 14 another five feet below that, right at the top of the tower, for 10,15,20, and 40m.
That's all for now. It's supposed to rain the next few days but I may get the gin pole finished and possibly get a start on the reinforcing steel for the base. The specs call for rebar but I have lots of old galvanized super strong steel tower that I am going to cut up and place in the hole instead. It is probably at least ten times better than cheap rebar. Besides it free and I need to get rid of some of it.
More updates as things progress.
That top section looks to weigh a few pounds.
Well it's eight feet long and is 18 inches across the face at the top and 21 inches at the bottom. Trylon specs the section alone to weigh 44 pounds. Add in the bearing and rotator shelves and it weighs in about 60 pounds. By comparison my old 40 foot Delhi is only 22 inches at the very bottom and about the same weight. :laugh:
Not much done the last two days. Yesterday was our 22'nd anniversary so when the wife asked if I wanted to go somewhere with her I thought I probably should spend some time with her despite having gone away with her last weekend.  Today was spent winterizing the trailer which was a learning experience as it was the first time for doing so. :headbang
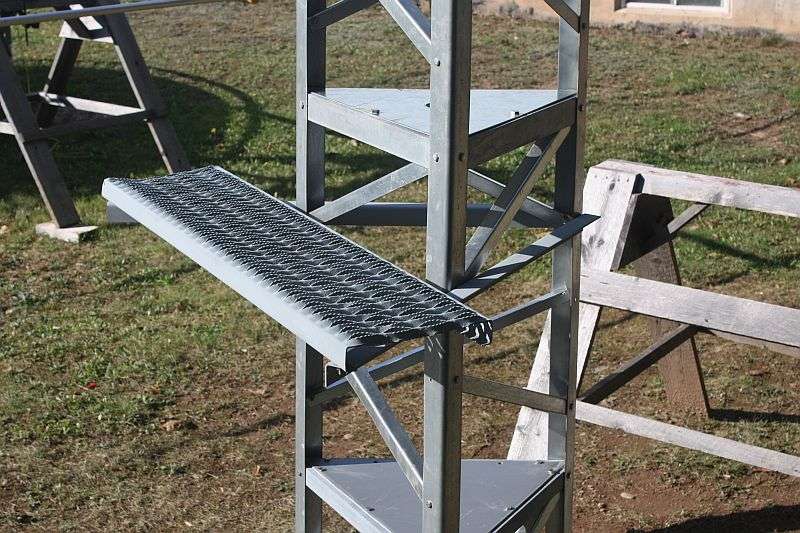
I did manage to find the time to get the work platform made up, cold galvanized, and attached to the top section. It is positioned such that the top of the tower will be at about mid-chest level making it great for working at the top of the tower where most of the work will be once the tower is up. This will make working on or installing antennas much easier. I may possibly add another one in the future on another face and place it lower so that the rotator is at the ideal working level.
Close up view of work platform.
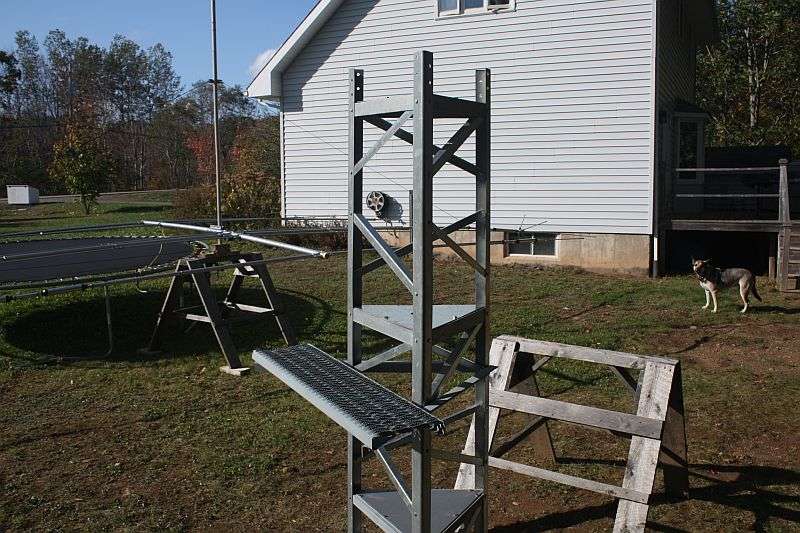
Overall view of top section.
Back to work tomorrow so no more progress for about four more days. I have to call the crane company on Monday and see what it will cost to stand the tower up in one piece and hope to have the cement base poured next Friday or Saturday. While the concrete cures I can bolt the tower together and get it ready for the crane truck the following week after my next work rotation.
Today was spent winterizing the trailer which was a learning experience as it was the first time for doing so. :headbangI did manage to find the time to get the work platform made up, cold galvanized, and attached to the top section. It is positioned such that the top of the tower will be at about mid-chest level making it great for working at the top of the tower where most of the work will be once the tower is up. This will make working on or installing antennas much easier. I may possibly add another one in the future on another face and place it lower so that the rotator is at the ideal working level.
Close up view of work platform.
Overall view of top section.
Back to work tomorrow so no more progress for about four more days. I have to call the crane company on Monday and see what it will cost to stand the tower up in one piece and hope to have the cement base poured next Friday or Saturday. While the concrete cures I can bolt the tower together and get it ready for the crane truck the following week after my next work rotation.
Hey Capt KW,
Its been a few weeks and how are things progressing?? Going to have it up and working before winter truly sets in??
Its been a few weeks and how are things progressing?? Going to have it up and working before winter truly sets in??
I just got in from working on it actually. The past couple weeks have been a bust due to work, weather, and family. Not been good at all. I got the tower bearings finally after a 6 week backorder. They are now mounted as is the Yaesu 2800DXA rotator. The base section is sitting in the hole and plumbed. Tomorrow I contact the concrete company and see when it can be poured, hopefully tomorrow. More pix soon I promise. The WX is supposed to be really nice the next week and I am off until the 17'th so I hope to get it up by then. I am going to use a crane truck if it does not cost me a fortune, and stand it all up in one piece. Then I just have to use a gin pole to mount the antennas.Still working on the gin pole too BTW. I just need a bit more time as I am also working on a splice for the two mast sections. The mast will be about 17 feet long with the bottom 10 feet steel and the top 6-7 feet heavy walled aluminum. The aluminum only needs to support a six element 6m yagi and a Cushcraft A3WS mounted just above the splice. It has handled more in the past so it's all good. 
OK,second attempt at posting this. I had too many windows open and closed the wrong one when I was posting the last picture and lost everything. :headbang
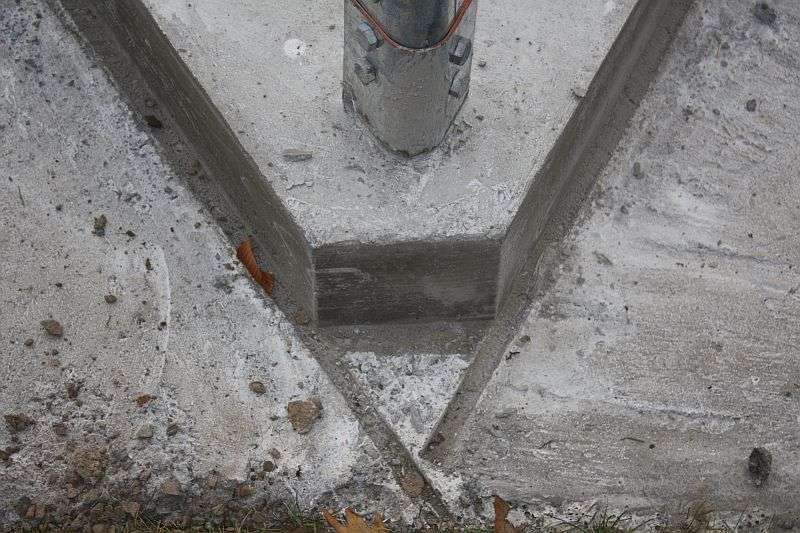
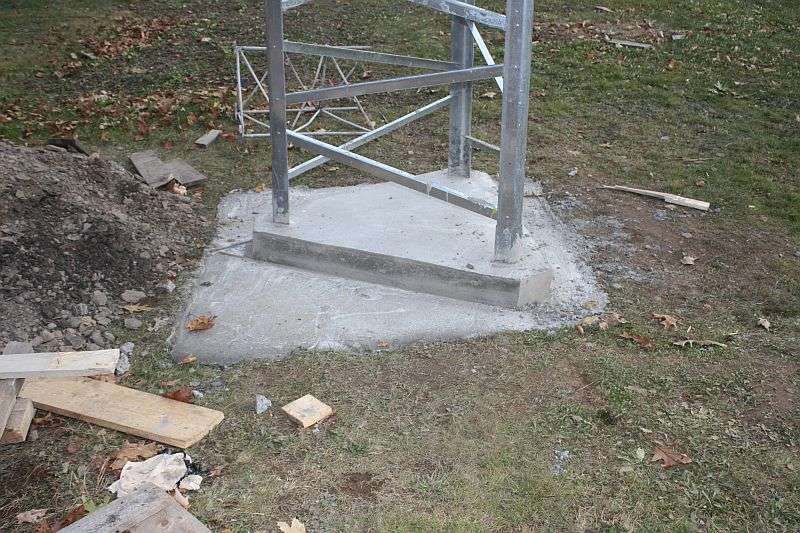
I finally got the tower base poured yesterday.All six yards of it. Here it is showing the triangular form at the top to make the finished product look a bit better. I will cover the outer parts with topsoil next year and just leave the top triangular portion showing.
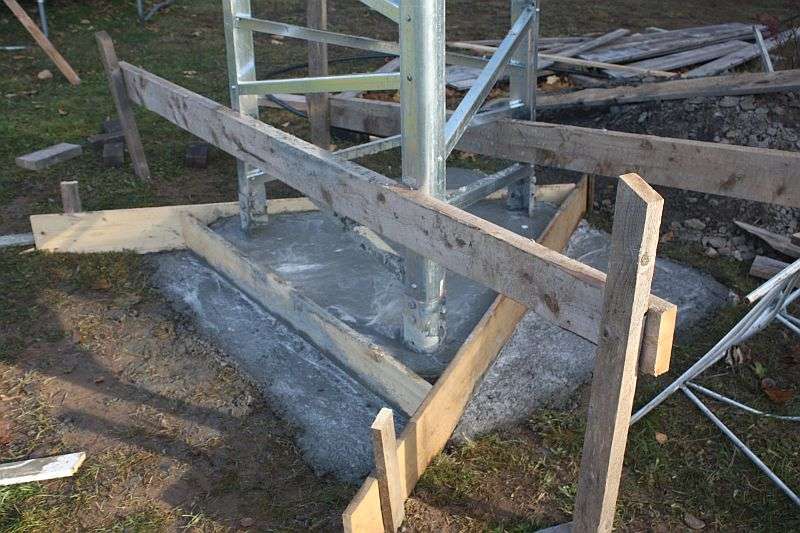
This is how I did the corners. It looks a bit better and will not break off as easily as if it were simply pointed on the end. Again, it's all just about looks and not necessary.
This all the cement truck did to the lawn. The ruts are only about 2 inches deep. Not bad for a truck weighing around 25 tons or more. Usually this time of the year it would be a lot worse however the ground drains very well here as attested too by the amount of water that kept draining thru the shale INTO the hole before it was poured. My father has a really heavy lawn roller that I will use next year when the ground is still soft to roll out the impressions. Anything left will be filled with topsoil and replanted. The lawn has enough bumps and hollows now so I am really not too concerned about it. It needs a lot of work anyway.
Overall view of the tower base with forms and braces still up.
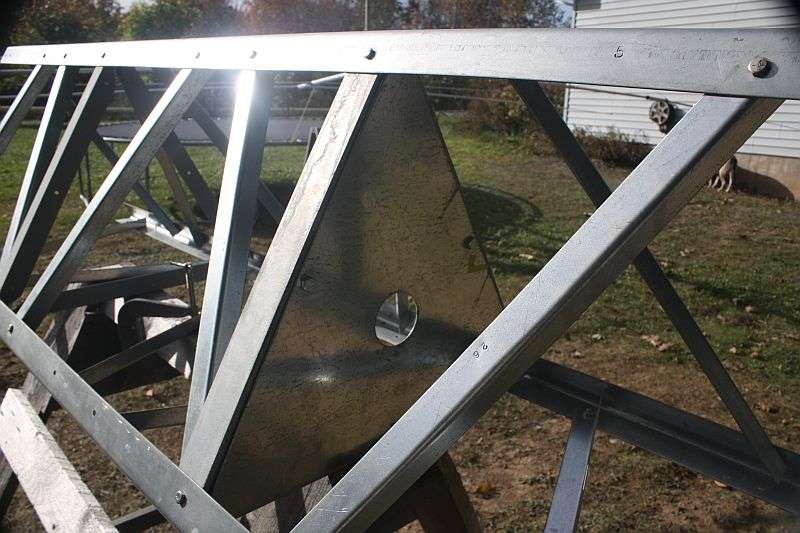
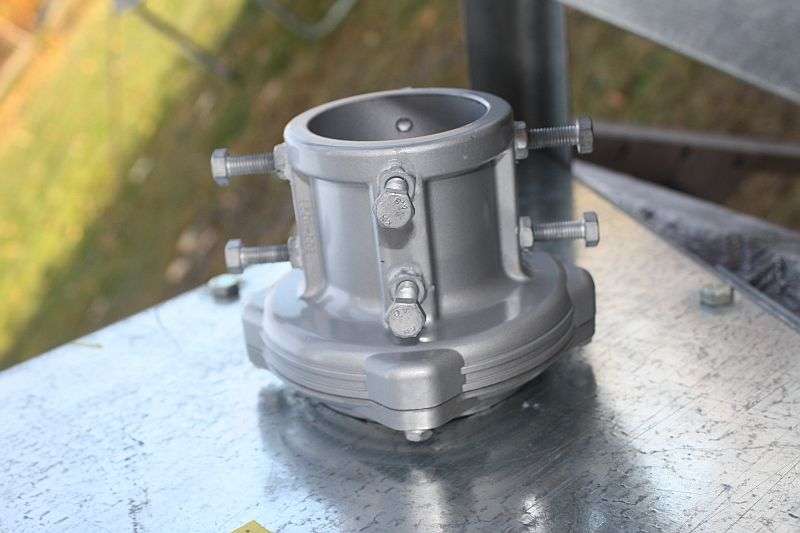
Overall view of the top section showing the two Yaesu GS-065 thrust bearings and the Yaesu G-2800DXA rotator. The Yaesu bearings are very good bearings and have two ball bearing races for smooth operation as well as two sets of clamp bolts to hold the mast securely. Using two sets also helps to distribute the sideways pressure on the mast and help relieve some of the breaking forces in a high wind.
Close up view of the Yaesu tower bearing.I should have used something to show size but I forgot. The bearing is quite large actually and will accept a 2 1/2 inch OD mast easily.
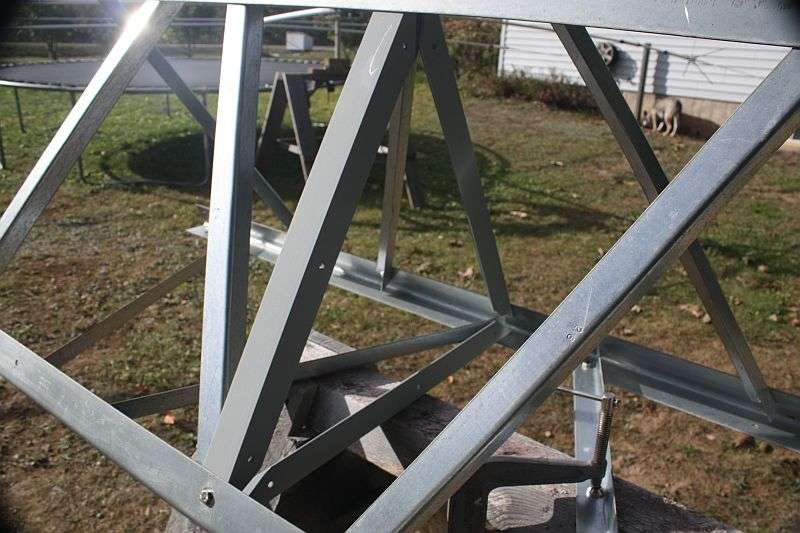
The very top of the top section showing mounting points for the gin pole. The gin pole has two similar pieces of angle iron mounted so as to fit perfectly with the two pieces on the tower. A pair of bolts dropped into the holes secures it in place. The gin pole is not yet finished but is basically a 10 foot heavy aluminum pole with a pulley at the top and a 3500 pound rated worm-drive hand winch at the bottom. The hoisting cable is 1/8 inch stainless steel aircraft cable, more than enough to hoist even the heaviest of antennas and mast etc. I chose the worm drive type because it will not fall when you let go of the handle and there is no messing around with levers to switch from up to down etc. with one hand while trying to prevent free-falling with the other. Besides that it has a greater lifting ability with less force required. I have also adapted the drive shaft to be used with a power drill so it requires even less manual effort and is faster as well.
I hope to take the forms down tomorrow and start work on the tower assembly. I contacted the crane company and the price is at the high end of what I wanted to pay but given time and weather it is the best option. Hopefully next Monday, weather and time permitting I can have the entire tower stood up in one piece and be done with it except for mounting the antennas which I will do myself using the gin pole.
As usual, more pix and updates as things progress.
I finally got the tower base poured yesterday.All six yards of it. Here it is showing the triangular form at the top to make the finished product look a bit better. I will cover the outer parts with topsoil next year and just leave the top triangular portion showing.
This is how I did the corners. It looks a bit better and will not break off as easily as if it were simply pointed on the end. Again, it's all just about looks and not necessary.
This all the cement truck did to the lawn. The ruts are only about 2 inches deep. Not bad for a truck weighing around 25 tons or more. Usually this time of the year it would be a lot worse however the ground drains very well here as attested too by the amount of water that kept draining thru the shale INTO the hole before it was poured. My father has a really heavy lawn roller that I will use next year when the ground is still soft to roll out the impressions. Anything left will be filled with topsoil and replanted. The lawn has enough bumps and hollows now so I am really not too concerned about it. It needs a lot of work anyway.
Overall view of the tower base with forms and braces still up.
Overall view of the top section showing the two Yaesu GS-065 thrust bearings and the Yaesu G-2800DXA rotator. The Yaesu bearings are very good bearings and have two ball bearing races for smooth operation as well as two sets of clamp bolts to hold the mast securely. Using two sets also helps to distribute the sideways pressure on the mast and help relieve some of the breaking forces in a high wind.
Close up view of the Yaesu tower bearing.I should have used something to show size but I forgot. The bearing is quite large actually and will accept a 2 1/2 inch OD mast easily.
The very top of the top section showing mounting points for the gin pole. The gin pole has two similar pieces of angle iron mounted so as to fit perfectly with the two pieces on the tower. A pair of bolts dropped into the holes secures it in place. The gin pole is not yet finished but is basically a 10 foot heavy aluminum pole with a pulley at the top and a 3500 pound rated worm-drive hand winch at the bottom. The hoisting cable is 1/8 inch stainless steel aircraft cable, more than enough to hoist even the heaviest of antennas and mast etc. I chose the worm drive type because it will not fall when you let go of the handle and there is no messing around with levers to switch from up to down etc. with one hand while trying to prevent free-falling with the other. Besides that it has a greater lifting ability with less force required. I have also adapted the drive shaft to be used with a power drill so it requires even less manual effort and is faster as well.
I hope to take the forms down tomorrow and start work on the tower assembly. I contacted the crane company and the price is at the high end of what I wanted to pay but given time and weather it is the best option. Hopefully next Monday, weather and time permitting I can have the entire tower stood up in one piece and be done with it except for mounting the antennas which I will do myself using the gin pole.
As usual, more pix and updates as things progress.
Well finally the problems with Imageshack have been resolved and I can now access my pictures to add to my update.
It was an absolutely beautiful day yesterday so I spent most of it outdoors getting a bit more work done. I took the forms off the tower base and assembled the tower sections. I have decided to go with a crane truck and stand it all up in one piece the first of next week. The first picture is of the tower base with the forms and braces removed. The corners turned out good. The plan is to fill in over the edges of the concrete up to the raised triangular section with topsoil and have it sloped down away from the tower base.
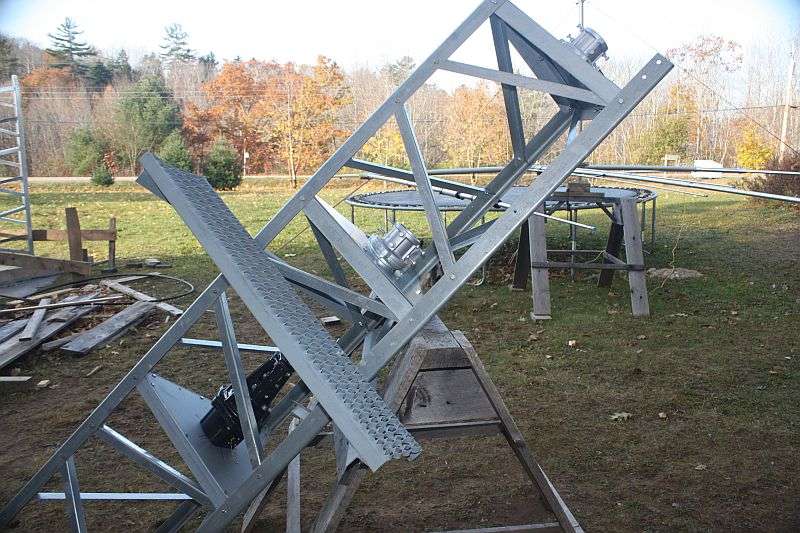
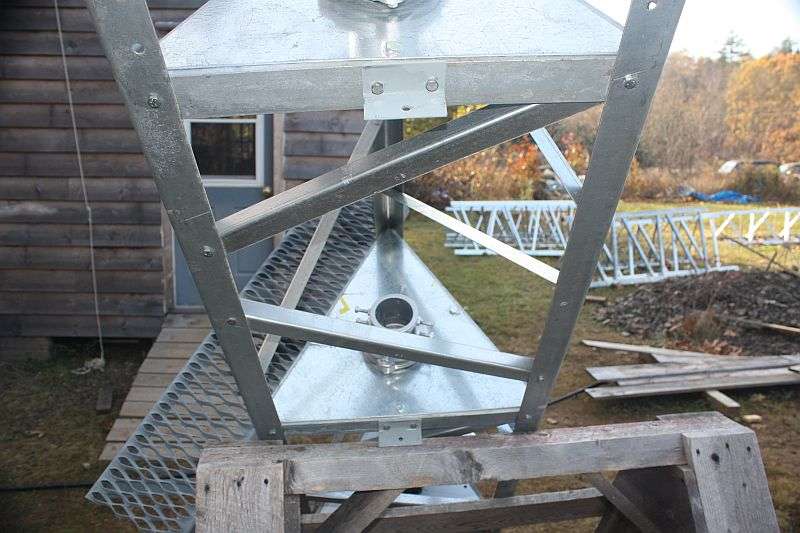
Looking inside the top 56 feet of tower. Kind of trippy. LOL That's the bottom of the rotator plate in the very centre.
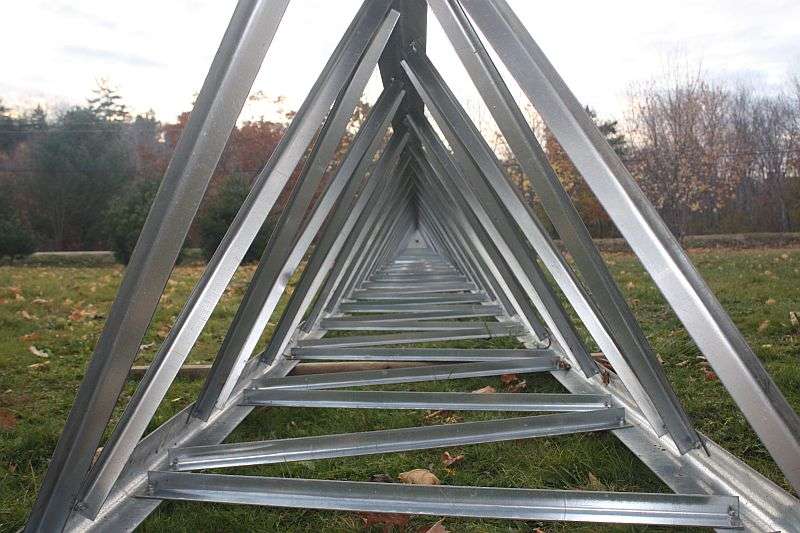
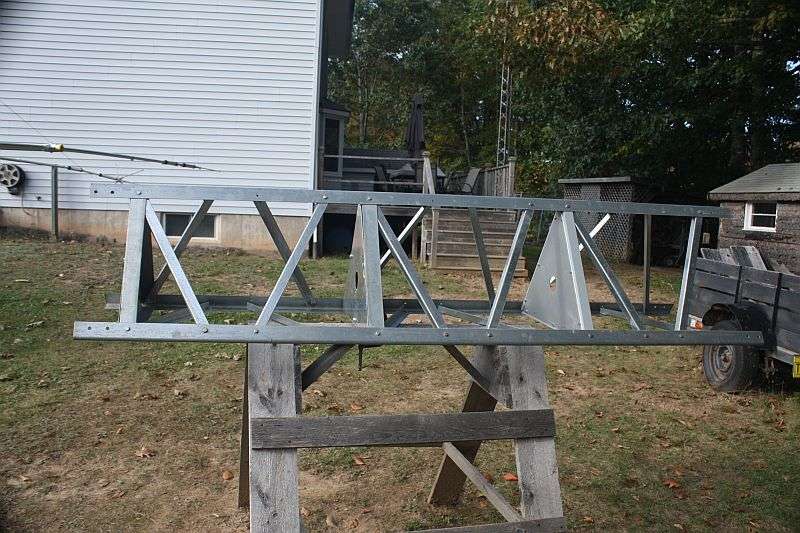
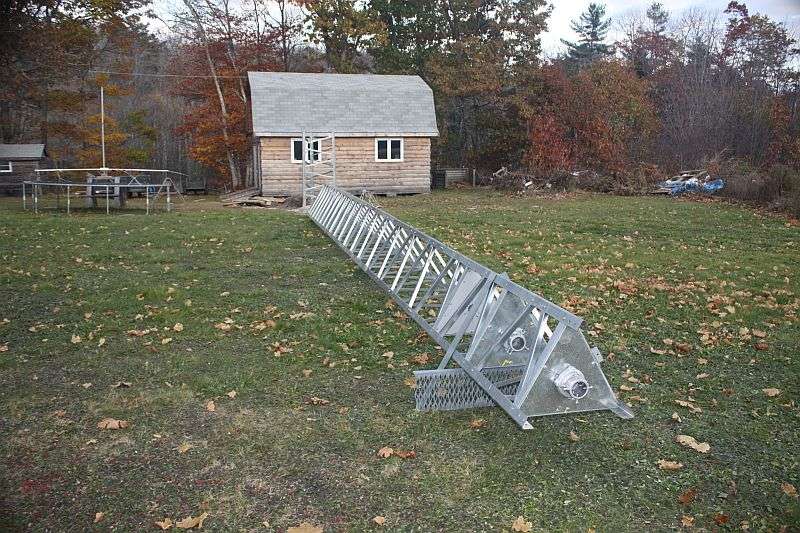
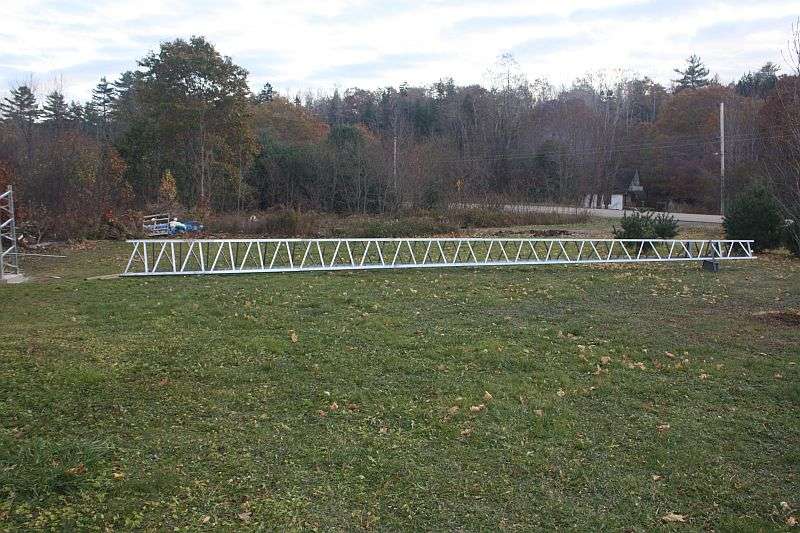
Here is the top 56 feet of tower. The bottom 8 feet is still on the concrete base. I will remove it in a day or two and bolt it to the rest of the tower before having the crane stand it all up. It is easier that way to work on bolting the tower to the concrete stubs at the bottom than trying to work 8 feet up. One thing I had to do while bolting the first two sections together (really sections two and three from the bottom) was to remove the bottom braces and place a ratchet strap around the bottom of the legs and squeeze it really tight to get it to fit inside the next section. All the rest went together with a little push and shove. Notice how straight the tower looks laying on the ground. All 56 feet is just supported on the bottom end which is on the ground, and the top which is resting about a foot off the ground because it is resting on the work platform. I stood in the middle of it, and I am what you would call a heavy weight, and it barely deflected from straight showing just how rigid this thing is.
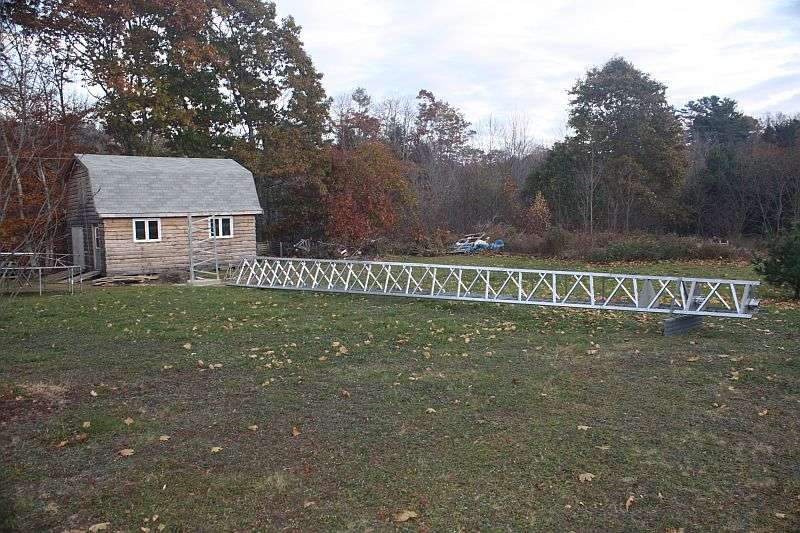
Top down view of assembled tower.
Eight feet vertical on the far left and 56 feet horizontal.
I was a bit concerned about section alignment with this tower as the bolts were threaded right up to the head. The Delhi tower I have had about a 1/8 inch shoulder that was tapered and as the bolts were drawn tight they would align the holes up perfectly and ensure the tower was straight. This was not going to happen with these bolts. My fears were unfounded however as Trylon has done a fantastic job of being precise. Each joint has twelve bolts and the holes were drilled to exact tolerances. This made bolt insertion a little tricky until you got the hang of wiggling the tower the right way and in some cases slightly tightening a couple to pull the leg sections the right way to align the rest of the holes. When all was said and done I sighted along the legs and could see no deviation from perfectly straight at all. There was absolutely no slack in the bolt holes at all when all the bolts were inserted.
Today I picked up a new mast. I was going to use what I have which is 2 inches OD but would be spliced but I got a single piece of 2 inch mast, actually 2 3/8 OD, 22 feet long for $30 so I couldn't pass it up. I knew someone that has some but was not sure if I could get a single piece 16-17 feet long. I wanted to get the old tower stripped of the 6m beam and cables to put on the new tower right away but I may have to fore go that until next spring. I think I will use a shorter mast that I already have inside the new mast as a reinforcement about 5 feet long plus/minus where the mast exits the top of the tower to add some extra strength at the point most vulnerable to bending.
That's it for a few days I think. Oh, the gin pole is complete but no pix. It is a 10 foot piece of aluminum pipe with brackets to attach to the top of the tower. The hand winch is mounted at the bottom and is spooled with about 100 feet of 1/8 inch stainless steel aircraft cable and there is a pulley at the top. It looks like a giant fishing rod and if all else fails I can always use it to go fishing for Giant Bluefin up the coast.
The crane has been confirmed for Monday afternoon so at least the tower will be up before I go back to work on Thursday. Unfortunately the weather is calling for rain on Tuesday and Wednesday.
It was an absolutely beautiful day yesterday so I spent most of it outdoors getting a bit more work done. I took the forms off the tower base and assembled the tower sections. I have decided to go with a crane truck and stand it all up in one piece the first of next week. The first picture is of the tower base with the forms and braces removed. The corners turned out good. The plan is to fill in over the edges of the concrete up to the raised triangular section with topsoil and have it sloped down away from the tower base.
Looking inside the top 56 feet of tower. Kind of trippy. LOL That's the bottom of the rotator plate in the very centre.
Here is the top 56 feet of tower. The bottom 8 feet is still on the concrete base. I will remove it in a day or two and bolt it to the rest of the tower before having the crane stand it all up. It is easier that way to work on bolting the tower to the concrete stubs at the bottom than trying to work 8 feet up. One thing I had to do while bolting the first two sections together (really sections two and three from the bottom) was to remove the bottom braces and place a ratchet strap around the bottom of the legs and squeeze it really tight to get it to fit inside the next section. All the rest went together with a little push and shove. Notice how straight the tower looks laying on the ground. All 56 feet is just supported on the bottom end which is on the ground, and the top which is resting about a foot off the ground because it is resting on the work platform. I stood in the middle of it, and I am what you would call a heavy weight, and it barely deflected from straight showing just how rigid this thing is.
Top down view of assembled tower.
Eight feet vertical on the far left and 56 feet horizontal.
I was a bit concerned about section alignment with this tower as the bolts were threaded right up to the head. The Delhi tower I have had about a 1/8 inch shoulder that was tapered and as the bolts were drawn tight they would align the holes up perfectly and ensure the tower was straight. This was not going to happen with these bolts. My fears were unfounded however as Trylon has done a fantastic job of being precise. Each joint has twelve bolts and the holes were drilled to exact tolerances. This made bolt insertion a little tricky until you got the hang of wiggling the tower the right way and in some cases slightly tightening a couple to pull the leg sections the right way to align the rest of the holes. When all was said and done I sighted along the legs and could see no deviation from perfectly straight at all. There was absolutely no slack in the bolt holes at all when all the bolts were inserted.
Today I picked up a new mast. I was going to use what I have which is 2 inches OD but would be spliced but I got a single piece of 2 inch mast, actually 2 3/8 OD, 22 feet long for $30 so I couldn't pass it up. I knew someone that has some but was not sure if I could get a single piece 16-17 feet long. I wanted to get the old tower stripped of the 6m beam and cables to put on the new tower right away but I may have to fore go that until next spring. I think I will use a shorter mast that I already have inside the new mast as a reinforcement about 5 feet long plus/minus where the mast exits the top of the tower to add some extra strength at the point most vulnerable to bending.
That's it for a few days I think. Oh, the gin pole is complete but no pix. It is a 10 foot piece of aluminum pipe with brackets to attach to the top of the tower. The hand winch is mounted at the bottom and is spooled with about 100 feet of 1/8 inch stainless steel aircraft cable and there is a pulley at the top. It looks like a giant fishing rod and if all else fails I can always use it to go fishing for Giant Bluefin up the coast.
The crane has been confirmed for Monday afternoon so at least the tower will be up before I go back to work on Thursday. Unfortunately the weather is calling for rain on Tuesday and Wednesday.
looking sweet CK..
are you planning to do anything with the notches in the base left from the forming wood or...?? ice can do a surprising amount of damage, i experienced that with my front step this past winter
are you planning to do anything with the notches in the base left from the forming wood or...?? ice can do a surprising amount of damage, i experienced that with my front step this past winter
looking sweet CK..
are you planning to do anything with the notches in the base left from the forming wood or...?? ice can do a surprising amount of damage, i experienced that with my front step this past winter
No, the depressions form the forms are only about 1/4 inch deep and 1 inch wide. That's not enough to develop any sideways pressure during freeze/thaw cycles. All the ice movement is vertical and not horizontal so therefore there is no danger of cracking or anything of that like. The real problem is when the depth far exceeds the width.
B
BOOTY MONSTER
Guest
dxChat
- No one is chatting at the moment.